How to install VMware Workstation on Ubuntu
Top Things To Do After Installing Ubuntu 14.04/13.10/13.04/12.10/12.04
Ubuntu 14.04 LTS and its official flavours have been released a couple of days before. In this brief how-to, let us discuss how we can enhance Ubuntu 14.04 and other older versions further for day to day activities. This post we will share some interesting insights and ideas about what you can and should do after a successful installation of Ubuntu.
If you have already a previous release of Ubuntu, and want to upgrade to the latest 14.04 version, then please follow our step by step guide upgrade to Ubuntu 14.04 Trusty Tahr.
First of all, after fresh installation of Ubuntu 14.04 Trusty, check the following few things first.
If sound is not working, check our previous post to resolve the issue.
1. Update System
Before proceeding to upgrade, the first and important thing to do is update/upgrade software repositories and make sure your systems contains latest versions of all software.
sudo apt-get update && sudo apt-get upgrade
2. Configure And Tweak Ubuntu
2.1 Disable Unity Dash Online Search feature
Whenever, you start typing in Unity Dash to search for an application or a file in your computer, your search terms will be automatically sent to third parties such as Amazon, and the third parties will display the relevant results (mostly ads) depending upon your search terms. If you don’t like this feature and feel this is really annoying to you, you can disable it.
Read the more details in the following link.
2.2 Ubuntu Tweak
Ubuntu Tweak is a must have application for Ubuntu and it’s derivatives. It is an application to configure Ubuntu easier for everyone. It provides many useful desktop and system options that the default desktop environment doesn’t provide. Using Ubuntu Tweak you can install all needed applications with a simple click, you can change the window buttons from Left to right…etc.
Install Ubuntu Tweak
Read our previous to know how to install and use Ubuntu Tweak.
2.3 Ubuntu After Install
Like Ubuntu Tweak, there is an another similar tool called “Ubuntu After install” available. Ubuntu After Install is a tool that can be used to install some of the best and essential software after installing the Ubuntu desktop. It has a bunch of useful applications, and will automate the installation process on a newly installed machine to get near perfect desktop. I would not say a complete desktop for all users, but a near perfect desktop. This tool saves your time and effort, and installs all latest versions of softwares by automatically adding the respective PPA’s to keep the installed softwares up to date on your Ubuntu system.
For more details about installation and usage of Ubuntu After Install Check out the following link.
The above two tools are enough to get a near perfect Ubuntu desktop for daily usage. These tools will help you to install every essential applications and tweak your system as per your needs for daily usage. You can omit all other things given below. Still you want to continue, go on and check them.
3. Desktop Environments
3.1 Cinnamon
Cinnamon is a GNOME 3 fork that allow you to have a panel at the bottom with a classic Menu, this is useful for people that want to use Ubuntu with a classic Bottom Menu.
Cinnamon latest version for Ubuntu 14.04 is not yet ported to the stable PPA, however we can install it using nightly builds which is not recommended for the production system.
If you want to install the most recent version of cinnamon, then follow the steps below.
sudo add-apt-repository ppa:gwendal-lebihan-dev/cinnamon-nightly
sudo apt-get update
sudo apt-get install cinnamon
Logout from the current session and select Cinnamon as your desktop session at the user login prompt. Now you’ll able to get the Cinnamon Desktop Environment.

3.2 Gnome
To install GNOME 3 in Ubuntu 14.04, enter the following command:
sudo apt-get install gnome-shell ubuntu-gnome-desktop
During installation, the installer will ask you to select the login manager of your choice (LightDM is the default Unity manager and GDM is the GNOME default — Both will work).
4. Configure Online Accounts
One of the top things you need to do is to setup your online accounts (Facebook, twitter…). To do that click on the gear button on the top right corner and select System Settings.

Then, select Online Accounts (see below).

Now setup your online accounts and get notifications in Ubuntu. For example, if you want to add your Facebook account, click on the Facebook icon.

Enter your facebook username and password, and click Log in to authorize.

5. System Monitoring & Eye Candy Tools
5.1 Conky
Conky is a free, light-weight system monitor for X, that displays any information on your desktop. There are many nice themes available for conky that can display clock, CPU usage, RAM usage, swap, disk, net and more. Check our previous post for installation and configuration of conky in Ubuntu 14.04/13.10/13.04/12.10/12.04.
5.2 Don’t like the default icons, Wanna try some cool icons?
Try the following cool Icon collections.
Want to change the default icons to something that match your taste? Check this nice collection of icons for Ubuntu (PPA included).
6. Multimedia
6.1 VLC Media Player
VLC is the best media player for Linux it play almost everything, it has many features that you can not find in any other media player, read this post if you want to know what VLC can do: 25 things you can do with VLC Media player!
You can install VLC from Ubuntu Software Center or via terminal by using the following command:
sudo apt-get install vlc
Or install the most recent version 2.1.1 using the following PPA.
sudo add-apt-repository ppa:videolan/stable-daily
sudo apt-get update
sudo apt-get install vlc
6.2 XMBC
XBMC is an award-winning free and open source (GPL) software media player and entertainment hub for digital media. XBMC is available for Linux, OS X, Windows, and the original Xbox. While XBMC functions very well as a standard media player application for your computer, it has been designed to be the perfect companion for your HTPC. Supporting an almost endless range of remote controls, and combined with its beautiful interface and powerful skinning engine, XBMC feels very natural to use from the couch and is the ideal solution for your home theater.
Open terminal and copy the following commands:
sudo apt-get install xbmc
6.3 Openshot video editor
My favorite Video editor is Openshot, the best existing actually for Linux. You can install Openshot from Ubuntu Software Center, but if you want to install the latest release, you can do that by adding the following repositories:
Note: PPA is not yet working in 13.10 at the time of writing this article. Hope it will be updated soon.
sudo add-apt-repository ppa:openshot.developers/ppa
sudo apt-get update
sudo apt-get install openshot openshot-doc
- Read also our interview with Jonathan Thomas the main developer of Openshot.
6.4 Handbrake
Check our previous article to know about the powerful video encoder called “Handbrake”.
7. Install Common Codecs And Enable DVD playback
Perhaps, installing a few common codecs might give you better playback for your media files.
sudo apt-get install gstreamer0.10-plugins-ugly libxine1-ffmpeg gxine mencoder libdvdread4 totem-mozilla icedax tagtool easytag id3tool lame nautilus-script-audio-convert libmad0 mpg321 gstreamer1.0-libav
To play encrypted DVDs, the libdvdcss2 package is essential. libdvdcss is a simple library designed for accessing DVDs like a block device without having to bother about the decryption.
sudo /usr/share/doc/libdvdread4/./install-css.sh
7.1 Enable Flash Support On Browsers
For Ubuntu 32 bit & 64 bit: To be able to watch some videos and see flash website in your browser (Firefox/Chrome), you need to install flash plugin, go to Ubuntu Software Center and search word “flash” and install it.
Alternatively enter the following command to install flash plugins.
sudo apt-get install flashplugin-installer
8. Torrent Softwares
8.1 uTorrent
uTorrent is a lightweight and efficient BitTorrent client for Linux, Windows OS and Mac OS. The installation of uTorrent in Linux is different from Windows and Mac OS. In Linux, uTorrent runs as a web server. You will access uTorrent from your browser. You should start the uTorrent server in order to access it from your browser.
Check our previous article to know more about uTorrent.
8.2 Deluge
The Deluge application was designed to be a full-featured torrent client. Deluge uses libtorrent in its back-end and PyGTK for its user interface and is currently usable on POSIX-compliant operating systems. It is intended to bring a native, full-featured client to GTK desktop environments such as GNOME and Xfce. An official Windows port is also available.
Open terminal and type the following commands:
sudo apt-get install deluge
9. Messengers
Here is the list of recommended Messengers for your system. Don’t install everything. Install one by one and pick up the right one for your requirement and delete the rest.
9.1 Pidgin
The best messenger client and 30 plugins, you can do voice and video chat with friends.
To install Pidgin, enter the following command:
$ sudo apt-get install pidgin
9.2 aMSN
aMSN is a free windows Live Messenger clone. aMSN attempts to emulate the look and feel of Windows Live Messenger, and supports many of its features.
aMSN has many features which are not present in Windows Live Messenger. Users can set alarms, are able to see others who have removed them from their contact list, and are able to open many profiles at once. It is also very customizable, with extensions and themes available at the main site.
To install aMsn, enter the following command in your terminal.
$ sudo apt-get install amsn
9.3 Skype
If you’re want to install Skype, check our previous post.
9.4 Jitsi
Jitsi is an open source and multi platform audio/video Internet phone and instant messenger written in Java. It supports some of the most popular instant messaging and telephony protocols such as SIP, Jabber/XMPP (and hence Facebook and Google Talk), AIM, ICQ, MSN, Yahoo! Messenger.
For details about Jitsi please check our previous article in the following link.
10. Gaming & Emulators
10.1 Steam
As you may know, Steam is an ultimate gaming platform developed by Valve corporation. Steam is available for GNU Linux, Mac OS X and Windows. Recently, Valve has developed and released SteamOS, a Linux based distribution built around Steam client. You can either download and install SteamOS on your system, or just download and install the steam client to play games on your existing operating system.
To install Steam On Ubuntu 14.04, enter the following command:
sudo apt-get install steam
Click Ok to continue.

Accept the License agreement.

Now, the steam will be installed on your system. Launch it either from Dash or Menu.

At the first launch, Steam will check for updates and download and install them if updates available.

After updating Steam, you can enter into steam and start playing games.

If you don’t have an account, create it using the CREATE NEW ACCOUNT link.
This is how my Steam dashboard looks.

10.2 Gaming made easy with Playdeb
If you are a grate fan of gaming so is important to add PlayDeb repositories to your Lucid Lynx. PlayDeb is a gaming repository for Ubuntu aimed to provide titles already available on getdeb.net in an easier to install and update format. You can install many games by a simple click.
10.3 Wine
Wine enables Linux, Mac, FreeBSD, and Solaris users to run Windows applications without a copy of Microsoft Windows. Wine is free software under constant development. Other platforms may benefit as well.
sudo apt-get install wine
Or
Please follow instructions in our previous post.
11. Sharing Files/Folders
11.1 Samba
In order to share folders in Raring Ringtail with other Linux and windows machines in your network, you will need to install and configure Samba share, for instructions how to configure Samba in Ubuntu check our previous post.
11.2 Gigola
Gigola is an another option to share files between Linux and Windows systems. Unlike Samba, we can use Gigola to send files between Linux-to-Linux and Linux-to-Windows systems.
Learn more about Gigola from the below link.
12. Extras & Miscellaneous
12.1 Install Archive Management Apps
Install the following packages will allow you to deal with almost all and any zip formated files.
sudo apt-get install unace unrar zip unzip p7zip-full p7zip-rar sharutils rar uudeview mpack arj cabextract file-roller
12.2 Y PPA Manager
Y PPA Manager is a GUI tool to easily add PPAs, search a package in all Launchpad PPAs, remove duplicate PPAs (only works with separate .list files), backup PPAs and other PPA-related tasks. Check out the Launchpad page for a complete features list.
sudo add-apt-repository ppa:webupd8team/y-ppa-manager
sudo apt-get update
sudo apt-get install y-ppa-manager
Y-PPA-Manager can be launched either from Dash or Menu.
12.3 Install Java 7
Java is fast, secure, and reliable programming and computing platform. There are lots of applications and websites that will not work unless you have Java installed, and more are created every day. To install java simply run the following command from your terminal.
sudo apt-get install openjdk-7-jdk
If you want to try oracle-java 7, try the following steps.
First you need to remove OpenJDK for this run the following command from your terminal:
sudo apt-get purge openjdk*
Now you can install Java 7 by adding the following repository:
sudo add-apt-repository ppa:webupd8team/java
sudo apt-get update
sudo apt-get install oracle-java7-installer
To remove Java 7, run this in terminal:
sudo apt-get remove oracle-java7-installer
12.4 FileZilla
Filezilla is one of the best ftp client for Linux.
Install it via command line:
sudo apt-get install filezilla
12.5 Dropbox
Dropbox is a free service that lets you bring all your photos, docs, and videos anywhere. This means that any file you save to your Dropbox will automatically save to all your computers, phones and even the Dropbox website. Dropbox also makes it super easy to share with others, whether you’re a student or professional, parent or grandparent.
12.6 Oracle VirtualBox
If you want to run another OS in a virtual machine, install Virtualbox.
For installation, follow the instructions in our previous post.
12.7 Cheese: Web Cam Software
Cheese uses your webcam to take photos and videos, applies fancy special effects and lets you share the fun with others. To install cheese on your Ubuntu desktop, enter the following command:
sudo apt-get install cheese
12.8 digikam
digiKam is an advanced digital photo management application for Linux, Windows, and Mac-OSX. It can be used by Photographers to view, manage, edit, enhance, organize, tag, and share photographs under Linux systems.
You can easily install it using command:
sudo apt-get install digikam
12.9 Gimp
Regardless of whether you need to edit images daily on a professional level or just a hobbyist, GIMP is an essential tool for all.
sudo apt-get install gimp gimp-data gimp-plugin-registry gimp-data-extras
12.10 Install Compiz
To install Compiz use the following command:
sudo apt-get install compiz compizconfig-settings-manager compiz-plugins
13. Desktop Effects
Want to spice-up your desktop with awesome wallpapers, well you can use the following two programs to change your desktop wallpapers in a particular interval.
13.1 Variety
Variety is a wallpaper changer for Ubuntu which is feature-full, yet slim and very easy to use. It can automatically download wallpapers from various online sources such as Flickr, Wallbase.cc, World sunlight map (a live wallpaper that changes as the day progresses), Wallpapers.net, NASA Astronomy Picture of the Day, Desktoppr.co etc. It allows rotating them on a regular interval or on demand, and provides easy to use ways to separate the great images from the junk.
To install it under Ubuntu follow our previous post instructions.
13.2 Wallch
Wallch is an application that can be used to change your Ubuntu (Ubuntu derivatives) desktop wallpapers automatically at a particular period of time. It supports Gnome and Unity. It also let you to stop/start wallch, change to next/previous wallpaper. You can adjust/change the wallpaper changing interval. Wallch supports live Earth wallpapers which updates automatically every half an hour, therefore you can set the live Earth wallpapers as your desktop background.
To install it under Ubuntu follow our previous post instructions.
14. Other worth trying applications
14.1 App Grid
App Grid is a light weight alternative for Ubuntu Software Center. It allows you to filter applications by installed, pending, categories, name and rating. It is released under proprietary license and is available for Ubuntu 12.04, 12.10, 13.04 and 13.10.
For more details about App Grid, check our previous article in the following link.
14.2 Boot UP Manager(BUM)
Boot-Up Manager is a Perl-Gtk2 application to manage runlevels configuration of any Ubuntu/Debian derivative systems. Using this program we can easily start and stop boot-up scripts, without the necessity to handle through complex symbolic links and permissions.
For more details about BUM, check our previous article in the following link.
14.3 TLP: Improve Battery performance
TLP is an advanced power management tool for Linux that gives the settings and tweaks to enhance your existing power management automatically without the need to know every technical details. It is purely a command-line tool and doesn’t have a GUI. It should work on almost all laptops.
For more details about TLP, check our previous article in the following link.
14.4 BleachBit: Clean up your system
BleachBit deletes the unnecessary files, free up cache, delete cookies, clear internet history, shred temporary files, delete logs, and discard junk you didn’t know was there. This tool can be used in both Windows OS and Linux systems. And it will support the following applications such as Firefox, Internet Explorer, Adobe Flash, Google Chrome, Opera, Safari and more. It not only deletes the files, but it includes some advanced features such as shredding files to prevent recovery, wiping free disk space to hide traces of files deleted by other applications, and vacuuming Firefox to make it faster.
For more details about BleachBit, check our previous article in the following link.
14.5 Timeshift
Timeshift a application that provides functionality similar to the System Restore feature in Windows and the Time Machine tool in Mac OS. TimeShift protects your system by taking incremental snapshots of the file system at regular intervals. These snapshots can be restored later to bring your system to the exact state it was in at the time when the snapshot was taken.
For more details, refer the following link.
14.5 TypeCatcher
TypeCatcher is an Open Source application developed by Andrew Starr-Bochicchio. It allows you to easily download and install Google webfonts for off-line use.
For more details, refer the following link.
14.6 Apt-fast
Apt-fast is a “shell script wrapper” for apt-get and aptitude that can drastically improve APT download times by downloading packages with multiple connections per package. apt-fast uses aria2c or axel download managers to speed up the APT download time. Just like the traditional apt-get package manager, apt-fast supports almost all apt-get functions such as install, remove, update,upgrade, dist-upgrade etc. And one more notable feature is it supports proxy too.
The installation and usage instructions can be found in the following link.
14.7 Apt-proz & ProZilla
apt-proz is a shell script similar to apt-fast that increases the download speed of apt-get and aptitude by many times (at least for the developer!). While apt-fast uses Axel or aria2c download manager, apt-proz uses ProZilla download accelerator instead.
ProZilla is a full featured command line download accelerator for Linux operating systems. It downloads a files by splitting into multiple pieces and downloads them simultaneously form multiple connections. It supports pause/resume, http/ftp protocols.
You can find more details of the above tools in the following link.
Also install the following useful software’s if you like.
- Opera – The fastest browser on Earth is even faster. But that is not all. Use Opera Turbo to double your page-download speed on slow connections.
- Google Chrome – Web browser from Google
- Google Earth – Travel to cities across the globe, dive into the depths of the ocean, explore remote islands or even fly to faraway galaxies.
Now you’ve reached the end of the article. At this stage, you’ll have a perfect and full fledged Ubuntu 14.04 Desktop.
Do you have any extra softwares to this list? Please share them. We will include them if possible.
Cheers!!
How to Install and Start Teamviewer in Ubuntu 14.04 13.10
How to Boot from USB in VirtualBox
How do I configure swappiness? (Swap file)
The Linux kernel provides a tweakable setting that controls how often the swap file is used, called swappiness
A swappiness setting of zero means that the disk will be avoided unless absolutely necessary (you run out of memory), while a swappiness setting of 100 means that programs will be swapped to disk almost instantly.
Ubuntu system comes with a default of 60, meaning that the swap file will be used fairly often if the memory usage is around half of my RAM. You can check your own system’s swappiness value by running:
one@onezero:~$ cat /proc/sys/vm/swappiness
60
As I have 4 GB of RAM, so I’d like to turn that down to 10 or 15. The swap file will then only be used when my RAM usage is around 80 or 90 percent. To change the system swappiness value, open /etc/sysctl.conf as root. Then, change or add this line to the file:
vm.swappiness = 10
Reboot for the change to take effect
You can also change the value while your system is still running
sysctl vm.swappiness=10
you can also clear your swap by running swapoff -a and then swapon -a as root instead of rebooting to achieve the same effect.
To calculate your swap Formula
free -m (total) / 100 = A

A * 10

root@onezero:/home/one# free -m
             total       used       free     shared    buffers     cached
Mem:          3950       2262       1687          0        407        952
-/+ buffers/cache:        903       3047
Swap:         1953          0       1953
so total is 3950 / 100 = 39.5 * 10 = 395
so what it mean is that when 10 % 395 MB of ram left then it start using swapiness
Help . Ubuntu . Swap
What is swappiness
The swappiness parameter controls the tendency of the kernel to move processes out of physical memory and onto the swap disk. Because disks are much slower than RAM, this can lead to slower response times for system and applications if processes are too aggressively moved out of memory.
. swappiness can have a value of between 0 and 100
. swappiness=0 : Version 3.5 and over: disables swapiness. Prior to 3.5: tells the kernel to avoid swapping processes out of physical memory for as long as possible.
. swappiness=1 : Version 3.5 and over: Minimum swappiness without disabling it entirely
. swappiness=100 tells the kernel to aggressively swap processes out of physical memory and move them to swap cache
See http://en.wikipedia.org/wiki/Swappiness
The default setting in Ubuntu is swappiness=60. Reducing the default value of swappiness will probably improve overall performance for a typical Ubuntu desktop installation. A value of swappiness=10 is recommended, but feel free to experiment.
Started Using swap at 91%
 As I have configured my system & vm to make use of ram at 90 % . At 90 % there was no swapping
after that I opened some application like Firefox & Shutter , its start swapping because of ram usage is above 90 %
vSphere 5.5 – How to install and configure VMware ESXi 5.5
Realtek network cards and VMware ESXi 5.5
Yesterday I decided to upgrade my two ESXi servers from ESXi 5.1 to ESXi 5.5 since the update came out some time ago.
The upgrade from ESXi 5.0 to ESXi 5.1 went great, without any problems. But this time, that is not the case.
My two ESXi servers are white boxes made of the following hardware:
- Motherboard: MSI Z87-G43 (http://www.msi.com/product/mb/Z87-G43.html)
- CPU: i5-4670K (http://ark.intel.com/products/75048/)
- RAM: Kingston HyperX DDR3 1600MHz, 8Gb * 2(16GB total) (http://www.newegg.com/Product/Product.aspx?Item=N82E16820104173)
The problem was the motherboard that ships with an onboard Realtek 8111E network adapter.
This problem has been verified to be the same with Realtek 8168 and Realtek 8169.
The reason for this, is that VMware removed the drivers from the new ESXi 5.5 iso.
In this post I will show you how to get ESXi 5.5 working with the Realtek network adapters.
Some people don’t like to use “not supported” hardware this way, and others had connection problems on the VM’s after doing this. I did not have any problems, and have been running with this solution since I wrote this post (21 days ago now). So i think it is pretty stable.
If you don’t want to use the method below, you can always buy a Intel Pro 1000 network card and put it in a PCI-e slot.
I highly recommend the Intel pro 1000 series, they are fast, reliable and works on any OS out of the box (including ESXi), but they are a little pricy. You can get them here, with free shipping:
Intel Pro 1000 Dual port
Intel Pro 1000 single port
There are two ways to make the upgrade work on your motherboard:
- Using a supported network adapter in a PCI-E slot (See above, regarding the Intel Pro 1000 network adapters)
- Creating a custom ESXi 5.5 iso with the drivers from ESXi 5.1
Putting in a extra network adapter was not an option for me, so I went for option two, and here is how I did it:
Creating a custom ESXi 5.5 iso including the Realtek network drivers
What you need
You just need a Windows XP or higher computer, and the software below.
Getting the needed software
First you need to get the needed software.
The following is what you need to download:
- The original VMware ESXi 5.5 iso (https://my.vmware.com/web/vmware/evalcenter?p=free-esxi5&lp=default)
- ESXi-Customizer (http://www.v-front.de/p/esxi-customizer.html#download)
- The drivers from the old ESXi 5.1 iso (save file and unzip), you only need one of the below depending on what model your network adapter is.
Injecting the drivers and create a new iso file
There is not a lot of steps to this, actually just a couple and it will not take long.
Open the “Esxi-customizer”
First run the .exe for ESXi-customizer to extract it.
When extracted, run the program so you get the following window:
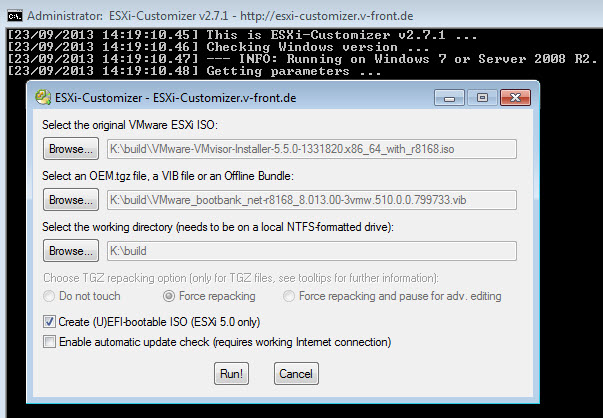
Fill out fields
Simply fill out all 3 fields.
First one: Choose the original VMware ESXi 5.5 iso you downloaded from VMware
Second one: Choose the .VIB file for you Realtek network adapter that you downloaded earlier.
Third one: Choose what folder to use for working folder. A log and the finished new .iso file will be saved here. just create a new folder on your C:\ drive and use it.
If your motherboard support UEFI boot, you can tick the “Create UEFI bootable ISO” if not, then untick this. If you are unsure about this, then untick it!
Tick the auto update check to make sure you always have the latest version of this software.
Do it!
Let’s do it! Press “Run!”
The program will run some commands in the command promt behind it, and that’s it.
It does not take long. Once done, you can close the program.
Upgrade your VMware ESXi server
Now, burn your newly created ISO image of VMware ESXi 5.5 with your Realtek network adapter drivers injected that was created in the folder you choose to be the working folder for the program.
You can also “Burn” it to a usb stick, if your server does not have a optical drive installed. I do not have a guide for this yet.
Boot up your server on the cd/usb and choose to upgrade the system like you would with the original iso.
Note that the custom .iso does not work trough VMware Update Manager.
Feel free to leave a comment below, and rate the post at the top if this helped you!
Difference between vSphere, ESXi and vCenter
VMware Inc. is a software company that develops many suite of software products specially for providing various virtualization solutions. There are many cloud products, datacenter products, desktop products and so on.
vSphere is a software suite that comes under data center product. vSphere is like Microsoft Office suite which has many software like MS Office, MS Excel, MS Access and so on. Like Microsoft Office, vSphere is also a software suite that has many software components like vCenter, ESXi, vSphere client and so on. So, the combination of all these software components is vSphere. vSphere is not a particular software that you can install and use, “it is just a package name which has other sub components”.
ESXi, vSphere client and vCenter are components of vSphere. ESXi server is the most important part of vSphere. ESXi is the virtualization server. It is type 1 hypervisor. All the virtual machines or Guest OS are installed on ESXi server. To install, manage and access those virtual servers which sit above of ESXi server, you will need other part of vSphere suit called vSphere client or vCenter. Now, vSphere client allows administrators to connect to ESXi servers and access or manage virtual machines. vSphere client is installed on the client machine (e.g. Administrator’s laptop). The vSphere client is used from client machine to connect to ESXi server and do management tasks. So now what is vCenter? Why we need it? Try cloning existing virtual machine using just a vSphere client without vCenter server.
vCenter server is similar to vSphere client but it’s a server with more power. vCenter server is installed on Windows Server or Linux Server. VMware vCenter server is a centralized management application that lets you manage virtual machines and ESXi hosts centrally. vSphere client is used to access vCenter Server and ultimately manage ESXi servers. vCenter server is compulsory for enterprises to have enterprise features like vMotion, VMware High Availability, VMware Update Manager and VMware Distributed Resource Scheduler (DRS). For example, you can easily clone existing virtual machine in vCenter server. So vCenter is another important part of vSphere package. You have to buy vCenter license separately.

The diagram above shows vSphere suite in a more descriptive way. vSphere is a product suite, ESXi is a hypervisor installed on a physical machine. vSphere Client is installed on laptop or desktop PC and is used to access ESXi Server to install and manage virtual machines on ESXi server. vCenter server is installed as virtual machine on top of ESXi server. vCenter server is a vSphere component which is mostly used in large environment where there are many ESXi server and dozens of virtual machines. The vCenter server is also accessed by vSphere client for management purpose. So, vSphere client is used to access ESXi server directly in small environment. In larger environment, vSphere client is used again to access vCenter server which ultimately manages ESXi server.
Shellshock (bash vulnerability/bash bug)(Deadly serious’ new vulnerability found)(All OS X and Linux systems wide open)
A new vulnerability has been found that potentially affects most versions of the Linux and Unix operating systems, in addition to Mac OS X (which is based around Unix). Known as the “Bash Bug” or “ShellShock,” the GNU Bash Remote Code Execution Vulnerability (CVE-2014-6271) could allow an attacker to gain control over a targeted computer if exploited successfully.
The vulnerability affects Bash, a common component known as a shell that appears in many versions of Linux and Unix. Bash acts as a command language interpreter. In other words, it allows the user to type commands into a simple text-based window, which the operating system will then run.
Bash can also be used to run commands passed to it by applications and it is this feature that the vulnerability affects. One type of command that can be sent to Bash allows environment variables to be set. Environment variables are dynamic, named values that affect the way processes are run on a computer. The vulnerability lies in the fact that an attacker can tack-on malicious code to the environment variable, which will run once the variable is received.
Symantec regards this vulnerability as critical, since Bash is widely used in Linux and Unix operating systems running on Internet-connected computers, such as Web servers. Although specific conditions need to be in place for the bug to be exploited, successful exploitation could enable remote code execution. This could not only allow an attacker to steal data from a compromised computer, but enable the attacker to gain control over the computer and potentially provide them with access to other computers on the affected network.
The following video provides an explanation of the Bash Bug vulnerability and demonstrates how a likely attack scenario through the CGI interface may work:
https://www.youtube.com/watch?v=ArEOVHQu9nk
Has it been exploited yet?
There are limited reports of the vulnerability being used by attackers in the wild. Proof-of-concept scripts have already been developed by security researchers. In addition to this, a module has been created for the Metasploit Framework, which is used for penetration testing.
Once the vulnerability has been made public, it was only a matter of time before attackers attempted to find and exploit unpatched computers.
How can it be exploited?
While the vulnerability potentially affects any computer running Bash, it can only be exploited by a remote attacker in certain circumstances. For a successful attack to occur, an attacker needs to force an application to send a malicious environment variable to Bash.
The most likely route of attack is through Web servers utilizing CGI (Common Gateway Interface), the widely-used system for generating dynamic Web content. An attacker can potentially use CGI to send a malformed environment variable to a vulnerable Web server. Because the server uses Bash to interpret the variable, it will also run any malicious command tacked-on to it.

Figure 1. How a malicious command can be tacked-on to the end of a legitimate environment variable. Bash will run the malicious command first.
The consequences of an attacker successfully exploiting this vulnerability on a Web server are serious in nature. For example attackers may have the ability to dump password files or download malware on to infected computers. Once inside the victim’s firewall, the attackers could then compromise and infect other computers on the network.
Aside from Web servers, other vulnerable devices include Linux-based routers that have a Web interface that uses CGI. In the same manner as an attack against a Web server, it may be possible to use CGI to exploit the vulnerability and send a malicious command to the router.
Computers running Mac OS X are also potentially vulnerable until Apple releases a patch for the vulnerability. Again, attackers would need to find a way to pass malformed commands to Bash on the targeted Mac. The most likely avenue of attack against OS X would probably be through Secure Shell (SSH), a secure communications protocol. However, it appears that the attacker would need to have valid SSH credentials to perform the attack. In other words, they would already have to be logged in to an SSH session.
Internet of Things (IoT) and embedded devices such as routers may be vulnerable if they’re running Bash. However, many newer devices run a set of tools called BusyBox which offers an alternative to Bash. Devices running BusyBox are not vulnerable to the Bash Bug.
For website owners and businesses
Businesses, in particular website owners, are most at risk from this bug and should be aware that its exploitation may allow access to their data and provide attackers with a foothold on their network. Accordingly, it is of critical importance to apply any available patches immediately.
Linux vendors have issued security advisories for the newly discovered vulnerability including patching information.
- Debian—https://www.debian.org/security/2014/dsa-3032
- Ubuntu—http://www.ubuntu.com/usn/usn-2362-1/
- Red Hat—https://access.redhat.com/articles/1200223*
- CentOS—http://centosnow.blogspot.com/2014/09/critical-bash-updates-for-centos-5.html
- Novell/SUSE— http://support.novell.com/security/cve/CVE-2014-6271.html
*Red Hat has updated its advisory to include fixes for a number of remaining issues.
If a patch is unavailable for a specific distribution of Linux or Unix, it is recommended that users switch to an alternative shell until one becomes available.
For consumers
Consumers are advised to apply patches to routers and any other web-enabled devices as and when they become available from vendors. Users of Apple’s Mac OS X should be aware that the operating system currently ships with a vulnerable version of Bash. Mac users should apply any patches for OS X when they become available.
Symantec Protection
Symantec has created an Intrusion Prevention signature for protection against this vulnerability:
Symantec will continue to investigate this vulnerability and provide more details as they become available.
Critical Error Failed to Create the VirtualBox COM object error and resolution
VirtualBox will not start and present a Critical Error dialog box which reads “Failed to create the VirtualBox COM object. The application will now terminate.” If you select Details for additional information, it may offer something similar to this error, if not the same, Callee RC: CO_E_SERVER_EXEC_FAILURE (0x80080005). Here is a solution that worked in this case and will get VirtualBox back up and running without losing any configuration changes.
I recognize this error will likely occur on multiple versions of this application, however, for the sake of disclosure, the error occured using Oracle VirtualBox 4.3.6 on a Microsoft Windows 7 Professional (64-bit). During the re-install, I elected to upgrade to the latest, at the time of this writing, Oracle VirtualBox 4.3.8.

The Process
- Navigate to your profile and look for the .VirtualBox folder. For example, C:\Users\your.name\.VirtualBox
- Copy the VirtualBox.xml to somewhere safe, like your desktop
- Uninstall VirtualBox
- Delete the .VirtualBox folder
- Re-install VirtualBox and the option package.
- Start VirtualBox
- Close VirtualBox
- Navigate to your profile and look for the .VirtualBox folder. For example, C:\Users\your.name\.VirtualBox
- Rename the VirtualBox.xml to VirtualBox.xml.old
- Copy your original VirtualBox.xml to the .VirtualBox folder
- Start VirtualBox
Note: If you are presented with a hardware error message of some sort, here the corrections may be made. In my case, there was a referenced hard disk that was unavailable. So I deleted it using the configuration window that was presented.
Everything should be working as expected.
Recommended size in percentage for each partition (Ubuntu / Linux)
I have seen most of dedicated hosting companies servers always have multiple partition for various folders. I have tried to follow some guide lines on my own on virtual box. I always use swap space as double the ram. let’s say
TS = total Size
SS = Swap Size
MS = Main Size

MS = TS - SS
What is bellow is percentage on MS.
/         20%
/boot     100M
/var      25%
/home     24%
/usr      10%
/tmp      200M
/opt      10%
it looks like I still need some key places I should give more space and some other places I should reduce space for example /usr and /var.


https://www.youtube.com/watch?v=o_trEVXBgLg
9.15.5. Recommended Partitioning Scheme
We recommend that you create the following partitions for x86, AMD64, and Intel 64 systems:
-
A
swappartition -
A
/bootpartition -
A
/partition -
A
homepartition
-
A
swappartition (at least 256 MB) — Swap partitions support virtual memory: data is written to a swap partition when there is not enough RAM to store the data your system is processing.In years past, the recommended amount of swap space increased linearly with the amount of RAM in the system. Modern systems often include hundreds of gigabytes of RAM, however. As a consequence, recommended swap space is considered a function of system memory workload, not system memory.The following table provides the recommended size of a swap partition depending on the amount of RAM in your system and whether you want sufficient memory for your system to hibernate. The recommended swap partition size is established automatically during installation. To allow for hibernation, however, you will need to edit the swap space in the custom partitioning stage.Table 9.2. Recommended System Swap Space
Amount of RAM in the system Recommended swap space Recommended swap space if allowing for hibernation ⩽ 2GB 2 times the amount of RAM 3 times the amount of RAM > 2GB – 8GB Equal to the amount of RAM 2 times the amount of RAM > 8GB – 64GB 0.5 times the amount of RAM 1.5 times the amount of RAM > 64GB 4GB of swap space No extra space needed At the border between each range listed above (for example, a system with 2GB, 8GB, or 64GB of system RAM), discretion can be exercised with regard to chosen swap space and hibernation support. If your system resources allow for it, increasing the swap space may lead to better performance.Note that distributing swap space over multiple storage devices — particularly on systems with fast drives, controllers and interfaces — also improves swap space performance.Note
Swap space size recommendations issued for Red Hat Enterprise Linux 6.0, 6.1, and 6.2 differed from the current recommendations, which were first issued with the release of Red Hat Enterprise Linux 6.3 in June 2012 and did not account for hibernation space. Automatic installations of these earlier versions of Red Hat Enterprise Linux 6 still generate a swap space in line with these superseded recommendations. However, manually selecting a swap space size in line with the newer recommendations issued for Red Hat Enterprise Linux 6.3 is advisable for optimal performance. -
A
/boot/partition (250 MB)The partition mounted on
/boot/contains the operating system kernel (which allows your system to boot Red Hat Enterprise Linux), along with files used during the bootstrap process. For most users, a 250 MB boot partition is sufficient.Important — Supported file systems
The GRUB bootloader in Red Hat Enterprise Linux 6.5 supports only the ext2, ext3, and ext4 (recommended) file systems. You cannot use any other file system for/boot, such as Btrfs, XFS, or VFAT.Warning
Note that normally the/bootpartition is created automatically by the installer. However, if the/(root) partition is larger than 2 TB and (U)EFI is used for booting, you need to create a separate/bootpartition that is smaller than 2 TB to boot the machine successfully.Note
If your hard drive is more than 1024 cylinders (and your system was manufactured more than two years ago), you may need to create a/boot/partition if you want the/(root) partition to use all of the remaining space on your hard drive.Note
If you have a RAID card, be aware that some BIOS types do not support booting from the RAID card. In cases such as these, the/boot/partition must be created on a partition outside of the RAID array, such as on a separate hard drive. -
A
rootpartition (3.0 GB – 5.0 GB) — this is where “/” (the root directory) is located. In this setup, all files (except those stored in/boot) are on the root partition.A 3.0 GB partition allows you to install a minimal installation, while a 5.0 GB root partition lets you perform a full installation, choosing all package groups.Root and
/rootThe/(or root) partition is the top of the directory structure. The/rootdirectory (sometimes pronounced “slash-root”) is the home directory of the user account for system administration. -
A
homepartition (at least 100 MB)To store user data separately from system data, create a dedicated partition within a volume group for the
/homedirectory. This will enable you to upgrade or reinstall Red Hat Enterprise Linux without erasing user data files.
Many systems have more partitions than the minimum listed above. Choose partitions based on your particular system needs. Refer to Section 9.15.5.1.1, “Advice on Partitions” for more information.
If you create many partitions instead of one large
/ partition, upgrades become easier. Refer to the description of the Edit option in Section 9.15, “ Creating a Custom Layout or Modifying the Default Layout ” for more information.The following table summarizes minimum partition sizes for the partitions containing the listed directories. You do not have to make a separate partition for each of these directories. For instance, if the partition containing
/foo must be at least 500 MB, and you do not make a separate /foo partition, then the / (root) partition must be at least 500 MB.Table 9.3. Minimum partition sizes
| Directory | Minimum size |
|---|---|
/ |
250 MB |
/usr |
250 MB, but avoid placing this on a separate partition |
/tmp |
50 MB |
/var |
384 MB |
/home |
100 MB |
/boot |
250 MB |
Leave Excess Capacity Unallocated
Only assign storage capacity to those partitions you require immediately. You may allocate free space at any time, to meet needs as they occur. To learn about a more flexible method for storage management, refer to Appendix D, Understanding LVM.
If you are not sure how best to configure the partitions for your computer, accept the default partition layout.
Optimal partition setup depends on the usage for the Linux system in question. The following tips may help you decide how to allocate your disk space.
-
Consider encrypting any partitions that might contain sensitive data. Encryption prevents unauthorized people from accessing the data on the partitions, even if they have access to the physical storage device. In most cases, you should at least encrypt the
/homepartition. -
Each kernel installed on your system requires approximately 10 MB on the
/bootpartition. Unless you plan to install a great many kernels, the default partition size of 250 MB for/bootshould suffice.Important — Supported file systems
The GRUB bootloader in Red Hat Enterprise Linux 6.5 supports only the ext2, ext3, and ext4 (recommended) file systems. You cannot use any other file system for/boot, such as Btrfs, XFS, or VFAT. -
The
/vardirectory holds content for a number of applications, including the Apache web server. It also is used to store downloaded update packages on a temporary basis. Ensure that the partition containing the/vardirectory has enough space to download pending updates and hold your other content.Warning
The PackageKit update software downloads updated packages to/var/cache/yum/by default. If you partition the system manually, and create a separate/var/partition, be sure to create the partition large enough (3.0 GB or more) to download package updates. -
The
/usrdirectory holds the majority of software content on a Red Hat Enterprise Linux system. For an installation of the default set of software, allocate at least 4 GB of space. If you are a software developer or plan to use your Red Hat Enterprise Linux system to learn software development skills, you may want to at least double this allocation.Do not place
/usron a separate partitionIf/usris partitioned separately from the rest of the root volume, the boot process becomes much more complex because/usrcontains boot-critical components. In some situations, such as when installing on an iSCSI drive, the system will not boot. -
Consider leaving a portion of the space in an LVM volume group unallocated. This unallocated space gives you flexibility if your space requirements change but you do not wish to remove data from other partitions to reallocate storage.
-
If you separate subdirectories into partitions, you can retain content in those subdirectories if you decide to install a new version of Red Hat Enterprise Linux over your current system. For instance, if you intend to run a MySQL database in
/var/lib/mysql, make a separate partition for that directory in case you need to reinstall later. -
UEFI systems should contain a 50-150MB
/boot/efipartition with an EFI System Partition filesystem.
The following table is a possible partition setup for a system with a single, new 80 GB hard disk and 1 GB of RAM. Note that approximately 10 GB of the volume group is unallocated to allow for future growth.
Example Usage
This setup is not optimal for all use cases.
