Linux DD Command : 15 Examples With All Options (backup master boot record / MBR)

The Linux command ‘dd’ is one of the very powerful utility which can be used in a variety of ways. This tool is mainly used for copying and converting data, hence it stands for ‘data duplicator’.

This tool can be used for.

• Backing up and restoring an entire hard drive or a partition

• Copy regions of raw device files like backing up MBR(master boot record)

• Converting data formats like ASCII to EBCDIC

• Converting lowercase to uppercase and vice versa

• Creating files with fixed size

Only superuser can execute this command. You should be very careful while using this command as improper usage may cause huge data loss. So, some people consider this tool as ‘data destroyer’.

Syntax of ‘dd’ command

dd  if=<source file name> of=<target file name> [Options]

We will learn the various ‘options’ while going through the examples.

1. Backing up and restoring an entire hard drive or a partition

a. Backup entire hard drive to another drive.

dd if=/dev/sda of=/dev/sdb bs=4096 conv=noerror,sync

Here, ‘if’ stands for input file , ‘of’ stands for output file and ‘bs’ stands for the block size (number of bytes to be read/write at a time). The conversion parameter ‘noerror’ allows the tool to continue to copy the data eventhough it encounter any errors. The sync option allows to use synchronized I/O.

The above command will copy all the data from the disk /dev/sda to /dev/sdb. ‘dd’ doesn’t know anything about the filesystem or partitions- it will just copy everything from /dev/sda to /dev/sdb. So, this will clone the disk with the same data on same partition.

b. Creating a disk image

dd if=/dev/sda of=/tmp/sdadisk.img

Backing up a disk to an image will be faster than copying the exact data. Also, disk image make the restoration much more easier.

c. Creating a compressed disk image

dd if=/dev/sda | gzip >/tmp/sdadisk.img.gz

d. Restoring hard disk image

dd if=/tmp/sdadisk.img of=/dev/sda

e. Restoring compressed image

gzip –dc /tmp/sdadisk.img.gz | dd of=/dev/sda

f. Clone one partition to another

dd if=/dev/sda1 of=/dev/sdb1 bs=4096 conv=noerror,sync

This will synchronize the partition /dev/sda1 to /dev/sdb1. You must verify that the size of /dev/sdb1 should be larger than /dev/sda1

2. Backing up and Restoring MBR

Master Boot record is the boot sector which houses the GRUB boot loader. If MBR got corrupted, we will not be able to boot into Linux. MBR -512 byte data- is located at the first sector of the hard disk. It consists of 446 byte bootstrap, 64 byte partition table and 2 bytes signature.

a. Backing up MBR

dd if=/dev/sda of=/tmp/mbr.img bs=512 count=1

The option “count” refers to the number of input blocks to be copied

b. Backing up the boot data of MBR excluding the partition table

dd if=/dev/sda of=/tmp/mbr.img bs=446 count=1

c. Restoring MBR from MBR image

dd if=/tmp/mbr.img of=/dev/sda

d. Display master boot record

dd if=/dev/hda of=mbr.bin bs=512 count=1
od -xa mbr.bin

3. Converting data formats

a. Convert the data format of a file from ASCII to EBCDIC

dd if=textfile.ascii of=textfile.ebcdic conv=ebcdic

b. Convert the data format of a file from EBCDIC to ASCII

dd if=textfile.ebcdic of=textfile.ascii conv=ascii

4. Converting case of a file

a. Converting a file to Uppercase

dd if=file1 of=file2 conv=ucase

b. Converting a file to lowercase

dd if=file1 of=file2 conv=lcase

5. Creating or modifying data files

a. Create a fixed size, say 10MB file

dd if=/dev/zero of=file1 bs=10485760 count=1

The block size is calculated as 10MB=10*1024*1024

b. Modify the first 512 bytes of a file with null data

dd if=/dev/zero of=file1 bs=512 count=1 conv=notrunc

The option ‘notrunc’ refers to do not truncate the file, only replace the first 512 bytes, if it exists. Otherwise, you will get a 512 byte file.

mbr

Sysctl ( /etc/sysctl.conf )

Description

The sysctl infrastructure is designed to configure kernel parameters at run time. The sysctl interface is heavily used by the Linux networking subsystem. It can be used to configure some core kernel parameters; represented as files in /proc/sys/*. The values can be accessed by using cat(1), echo(1) or the sysctl(8) commands. If a value is set by the echo command it only persists as long as the kernel is running, but gets lost as soon as the machine is rebooted. In order to change the values permanently they have to be written to the file /etc/sysctl.conf. Upon restarting the machine all values specified in this file are written to the corresponding files in /proc/sys/.

To enable IPv4 forwarding on your RH 6.2 system, use the following command: Edit the /etc/sysctl.conf file and add the following line:

           # Enable packet forwarding
           net.ipv4.ip_forward = 1

You must restart your network for the change to take effect. The command to restart the network is the following:

           [root@deep] /# /etc/rc.d/init.d/network restart
           
           Setting network parameters	        [  OK  ]
           Bringing up interface lo	        [  OK  ]
           Bringing up interface eth0	        [  OK  ]
           Bringing up interface eth1	        [  OK  ]


Linux Kernel /etc/sysctl.conf Security Hardening

How do I set advanced security options of the TCP/IP stack and virtual memory to improve security and performance of my system? How do I configure Linux kernel to prevent certain kinds of attacks using /etc/sysctl.conf? How do I set Linux kernel parameters?

sysctl is an interface that allows you to make changes to a running Linux kernel. With /etc/sysctl.conf you can configure various Linux networking and system settings such as:

  1. Limit network-transmitted configuration for IPv4
  2. Limit network-transmitted configuration for IPv6
  3. Turn on execshield protection
  4. Prevent against the common ‘syn flood attack’
  5. Turn on source IP address verification
  6. Prevents a cracker from using a spoofing attack against the IP address of the server.
  7. Logs several types of suspicious packets, such as spoofed packets, source-routed packets, and redirects.

sysctl command

The sysctl command is used to modify kernel parameters at runtime. /etc/sysctl.conf is a text file containing sysctl values to be read in and set by sysct at boot time. To view current values, enter:
# sysctl -a
# sysctl -A
# sysctl mib
# sysctl net.ipv4.conf.all.rp_filter

To load settings, enter:
# sysctl -p

Sample /etc/sysctl.conf

Edit /etc/sysctl.conf and update it as follows. The file is documented with comments. However, I recommend reading the official Linux kernel sysctl tuning help file (see below):

# The following is suitable for dedicated web server, mail, ftp server etc. 
# ---------------------------------------
# BOOLEAN Values:
# a) 0 (zero) - disabled / no / false
# b) Non zero - enabled / yes / true
# --------------------------------------
# Controls IP packet forwarding
net.ipv4.ip_forward = 0
 
# Controls source route verification
net.ipv4.conf.default.rp_filter = 1
 
# Do not accept source routing
net.ipv4.conf.default.accept_source_route = 0
 
# Controls the System Request debugging functionality of the kernel
kernel.sysrq = 0
 
# Controls whether core dumps will append the PID to the core filename
# Useful for debugging multi-threaded applications
kernel.core_uses_pid = 1
 
# Controls the use of TCP syncookies
#net.ipv4.tcp_syncookies = 1
net.ipv4.tcp_synack_retries = 2
 
########## IPv4 networking start ##############
# Send redirects, if router, but this is just server
net.ipv4.conf.all.send_redirects = 0
net.ipv4.conf.default.send_redirects = 0
 
# Accept packets with SRR option? No
net.ipv4.conf.all.accept_source_route = 0
 
# Accept Redirects? No, this is not router
net.ipv4.conf.all.accept_redirects = 0
net.ipv4.conf.all.secure_redirects = 0
 
# Log packets with impossible addresses to kernel log? yes
net.ipv4.conf.all.log_martians = 1
net.ipv4.conf.default.accept_source_route = 0
net.ipv4.conf.default.accept_redirects = 0
net.ipv4.conf.default.secure_redirects = 0
 
# Ignore all ICMP ECHO and TIMESTAMP requests sent to it via broadcast/multicast
net.ipv4.icmp_echo_ignore_broadcasts = 1
 
# Prevent against the common 'syn flood attack'
net.ipv4.tcp_syncookies = 1
 
# Enable source validation by reversed path, as specified in RFC1812
net.ipv4.conf.all.rp_filter = 1
net.ipv4.conf.default.rp_filter = 1
 
########## IPv6 networking start ##############
# Number of Router Solicitations to send until assuming no routers are present.
# This is host and not router
net.ipv6.conf.default.router_solicitations = 0
 
# Accept Router Preference in RA?
net.ipv6.conf.default.accept_ra_rtr_pref = 0
 
# Learn Prefix Information in Router Advertisement
net.ipv6.conf.default.accept_ra_pinfo = 0
 
# Setting controls whether the system will accept Hop Limit settings from a router advertisement
net.ipv6.conf.default.accept_ra_defrtr = 0
 
#router advertisements can cause the system to assign a global unicast address to an interface
net.ipv6.conf.default.autoconf = 0
 
#how many neighbor solicitations to send out per address?
net.ipv6.conf.default.dad_transmits = 0
 
# How many global unicast IPv6 addresses can be assigned to each interface?
net.ipv6.conf.default.max_addresses = 1
 
########## IPv6 networking ends ##############
 
#Enable ExecShield protection
kernel.exec-shield = 1
kernel.randomize_va_space = 1
 
# TCP and memory optimization 
# increase TCP max buffer size setable using setsockopt()
#net.ipv4.tcp_rmem = 4096 87380 8388608
#net.ipv4.tcp_wmem = 4096 87380 8388608
 
# increase Linux auto tuning TCP buffer limits
#net.core.rmem_max = 8388608
#net.core.wmem_max = 8388608
#net.core.netdev_max_backlog = 5000
#net.ipv4.tcp_window_scaling = 1
 
# increase system file descriptor limit    
fs.file-max = 65535
 
#Allow for more PIDs 
kernel.pid_max = 65536
 
#Increase system IP port limits
net.ipv4.ip_local_port_range = 2000 65000

Linux Network (TCP) Performance Tuning with Sysctl

Before the Linux kernel version 1.3.57, there was no mechanism other than recompiling the kernel, if you wanted to modify some system parameters.

And recompiling the kernel for each and every modification you needed was not at all a good idea. Simply because it didn’t offered flexibility, and it was not possible for a normal day to day user to sit and recompile, a kernel for modifying a value to his required one.

Hence there was a need to provide a user interface, using which a user can easily modify kernel parameters, at run time, without recompiling the kernel. Hence Sysctl was introduced. Before the introduction of sysctl in Linux. Almost all kernel parameters, were defined as constants. However using sysctl you can modify these constants to fit to your needs.

In this article we will be discussing some of the sysctl parameters, that affects the performance of network. Before getting into the details, let’s first see some of the things that can be modified using sysctl.

  • Device parameters
  • Network parameters
  • Firewall behavior
  • File system
  • NFS
  • Processes
  • Version details and much more..

A complete list of all sysctl parameters, can be found by running the below command.

?
1
[root@www kernel]# sysctl -a

Discussing all of them is beyond the scope of this article. However in the coming days I will surely write about a few more options available in sysctl.

We will be discussing Network related switches in sysctl, which on modification can result in speeding up network substantially.

Most of the Linux users out there are aware of the fact that, whatever you modify in sysctl, it ultimately modify some file in the /proc directory. On a running system you can redirect your required values to files in /proc file system, which will immediately get applied. However its better to always use sysctl to modify kernel parameters.

The primary objective of this article is to understand these network related options available in sysctl, and what exactly they do, as far as networking and communication is concerned. We will discuss what each of these options one by one, and understand how does they fit into the whole picture of networking in Linux. 

Let’s understand some basics of networking and TCP before we go ahead and fine tune these parameters on our Linux machine.

1. Round Trip Time

This is nothing but the amount of time it takes to send a packet to the receiver and the time took to get an acknowledgement from the receiver.  Hence the round trip time is the amount of time it took to send an IP packet and then receive and acknowledgement from the other side. In networking this can be tested with a very highly used command called PING.

?
1
2
3
4
C:\Users\sarath>ping slashroot.in
Pinging slashroot.in [212.71.233.103] with 32 bytes of data:
Reply from 212.71.233.103: bytes=32 time=130ms TTL=51

The time=130ms (milliseconds), shows the round trip time for reaching slashroot.in, from my computer. My server is located at a Linode datacenter in London. And the time it took for an IP packet to reach my server from my current location of Hyderabad (India), and then get an acknowledgement back from London it took 130 milliseconds.

2.TCP and its connection Type

Transmission Control Protocol (TCP) is a connection oriented protocol. Now why is it called as connection oriented?. Its because of a reliable establishment of a connection between the sender and the receiver before any data transmission occurs. This connection establishment is very important, because the sender needs to properly deliver its data to the receiver and then also confirm that the data was delivered properly.

Read: How a TCP connection is Established

Once a reliable connection is established, then data can flow in both the direction. From sender to receiver and back from receiver to sender. The sender also needs to confirm the proper delivery of the data, by waiting for an acknowledgement from the receiver. Please remember the fact that “Who sends data has nothing to do with who originated the connection”.

3. What are segments, packets, and frames

People use these terms (segments, packets, and frames), interchangeably in networking. However they are totally different. You might already know that in networking there are 5 different layers. The first one is Application layer, Transport layer, Network Layer, Data Link Layer, and the finally comes the Physical layer(This physical layer is the layer where data flows through the wire).

Whenever any application sends data to a remote server (For example, you are browsing this web page with your favorite web browser called Mozilla Firefox). While browsing, Application layer is taken care by your web browser and the operating system, and Transport layer is taken care by the TCP suite in your operating system, And network layer is where IP address and receiver address details comes (which is also taken care by the networking stack installed in your operating system), then comes the Data link layer where hardware part is involved like MAC address etc, and then comes the physical layer where the final data is crafted on the wire to be transmitted.

Hence whatever you send to the server from your system travels through these different layers (Each layer adds its own bit of information to the data submitted by the previous layer.).

  • Data at Transport Layer is called Segments
  • Data at Network Layer is called as Packets
  • Data at the last layer is called as Frames(ready to be transmitted over wire)

Now we discussed previously that TCP is a reliable protocol. Its reliable because whatever you send, the receiver must acknowledge that it has got the thing you send. I must say that all the bytes you send must be acknowledged by the receiver. Now what if the receiver does not acknowledge?. If the receiver does not acknowledge, then the sender will resend the bytes those where unacknowledged.

It appears to be quite simple when we talk about sending and getting an acknowledgment back. However setting out to implement this in a reliable manner is a quite tough task, and you need to consider a lot of things.

Things like how much amount of data will be send on a continues base before the sender gets an acknowledgement back. How much data can the receiver handle before its finally being processed by the receiving application.

Those issues related to implementing such a reliable communication protocol is addressed by something called as Flow Control in TCP. Now let’s understand what is Flow Control (Don’t worry we will configure and fine tune our settings in Linux, once we understand these concepts.)

Flow Control in TCP

So the problem that will be addressed using Flow control in TCP is the proper amount of data that will be send and received. Data send by the sender must not be large enough to overwhelm the receiver.

Now such a control over communication is very much important because we have networks of different speed communicating with each other.

TCP uses something called Sliding window Protocol for managing this flow control. Its working is quite simple to understand. Both receiver and the sender will inform each other about the amount of data it can accept. Now the thing is how is this information shared with each other. There is a field in each TCP segment that is send and received called as “receive window” (Please note that we are talking about segments, hence its in the Transport layer). The receiver will mention the amount of data that it can accept or say willing to accept in “receive window” field.

The sender on seeing the receive window size mentioned in the the segment sent by the receiver, will make a note of it. Now the sender cannot send more than the receive window size mentioned by the receiver until they are acknowledged. Once the acknowledgement is received, and a new receive window value is send by the receiver, the sender can now send next set of data (again only that amount of data which the receiver has mentioned in the receiver window size.)

If a receiver sends a receive window size of 0, the sender cannot send any more data till an acknowledgement is received for its previous sent data and a new receive window size is send by the receiver.

The sender cannot send any more data until and unless a new receive window size is send by the receiver.

There is always a limitation of what you can include in an IP packet or a TCP segment. The limitation is because of the standard size alloted to each field in a TCP segment, as defined in the protocol specification. TCP is not a very new technology, and was made at the time when networks were really slow compared to the high speed networks we have today.

Hence there was a need to modify or say include and modify some additional features as far as performance is concerned. Hence RFC 1323 was born. It contains details about performance improvements in TCP.

The limitation was that the maximum receive window size that can be included in a TCP frame is 65,535 bytes. Now that is a very low number, if you take todays network speed into consideration.

The new modification came up with something called as window scaling, that increases the limit of receive window size from 65535 bytes to a maximum of 1,073,725,440 bytes (which is very close to 1 Giga byte). To understand this more closely let’s dive into a little bit of calculation. This calculation is called as Bandwidth Delay Product.

Bandwidth Delay Product

The term bandwidth delay product in itself is quite self explanatory. Its the product of Bandwidth and Delay caused while communicating between two end points. Now let’s see what’s it.

The second value with which we will multiply the bandwidth is nothing but the delay caused in sending a packet and then getting an acknowledgement back. We saw how to determine that value in our Round Trip Time section.

Now if you have your bandwidth of 10Mbps, and has a RTT (Round Trip Time) of around 200ms for reaching your target receiver, then the Bandwidth delay product will be.

Bandwidth Delay Product = 2 x 10⁶  b/s x 200 x 10-3 s =  244.14Kilobytes

You can calculate Bandwidth delay product from the link shown below.

Calculate Bandwidth Delay Product

The bandwidth delay product result shows the amount of bytes that must be transmitted, to efficiently use the connection speed. However as our operating system has this default value of 65535 bytes (65 Kilobytes )window size, the connection is not at all efficiently used.

If you calculate 244.14 – 65 = 179 KiloBytes is left unused. So the more Round Trip Time you have the more data needs to be send to fully utilize the link speed(because more delay means you need to send a little bit more data at once, to utilize the bandwidth.). Bandwidth Delay product will go on increasing if the latency (Round Trip Time) is more.

Hence to solve this problem we need to use a higher window size. As mentioned before performance improvements were brought to TCP with a new modification in the form of RFC 1323. Increasing the window size for performance is implemented in the form of something called as TCP Window Scaling.

Using Window Scaling option in TCP will improve your network throughput and speed, if you have your Bandwidth Delay Product more than 65kilobytes.

Let’s go ahead and modify our Linux system’s TCP parameters, to by default use this option called TCP Window Scaling. As we discussed in the beginning of this article, enabling this option of window scaling is done by modifying sysctl.conf file.

?
1
net.ipv4.tcp_window_scaling = 1

Even after enabling window scaling option, the maximum amount of data that can be send to a receiver without getting an acknowledgement back depends on one more factor. Its called as receive window size. This is the maximum amount of data that a receiver can buffer before being processed by the receiving application.

Now if the receiver’s receive window size is smaller, even after setting up window scaling option the sender can only send maximum data size equal to the receive window size configured at the receiver end.

Hence we need to modify the receive window size to a bigger maximum value. This configuration is also made using sysctl.conf file, with the below option.

?
1
net.core.rmem_max = 16777216

Apart from receive window size, the sender must also have a higher value in the maximum send window size. You might be thinking why there is a requirement of fixed value of send and receive window size. This is because the sender must keep track of the bytes its sending till it gets an acknowledgment back. Because if the acknowledgement doesn’t come, then the sender has to resend the entire bytes (if its in buffer it can resend it. Hence this buffer data is not flushed until an acknowledgement comes.)

Modifying the maximum send window size, is also similar to the way we modified the maximum receive window size.

?
1
net.core.wmem_max = 16777216

Now other than the above mentioned maximum values of receive window size and send window size, there is one more setting that the operating system uses which sets these values for different conditions. Let’s see that option (this is also set in sysctl.conf file). Let’s see the receive window size values first.

?
1
net.ipv4.tcp_rmem = 4096 87380 16777216

There are three values in there.

  • The first value is the minimum amount of receive window that will be set to each TCP connection, even if the system is under extreme high pressure.
  • The default value allocated to each tcp connection
  • The third one is the maximum that can be allocated to a TCP connection

Please don’t forget the fact that we are using window scaling option, hence the window size will be dynamic and will go on increasing till the maximum receive window size reaches

Similarly there is send window settings, which is shown below. (The three values in send window settings also denote the three things we discussed above)

?
1
net.ipv4.tcp_wmem = 4096        16384   16777216

Hence all these things combined together our sysctl.conf file will look something like the below.

?
1
2
3
4
net.ipv4.tcp_window_scaling = 1
net.core.rmem_max = 16777216
net.ipv4.tcp_rmem = 4096 87380 16777216
net.ipv4.tcp_wmem = 4096        16384   16777216

Once you have modified your sysctl.conf file with the above required settings, you can reload the configuration and make it permanent, by the below command.

?
1
sysctl -p /etc/sysctl.conf

Alternatively you can also modify the above values on the fly, by redirecting your required values to the required file in /proc. This can be done as shown below.

?
1
echo '16777216' > /proc/sys/net/core/rmem_max
?
1
echo '16777216' > /proc/sys/net/core/wmem_max

Hope this article was helpful in understanding some concepts behind tuning of TCP in Linux.

Soft and Hard links Linux

Difference between symbolic link and hard link

(hard links can not be created for files on a different drive,  but soft link can)

What is the difference between symbolic link and hard link? Explaining the difference between a symbolic link or a symlink and a hard link is easy and vital to knowing about how Linux/Unix environments work.

Understanding the difference between a symbolic link and a hard link is also important for web server maintenance and understanding how modern websites work.

What is symbolic link or symlink?

Symbolic link, often called symlink or softlink, is very similar to what we know from Windows – a shortcut. They are kind of shortcuts in the Linux/Unix world. Well, symbolic link can exist in the Windows world too, but for the simplicity of our explanation, let’s just work with the comparison that symlink is kind of a shortcutfor now. We will get into more details later. Symbolic link contains information about the destination of the target file.

What is hard link?

Hard link (often also called hardlink) is a bit different object when compared to a symlink. Hard link is a directory reference or pointer to a file. Hardlink is a label stored in a directory structure that refers the operating system to the file data when it is accessed. The important part is that hard link is closely tied together with its originating file. If you make changes to a hard link, you automatically make changes to the underlying file that the hardlink is attached to.

Hard link can only refer to data that exists on the same file system.

Many of us are used to Windows where files live in folders. Files in Linux/Unix are not stored in directories. Files in Linux are assigned an inode number which Linux uses to locate files. Each file can have multiple hard links which are located in various directories. A file does not get deleted until there are no remaining hard links to it.

Differences between symbolic link and hard link

Let’s summarize our findings. The list bellow summarizes some differences between symlink and hard link:

  1. Hardlink or hardlinks cannot be created for directories (folders). Hard link can only be created for a file.
  2. Symbolic links or symlinks can link to a directory (folder).
  3. Removing the original file that your hard link points to does not remove the hardlink itself; the hardlink still provides the content of the underlying file.
  4. If you remove the hard link or the symlink itself, the original file will stay intact.
  5. Removing the original file does not remove the attached symbolic link or symlink, but without the original file, the symlink is useless (the same concept like Windows shortcut).

In case you are interested getting to know even more details, this list is expanded more on the the Mklink page. The concept is simply that hard links are tied to their sources more rigidly.

What is the difference between symlink and shortcut?

We mentioned that symlinks are like shortcuts. They are like shortcuts but with some small differences. Symbolic links are automatically resolved by the file system. Any software programs, upon accessing a symbolic link, will see the target instead, whether the program is aware of symbolic links or not. On the other hand, shortcuts are treated like ordinary files by the files system and by software programs that are not aware of them. Only software programs that understand shortcuts (such as Windows) treat shortcuts as references to other files. Shortcuts can point to files or directories that exist in another file system or on the network. The difference between symbolic link and shortcut is clearer from the example mentioned at the bottom of this article, respectively as shown in the big print screen on the Mklink page.

How to create a hard link or hardlink?

In Linux, you would use the ln command to create a hard link.

$ ln fileA fileB

where fileA is the original file and fileB is the name you want to give to the hardlink. Let’s do some research now. You have the original file and one hard link that is attached to it. Now, you look at these two objects with the ls command:

$ ls -il fileA fileB

You can see in the output of this command that both files fileA and fileB have the same inode number (the first number on the line). In addition to having the same inode, both files have the same file permissions and the same size. Because that size is reported for the same inode, we can see that a hard link does not occupy any extra space on your space.

If you now remove the original file and open the hard link, you will still be able to see the content of the original file.

Note, hard link cannot be created to a folder. If you try creating a hard link to a folder, you will get “Access denied.”

How to create a symlink?

Let’s demonstrate this with an example. When talking about Linux, you would use the ln command with the -s parameter. You would do something like:

$ ln -s fileA fileB

where fileA is the original file and fileB is the name you want to give to the symbolic link. Now, let’s take a look at these two objects with the ls command again:

$ ls -il fileA fileB

You can see that you get different result as compared to when we displayed the hard link. The first difference between symlink and the original file is the inode number. The inode is different for the original file and for the symbolic link. Next, you can also notice that there is the pipe symbol “l” before the permissions on the symlink line. Also, the symbolic link has different permissions than the original file (because it is just a symbolic link). The content of the symlink is just a string pointing to the original file. The size of the symlink is not the same as the size of the original file. The symbolic link is a separate entity and as such occupies some space on your hard drive. You can see at the end of the line where the symlink points to.

You can access the content of the original file directly by calling the original file or by calling the symbolic link. You will see the same result.

Now if you remove the original file, the symlink will still be there. If you try to access the content of the original file through the symbolic link after removing the original file, you will get a message saying there is no such file or directory.

Can I make a symlink to a hard link?

Yes. The hard link functions the same way like the original file; therefore, you can make symlinks to it. You would use in our example the following command:

$ ln -s fileB fileC

where fileB would be the name of the hard link, and fileC would be the name of your new symlink.

Difference between symlink and hard link in Windows?

There are not many differences between symbolic link and hard link in the concept; the concept is the same whether we are working with Linux or Windows; the difference between symlink and hardlink is in how you create them. When talking about MS Windows, you can create three things:

  • shortcut
  • hard link / hardlink
  • symbolic link / symlink

The Ultimate Linux Soft and Hard Link Guide (10 Ln Command Examples)

There are two types of links available in Linux — Soft Link and Hard Link.

Linux ln command is used to create either soft or hard links.

This article explains how to create soft link, how to create hard link, and various link tips and tricks with 10 practical examples.

$ ls -l
total 4
lrwxrwxrwx 1 chris chris 10 2010-09-17 23:40 file1 -> sample.txt
-rw-r--r-- 1 chris chris 22 2010-09-17 23:36 sample.txt

The 1st character in each and every line of the ls command output indicates one of the following file types. If the 1st character is l (lower case L), then it is a link file.

  • regular file
  • l link file
  • d directory
  • p pipe
  • c character special device
  • b block special device

1. What is Soft Link and Hard Link?

Soft Link

Linux OS recognizes the data part of this special file as a reference to another file path. The data in the original file can be accessed through the special file, which is called as Soft Link.

To create a soft link, do the following (ln command with -s option):

$ ln -s /full/path/of/original/file /full/path/of/soft/link/file

Hard Link

With Hard Link, more than one file name reference the same inode number. Once you create a directory, you would see the hidden directories “.” and “..” . In this, “.” directory is hard linked to the current directory and the “..” is hard linked to the parent directory.

When you use link files, it helps us to reduce the disk space by having single copy of the original file and ease the administration tasks as the modification in original file reflects in other places.

To create a hard link, do the following (ln command with no option):

$ ln /full/path/of/original/file /full/path/of/hard/link/file

2. Create Symbolic Link for File or Directory

Create a symbolic link for a File

The following examples creates a symbolic link library.so under /home/chris/lib, based on the library.so located under /home/chris/src/ directory.

$ cd /home/chris/lib 

$ ln -s /home/chris/src/library.so library.so

$ ls -l library.so
lrwxrwxrwx  1 chris chris       21 2010-09-18 07:23 library.so -> /home/chris/src/library.so

Create a symbolic link for a Directory

Just like file, you can create symbolic link for directories as shown below.

$ mkdir /home/chris/obj

$ cd tmp

$ ln -s /home/chris/obj objects

$ ls -l objects
lrwxrwxrwx 1 chris chris       6 2010-09-19 16:48 objects -> /home/chris/obj

Note: The inode of the original file/directory and the soft link should not be identical.

3. Create Hard Link for Files

The inode number for the hard linked files would be same. The hard link for files can be created as follows,

$ ln src_original.txt dst_link.txt

$ ls -i dst_link.txt
253564 dst_link.txt

$ ls -i src_original.txt
253564 src_original.txt

Note: Unix / Linux will not allow any user (even root) to create hard link for a directory.

4. Create Links Across Different Partitions

When you want to create the link across partitions, you are allowed to create only the symbolic links. Creating hard link across partitions is not allowed, as Unix can’t create/maintain same inode numbers across partitions.

You would see the “Invalid cross-device link” error when you are trying to create a hard link file across partitions.

# mount /dev/sda5 /mnt

# cd /mnt

# ls
main.c Makefile

# ln Makefile /tmp/Makefile
ln: creating hard link `/tmp/Makefile' to `Makefile': Invalid cross-device link

And the symbolic link can be created in the same way as we did in the above.

5. Backup the Target Files If it Already Exists

When you create a new link (if another file exist already with the same name as the new link name), you can instruct ln command to take a backup of the original file before creating the new link using the –backup option as shown below.

$ ls
ex1.c  ex2.c

$ ln --backup -s ex1.c ex2.c 

$ ls -lrt
total 8
-rw-r--r-- 1 chris chris 20 2010-09-19 16:57 ex1.c
-rw-r--r-- 1 chris chris 20 2010-09-19 16:57 ex2.c~
lrwxrwxrwx 1 chris chris  5 2010-09-19 17:02 ex2.c -> ex1.c

Note: If you don’t want the backup and overwrite the existing file then use -f option.

6. Create Link Using “No-Deference” ln Command Option

While creating a new soft link, normally OS would de-reference the destination path before it creates the new soft link.

Sometimes you might not want ln command to create the new link, if the destination path is already a symbolic link that is pointing to a directory.

Following examples shows a normal way of creating soft link inside a directory.

$ cd ~

$ mkdir example

$ ln -s /etc/passwd example

$ cd example/

$ ls -l
total 0
lrwxrwxrwx 1 root root 16 2010-09-19 17:24 passwd -> /etc/passwd

In case the “example” directory in the above code-snippet is a symbolic link pointing to some other directory (for example second-dir), the ln command shown will still create the link under second-dir. If you don’t want that to happen, use ln -n option as shown below.

$ cd ~

$ rm -rf example

$ mkdir second-dir

$ ln -s second-dir example

$ ln -n -s /etc/passwd example
ln: creating symbolic link `example': File exists

Note: In the above example, if you don’t use the -n option, the link will be created under ~/second-dir directory.

7. Create Link for Multiple Files at the Same Time

In the following example, there are two directories — first-dir and second-dir. The directory first-dir contains couple of C program files. If you want to create soft links for these files in second-dir, you’ll typically do it one by one. Instead, you can create soft list for multiple files together using -t option as shown below.

$ ls
first-dir second-dir

$ ls first-dir
ex1.c  ex2.c

$ cd second-dir

$ ln -s ../first-dir/*.c -t .

$ ls -l
total 0
lrwxrwxrwx 1 chris chris 14 2010-09-19 15:20 ex1.c -> ../first-dir/ex1.c
lrwxrwxrwx 1 chris chris 14 2010-09-19 15:20 ex2.c -> ../first-dir/ex2.c

Keep in mind that whenever you are creating link files with -t option, it is better to go into target directory and perform the link creation process. Otherwise, you would face the broken link files as shown below.

$ cd first-dir

$ ln -s *.c /home/chris/second-dir

$ cd /home/chris/second-dir
$ ls -l
total 0
lrwxrwxrwx 1 chris chris 5 2010-09-19 15:26 ex1.c -> ex1.c
lrwxrwxrwx 1 chris chris 5 2010-09-19 15:26 ex2.c -> ex2.c

Instead, you might also use actual path for source files to create the link properly.

8. Removing the Original File When a Soft Link is pointing to it

When the original file referred by a soft-link is deleted, the soft link will be broken as shown below.

$ ln -s file.txt /tmp/link

$ ls -l /tmp/link
lrwxrwxrwx 1 chris chris 9 2010-09-19 15:38 /tmp/link -> file1.txt

$ rm file.txt

$ ls -l /tmp/link
lrwxrwxrwx 1 chris chris 9 2010-09-19 15:38 /tmp/link -> file1.txt

9. Links Help You to Increase the Partition Size Virtually

Let us assume that you have two partitions – 5GB and 20GB. The first partition does not have too much free space available in it. If a program located on the first partition needs more space (For example, for it’s log file), you can use some of the space from the second partition by creating a link for the log files as shown below.

Consider that partition1 is mounted on /, and partition2 is mounted to /mnt/. Let us assume that the logs that are located on partition1 is running out of space, and you’ve decided to move them to partition2. You can achieve this as shown below.

$ mkdir /mnt/logs

$ cd /logs

$ mv * /mnt/logs

$ cd /; rmdir logs

$ ln -s /mnt/logs logs

10. Removing the Hard Linked Files

When you delete a file that is hard linked, you would be still able to access the content of the file until you have the last file which is hard linked to it, as shown in the example below.

Create a sample file.

$ vim src_original.txt
Created this file to test the hard link.

Create a hard link to the sample file.

$ ln src_original.txt dst_link.txt

Delete the original file.

$ rm src_original.txt

You can still access the original file content by using the hard link you created.

$ cat dst_link.txt
Created this file to test the hard link.

25 Useful Basic Commands of APT-GET and APT-CACHE for Package Management

This article explains how quickly you can learn to install, remove, update and search software packages usingapt-get and apt-cache commands from the command line. This article provides some useful commands that will help you to handle package management in Debian/Ubuntu based systems.

APT-GET and APT-CACHE Commands

What is apt-get?

The apt-get utility is a powerful and free package management command line program, that is used to work with Ubuntu’s APT (Advanced Packaging Tool) library to perform installation of new software packages, removing existing software packages, upgrading of existing software packages and even used to upgrading the entire operating system.

What is apt-cache?

The apt-cache command line tool is used for searching apt software package cache. In simple words, this tool is used to search software packages, collects information of packages and also used to search for what available packages are ready for installation on Debian or Ubuntu based systems.

APT-CACHE – 5 Useful Basic Commands

1. How Do I List All Available Packages?

To list all the available packages, type the following command.

$ apt-cache pkgnames
esseract-ocr-epo
pipenightdreams
mumudvb
tbb-examples
libsvm-java
libmrpt-hmtslam0.9
libboost-timer1.50-dev
kcm-touchpad
g++-4.5-multilib
...

2. How Do I Find Out Package Name and Description of Software?

To find out the package name and with it description before installing, use the ‘search‘ flag. Using “search” withapt-cache will display a list of matched packages with short description. Let’s say you would like to find out description of package ‘vsftpd‘, then command would be.

$ apt-cache search vsftpd
vsftpd - lightweight, efficient FTP server written for security
ccze - A robust, modular log coloriser
ftpd - File Transfer Protocol (FTP) server
yasat - simple stupid audit tool

To find and list down all the packages starting with ‘vsftpd‘, you could use the following command.

$ apt-cache pkgnames vsftpd
vsttpd

3. How Do I Check Package Information?

For example, if you would like to check information of package along with it short description say (version number, check sums, size, installed size, category etc). Use ‘show‘ sub command as shown below.

$ apt-cache show netcat
Package: netcat
Priority: optional
Section: universe/net
Installed-Size: 30
Maintainer: Ubuntu Developers <ubuntu-devel-discuss@lists.ubuntu.com>
Original-Maintainer: Ruben Molina <rmolina@udea.edu.co>
Architecture: all
Version: 1.10-40
Depends: netcat-traditional (>= 1.10-39)
Filename: pool/universe/n/netcat/netcat_1.10-40_all.deb
Size: 3340
MD5sum: 37c303f02b260481fa4fc9fb8b2c1004
SHA1: 0371a3950d6967480985aa014fbb6fb898bcea3a
SHA256: eeecb4c93f03f455d2c3f57b0a1e83b54dbeced0918ae563784e86a37bcc16c9
Description-en: TCP/IP swiss army knife -- transitional package
 This is a "dummy" package that depends on lenny's default version of
 netcat, to ease upgrades. It may be safely removed.
Description-md5: 1353f8c1d079348417c2180319bdde09
Bugs: https://bugs.launchpad.net/ubuntu/+filebug
Origin: Ubuntu

4. How Do I Check Dependencies for Specific Packages?

Use the ‘showpkg‘ sub command to check the dependencies for particular software packages. whether those dependencies packages are installed or not. For example, use the ‘showpkg‘ command along with package-name.

$ apt-cache showpkg vsftpd
Package: vsftpd
Versions: 
2.3.5-3ubuntu1 (/var/lib/apt/lists/in.archive.ubuntu.com_ubuntu_dists_quantal_main_binary-i386_Packages)
 Description Language: 
                 File: /var/lib/apt/lists/in.archive.ubuntu.com_ubuntu_dists_quantal_main_binary-i386_Packages
                  MD5: 81386f72ac91a5ea48f8db0b023f3f9b
 Description Language: en
                 File: /var/lib/apt/lists/in.archive.ubuntu.com_ubuntu_dists_quantal_main_i18n_Translation-en
                  MD5: 81386f72ac91a5ea48f8db0b023f3f9b

Reverse Depends: 
  ubumirror,vsftpd
  harden-servers,vsftpd
Dependencies: 
2.3.5-3ubuntu1 - debconf (18 0.5) debconf-2.0 (0 (null)) upstart-job (0 (null)) libc6 (2 2.15) libcap2 (2 2.10) libpam0g (2 0.99.7.1) libssl1.0.0 (2 1.0.0) libwrap0 (2 7.6-4~) adduser (0 (null)) libpam-modules (0 (null)) netbase (0 (null)) logrotate (0 (null)) ftp-server (0 (null)) ftp-server (0 (null)) 
Provides: 
2.3.5-3ubuntu1 - ftp-server 
Reverse Provides:

5. How Do I Check statistics of Cache

The ‘stats‘ sub command will display overall statistics about the cache. For example, the following command will display Total package names is the number of packages have found in the cache.

$ apt-cache stats
Total package names: 51868 (1,037 k)
Total package structures: 51868 (2,490 k)
  Normal packages: 39505
  Pure virtual packages: 602
  Single virtual packages: 3819
  Mixed virtual packages: 1052
  Missing: 6890
Total distinct versions: 43015 (2,753 k)
Total distinct descriptions: 81048 (1,945 k)
Total dependencies: 252299 (7,064 k)
Total ver/file relations: 45567 (729 k)
Total Desc/File relations: 81048 (1,297 k)
Total Provides mappings: 8228 (165 k)
Total globbed strings: 286 (3,518 )
Total dependency version space: 1,145 k
Total slack space: 62.6 k
Total space accounted for: 13.3 M
APT-GET – 20 Useful Basic Commands for Package Management

6. How to Update System Packages

The ‘update‘ command is used to resynchronize the package index files from the their sources specified in/etc/apt/sources.list file. The update command fetched the packages from their locations and update the packages to newer version.

repo

$ sudo apt-get update
[sudo] password for tecmint: 
Ign http://security.ubuntu.com quantal-security InRelease                      
Get:1 http://security.ubuntu.com quantal-security Release.gpg [933 B]          
Get:2 http://security.ubuntu.com quantal-security Release [49.6 kB]            
Ign http://in.archive.ubuntu.com quantal InRelease                             
Ign http://in.archive.ubuntu.com quantal-updates InRelease                     
Get:3 http://repo.varnish-cache.org precise InRelease [13.7 kB]                
Ign http://in.archive.ubuntu.com quantal-backports InRelease                   
Hit http://in.archive.ubuntu.com quantal Release.gpg                           
Get:4 http://security.ubuntu.com quantal-security/main Sources [34.8 kB]       
Get:5 http://in.archive.ubuntu.com quantal-updates Release.gpg [933 B]         
...

7. How to Upgrade Software Packages

The ‘upgrade‘ command is used to upgrade all the currently installed software packages on the system. Under any circumstances currently installed packages are not removed or packages which are not already installed neither retrieved and installed to satisfy upgrade dependencies.

$ sudo apt-get upgrade
Reading package lists... Done
Building dependency tree       
Reading state information... Done
The following packages have been kept back:
  linux-headers-generic linux-image-generic wine1.5 wine1.5-i386
The following packages will be upgraded:
  activity-log-manager-common activity-log-manager-control-center adium-theme-ubuntu alacarte
  alsa-base app-install-data-partner appmenu-gtk appmenu-gtk3 apport apport-gtk apt
  apt-transport-https apt-utils aptdaemon aptdaemon-data at-spi2-core bamfdaemon base-files bind9-host
   ...

However, if you want to upgrade, unconcerned of whether software packages will be added or removed to fulfill dependencies, use the ‘dist-upgrade‘ sub command.

$ sudo apt-get dist-upgrade

8. How Do I Install or Upgrade Specific Packages?

The ‘install‘ sub command is tracked by one or more packages wish for installation or upgrading.

$ sudo apt-get install netcat
Reading package lists... Done
Building dependency tree       
Reading state information... Done
The following extra packages will be installed:
  netcat-traditional
The following NEW packages will be installed:
  netcat netcat-traditional
0 upgraded, 2 newly installed, 0 to remove and 328 not upgraded.
Need to get 67.1 kB of archives.
After this operation, 186 kB of additional disk space will be used.
Do you want to continue [Y/n]? y
Get:1 http://in.archive.ubuntu.com/ubuntu/ quantal/universe netcat-traditional i386 1.10-40 [63.8 kB]
Get:2 http://in.archive.ubuntu.com/ubuntu/ quantal/universe netcat all 1.10-40 [3,340 B]
Fetched 67.1 kB in 1s (37.5 kB/s)
Selecting previously unselected package netcat-traditional.
(Reading database ... 216118 files and directories currently installed.)
Unpacking netcat-traditional (from .../netcat-traditional_1.10-40_i386.deb) ...
Selecting previously unselected package netcat.
Unpacking netcat (from .../netcat_1.10-40_all.deb) ...
Processing triggers for man-db ...
Setting up netcat-traditional (1.10-40) ...
Setting up netcat (1.10-40) ...

9. How I can Install Multiple Packages?

You can add more than one package name along with the command in order to install multiple packages at the same time. For example, the following command will install packages ‘nethogs‘ and ‘goaccess‘.

$ sudo apt-get install nethogs goaccess
Reading package lists... Done
Building dependency tree       
Reading state information... Done
goaccess is already the newest version.
nethogs is already the newest version.
0 upgraded, 0 newly installed, 0 to remove and 328 not upgraded.

10. How to Install Several Packages using Wildcard

With the help of regular expression you can add several packages with one string. For example, we use *wildcard to install several packages that contains the ‘*name*‘ string, name would be ‘package-name’.

$ sudo apt-get install '*name*'

11. How to install Packages without Upgrading

Using sub ‘–no-upgrade‘ command will prevent already installed packages from upgrading.

$ sudo apt-get install packageName --no-upgrade
Reading package lists... Done
Building dependency tree       
Reading state information... Done
Skipping vsftpd, it is already installed and upgrade is not set.
0 upgraded, 0 newly installed, 0 to remove and 328 not upgraded.

12. How to Upgrade Only Specific Packages

The ‘–only-upgrade‘ command do not install new packages but it only upgrade the already installed packages and disables new installation of packages.

$ sudo apt-get install packageName --only-upgrade
Reading package lists... Done
Building dependency tree       
Reading state information... Done
vsftpd is already the newest version.
0 upgraded, 0 newly installed, 0 to remove and 328 not upgraded.

13. How Do I Install Specific Package Version?

Let’s say you wish to install only specific version of packages, simply use the ‘=‘ with the package-name and append desired version.

$ sudo apt-get install vsftpd=2.3.5-3ubuntu1
Reading package lists... Done
Building dependency tree       
Reading state information... Done
vsftpd is already the newest version.
0 upgraded, 0 newly installed, 0 to remove and 328 not upgraded.

14. How Do I Remove Packages Without Configuration

To un-install software packages without removing their configuration files (for later re-use the same configuration). Use the ‘remove‘ command as shown.

$ sudo apt-get remove vsftpd
[sudo] password for tecmint: 
Reading package lists... Done
Building dependency tree       
Reading state information... Done
The following packages will be REMOVED:
  vsftpd
0 upgraded, 0 newly installed, 1 to remove and 328 not upgraded.
After this operation, 364 kB disk space will be freed.
Do you want to continue [Y/n]? y
(Reading database ... 216156 files and directories currently installed.)
Removing vsftpd ...
vsftpd stop/waiting
Processing triggers for ureadahead ...
Processing triggers for man-db ...

15. How Do I Completely Remove Packages

To remove software packages including their configuration files, use the ‘purge‘ sub command as shown below.

$ sudo apt-get purge vsftpd
Reading package lists... Done
Building dependency tree       
Reading state information... Done
The following packages will be REMOVED:
  vsftpd*
0 upgraded, 0 newly installed, 1 to remove and 328 not upgraded.
After this operation, 0 B of additional disk space will be used.
Do you want to continue [Y/n]? y
(Reading database ... 216107 files and directories currently installed.)
Removing vsftpd ...
Purging configuration files for vsftpd ...
Processing triggers for ureadahead ...

Alternatively, you can combine both the commands together as shown below.

$ sudo apt-get remove --purge vsftpd
Reading package lists... Done
Building dependency tree       
Reading state information... Done
The following packages will be REMOVED:
  vsftpd*
0 upgraded, 0 newly installed, 1 to remove and 328 not upgraded.
After this operation, 364 kB disk space will be freed.
Do you want to continue [Y/n]? y
(Reading database ... 216156 files and directories currently installed.)
Removing vsftpd ...
vsftpd stop/waiting
Purging configuration files for vsftpd ...
Processing triggers for ureadahead ...
Processing triggers for man-db ...

16. How I Can Clean Up Disk Space

The ‘clean‘ command is used to free up the disk space by cleaning retrieved (downloaded) .deb files (packages) from the local repository.

$ sudo apt-get clean

17. How Do I Download Only Source Code of Package

To download only source code of particular package, use the option ‘–download-only source‘ with ‘package-name’ as shown.

$ sudo apt-get --download-only source vsftpd
Reading package lists... Done
Building dependency tree       
Reading state information... Done
Need to get 220 kB of source archives.
Get:1 http://in.archive.ubuntu.com/ubuntu/ quantal/main vsftpd 2.3.5-3ubuntu1 (dsc) [1,883 B]
Get:2 http://in.archive.ubuntu.com/ubuntu/ quantal/main vsftpd 2.3.5-3ubuntu1 (tar) [188 kB]
Get:3 http://in.archive.ubuntu.com/ubuntu/ quantal/main vsftpd 2.3.5-3ubuntu1 (diff) [30.5 kB]
Fetched 220 kB in 4s (49.1 kB/s)
Download complete and in download only mode

18. How Can I Download and Unpack a Package

To download and unpack source code of a package to a specific directory, type the following command.

$ sudo apt-get source vsftpd
Reading package lists... Done
Building dependency tree       
Reading state information... Done
Need to get 220 kB of source archives.
Get:1 http://in.archive.ubuntu.com/ubuntu/ quantal/main vsftpd 2.3.5-3ubuntu1 (dsc) [1,883 B]
Get:2 http://in.archive.ubuntu.com/ubuntu/ quantal/main vsftpd 2.3.5-3ubuntu1 (tar) [188 kB]
Get:3 http://in.archive.ubuntu.com/ubuntu/ quantal/main vsftpd 2.3.5-3ubuntu1 (diff) [30.5 kB]
Fetched 220 kB in 1s (112 kB/s)  
gpgv: Signature made Thursday 24 May 2012 02:35:09 AM IST using RSA key ID 2C48EE4E
gpgv: Can't check signature: public key not found
dpkg-source: warning: failed to verify signature on ./vsftpd_2.3.5-3ubuntu1.dsc
dpkg-source: info: extracting vsftpd in vsftpd-2.3.5
dpkg-source: info: unpacking vsftpd_2.3.5.orig.tar.gz
dpkg-source: info: unpacking vsftpd_2.3.5-3ubuntu1.debian.tar.gz
dpkg-source: info: applying 01-builddefs.patch
dpkg-source: info: applying 02-config.patch
dpkg-source: info: applying 03-db-doc.patch
dpkg-source: info: applying 04-link-local.patch
dpkg-source: info: applying 05-whitespaces.patch
dpkg-source: info: applying 06-greedy.patch
dpkg-source: info: applying 07-utf8.patch
dpkg-source: info: applying 08-manpage.patch
dpkg-source: info: applying 09-s390.patch
dpkg-source: info: applying 10-remote-dos.patch
dpkg-source: info: applying 11-alpha.patch
dpkg-source: info: applying 09-disable-anonymous.patch
dpkg-source: info: applying 12-ubuntu-use-snakeoil-ssl.patch

19. How Can I Download, Unpack and Compile a Package

You can also download, unpack and compile the source code at the same time, using option ‘–compile‘ as shown below.

$ sudo apt-get --compile source goaccess
[sudo] password for tecmint: 
Reading package lists... Done
Building dependency tree       
Reading state information... Done
Need to get 130 kB of source archives.
Get:1 http://in.archive.ubuntu.com/ubuntu/ quantal/universe goaccess 1:0.5-1 (dsc) [1,120 B]
Get:2 http://in.archive.ubuntu.com/ubuntu/ quantal/universe goaccess 1:0.5-1 (tar) [127 kB]
Get:3 http://in.archive.ubuntu.com/ubuntu/ quantal/universe goaccess 1:0.5-1 (diff) [2,075 B]
Fetched 130 kB in 1s (68.0 kB/s)
gpgv: Signature made Tuesday 26 June 2012 09:38:24 AM IST using DSA key ID A9FD4821
gpgv: Can't check signature: public key not found
dpkg-source: warning: failed to verify signature on ./goaccess_0.5-1.dsc
dpkg-source: info: extracting goaccess in goaccess-0.5
dpkg-source: info: unpacking goaccess_0.5.orig.tar.gz
dpkg-source: info: unpacking goaccess_0.5-1.debian.tar.gz
dpkg-buildpackage: source package goaccess
dpkg-buildpackage: source version 1:0.5-1
dpkg-buildpackage: source changed by Chris Taylor <ctaylor@debian.org>
dpkg-buildpackage: host architecture i386
 dpkg-source --before-build goaccess-0.5
dpkg-checkbuilddeps: Unmet build dependencies: debhelper (>= 9) autotools-dev libncurses5-dev libglib2.0-dev libgeoip-dev autoconf
dpkg-buildpackage: warning: build dependencies/conflicts unsatisfied; aborting
dpkg-buildpackage: warning: (Use -d flag to override.)
...

20. How Do I Download a Package Without Installing

Using ‘download‘ option, you can download any given package without installing it. For example, the following command will only download ‘nethogs‘ package to current working directory.

$ sudo apt-get download nethogs
Get:1 Downloading nethogs 0.8.0-1 [27.1 kB]
Fetched 27.1 kB in 3s (7,506 B/s)

21. How Do I Check Change Log of Package?

The ‘changelog‘ flag downloads a package change-log and shows the package version that is installed.

$ sudo apt-get changelog vsftpd
vsftpd (2.3.5-3ubuntu1) quantal; urgency=low

  * Merge from Debian testing (LP: #1003644).  Remaining changes:
    + debian/vsftpd.upstart: migrate vsftpd to upstart.
    + Add apport hook (LP: #513978):
      - debian/vsftpd.apport: Added.
      - debian/control: Build-depends on dh-apport.
      - debian/rules: Add --with apport.
    + Add debian/watch file.
    + debian/patches/09-disable-anonymous.patch: Disable anonymous login
      by default. (LP: #528860)
  * debian/patches/12-ubuntu-us-snakeoil-ssl.patch: Use snakeoil SSL
    certificates and key.

 -- Andres Rodriguez <andreserl@ubuntu.com>  Wed, 23 May 2012 16:59:36 -0400
...

22. How Do I Check Broken Dependencies?

The ‘check‘ command is a diagnostic tool. It used to update package cache and checks for broken dependencies.

$ sudo apt-get check
[sudo] password for tecmint: 
Reading package lists... Done
Building dependency tree       
Reading state information... Done

23. How Do I Search and Build Dependencies?

This ‘build-dep‘ command searches the local repositories in the system and install the build dependencies for package. If the package does not exists in the local repository it will return an error code.

$ sudo apt-get build-dep netcat
The following NEW packages will be installed:
  debhelper dh-apparmor html2text po-debconf quilt
0 upgraded, 5 newly installed, 0 to remove and 328 not upgraded.
Need to get 1,219 kB of archives.
After this operation, 2,592 kB of additional disk space will be used.
Do you want to continue [Y/n]? y
Get:1 http://in.archive.ubuntu.com/ubuntu/ quantal/main html2text i386 1.3.2a-15build1 [91.4 kB]
Get:2 http://in.archive.ubuntu.com/ubuntu/ quantal/main po-debconf all 1.0.16+nmu2ubuntu1 [210 kB]
Get:3 http://in.archive.ubuntu.com/ubuntu/ quantal/main dh-apparmor all 2.8.0-0ubuntu5 [9,846 B]
Get:4 http://in.archive.ubuntu.com/ubuntu/ quantal/main debhelper all 9.20120608ubuntu1 [623 kB]
Get:5 http://in.archive.ubuntu.com/ubuntu/ quantal/main quilt all 0.60-2 [285 kB]
Fetched 1,219 kB in 4s (285 kB/s)
...

24. How I Can Auto clean Apt-Get Cache?

The ‘autoclean‘ command deletes all .deb files from /var/cache/apt/archives to free-up significant volume of disk space.

$ sudo apt-get autoclean
Reading package lists... Done
Building dependency tree       
Reading state information... Done

25. How I Can Auto remove Installed Packages?

The ‘autoremove‘ sub command is used to auto remove packages that were certainly installed to satisfy dependencies for other packages and but they were now no longer required. For example, the following command will remove an installed package with its dependencies.

$ sudo apt-get autoremove vsftpd
Reading package lists... Done
Building dependency tree       
Reading state information... Done
Package 'vsftpd' is not installed, so not removed
0 upgraded, 0 newly installed, 0 to remove and 328 not upgraded.

I’ve covered most of the available options with apt-get and apt-cache commands, but still there are more options available, you can check them out using ‘man apt-get‘ or ‘man apt-cache‘ from the terminal. I hope you enjoyed reading this article, If I’ve missed anything and you would like me to add to the list. Please feel free to mention in the comment below.

How To Manage Packages Using apt-get, apt-cache, apt-file and dpkg Commands ( With 13 Practical Examples )

Debian based systems (including Ubuntu) uses apt-* commands for managing packages from the command line.

In this article, using Apache 2 installation as an example, let us review how to use apt-* commands to view, install, remove, or upgrade packages.

1. apt-cache search: Search Repository Using Package Name

If you are installing Apache 2, you may guess that the package name is apache2.  To verify whether it is a valid package name, you may want to search the repository for that particular package name as shown below.

The following example shows how to search the repository for a specific package name.

$ apt-cache search ^apache2$
apache2 - Apache HTTP Server metapackage

2. apt-cache search: Search Repository Using Package Description

If you don’t know the exact name of the package, you can still search using the package description as shown below.

$ apt-cache search "Apache HTTP Server"
apache2 - Apache HTTP Server metapackage
apache2-doc - Apache HTTP Server documentation
apache2-mpm-event - Apache HTTP Server - event driven model
apache2-mpm-prefork - Apache HTTP Server - traditional non-threaded model
apache2-mpm-worker - Apache HTTP Server - high speed threaded model
apache2.2-common - Apache HTTP Server common files

3. apt-file search: Search Repository Using a Filename from the Package

Sometimes you may know the configuration file name (or) the executable name from the package that you would like to install.

The following example shows that apache2.conf file is part of the apache2.2-common package. Search the repository with a configuration file name using apt-file command as shown below.

$ apt-file search apache2.conf
apache2.2-common: /etc/apache2/apache2.conf
apache2.2-common: /usr/share/doc/apache2.2-common/examples/apache2/apache2.conf.gz

4. apt-cache show: Basic Information About a Package

Following example displays basic information about apache2 package.

$ apt-cache show apache2
Package: apache2
Priority: optional
Maintainer: Ubuntu Core Developers
Original-Maintainer: Debian Apache Maintainers
Version: 2.2.11-2ubuntu2.3
Depends: apache2-mpm-worker (>= 2.2.11-2ubuntu2.3)
 | apache2-mpm-prefork (>= 2.2.11-2ubuntu2.3)
 | apache2-mpm-event (>= 2.2.11-2ubuntu2.3)
Filename: pool/main/a/apache2/apache2_2.2.11-2ubuntu2.3_all.deb
Size: 46350
Description: Apache HTTP Server metapackage
 The Apache Software Foundation's goal is to build a secure, efficient and
 extensible HTTP server as standards-compliant open source software.
Homepage: http://httpd.apache.org/

5. apt-cache showpkg: Detailed Information About a Package

“apt-cache show” displays basic information about a package. Use “apt-cache showpkg” to display detailed information about a package as shown below.

$ apt-cache showpkg apache2
Package: apache2
Versions:
2.2.11-2ubuntu2.3 (/var/lib/apt/lists/us.archive.ubuntu.com_ubuntu_dists_jaunty-updates_main_binary-i386_Packages) (/var/lib/apt/lists/security.ubuntu.com_ubuntu_dists_jaunty-security_main_binary-i386_Packages)
 Description Language:
                 File: /var/lib/apt/lists/us.archive.ubuntu.com_ubuntu_dists_jaunty-updates_main_binary-i386_Packages
                  MD5: d24f049cd70ccfc178dd8974e4b1ed01
Reverse Depends:
  squirrelmail,apache2
  squid3-cgi,apache2
  phpmyadmin,apache2
  mahara-apache2,apache2
  ipplan,apache2
Dependencies:
  2.2.11-2ubuntu2.3 - apache2-mpm-worker (18 2.2.11-2ubuntu2.3) apache2-mpm-prefork (18 2.2.11-2ubuntu2.3) apache2-mpm-event (2 2.2.11-2ubuntu2.3)
  2.2.11-2ubuntu2 - apache2-mpm-worker (18 2.2.11-2ubuntu2) apache2-mpm-prefork (18 2.2.11-2ubuntu2) apache2-mpm-event (2 2.2.11-2ubuntu2)
Provides:
  2.2.11-2ubuntu2.3 -
  2.2.11-2ubuntu2 -
Reverse Provides:
  apache2-mpm-itk 2.2.6-02-1build4.3
  apache2-mpm-worker 2.2.11-2ubuntu2.3
  apache2-mpm-prefork 2.2.11-2ubuntu2.3
  apache2-mpm-prefork 2.2.11-2ubuntu2
  apache2-mpm-event 2.2.11-2ubuntu2

6. apt-file list: List all the Files Located Inside a Package

Use “apt-file list” to display all the files located inside the apache2 package as shown below.

$ apt-file list apache2 | more
apache2: /usr/share/bug/apache2/control
apache2: /usr/share/bug/apache2/script
apache2: /usr/share/doc/apache2/NEWS.Debian.gz
apache2: /usr/share/doc/apache2/README.Debian.gz
apache2: /usr/share/doc/apache2/changelog.Debian.gz
...

7. apt-cache depends: List all Dependent Packages

Before installation, if you like to view all the dependent packages, use “apt-cache depends” as shown below.

$ apt-cache depends apache2
apache2
 |Depends: apache2-mpm-worker
 |Depends: apache2-mpm-prefork
  Depends: apache2-mpm-event

8. dpkg -l: Is the Package Already Installed?

Before installing a package, you may want to make sure it is not already installed as shown below using dpkg -l command.

$ dpkg -l | grep -i apache

9. apt-get install: Install a Package

Finally, install the package using “apt-get install” as shown below.

$ sudo apt-get install apache2
[sudo] password for ramesh: 

The following NEW packages will be installed:
  apache2 apache2-mpm-worker apache2-utils apache2.2-common libapr1
  libaprutil1 libpq5

0 upgraded, 7 newly installed, 0 to remove and 26 not upgraded.

10. dpkg -l : Verify Whether the Package got Successfully Installed

After installing the package, use “dpkg -l” to make sure it got installed successfully.

$ dpkg -l | grep apache
ii  apache2             2.2.11-2ubuntu2.3  Apache HTTP Server metapackage
ii  apache2-mpm-worker  2.2.11-2ubuntu2.3  Apache HTTP Server - high speed threaded mod
ii  apache2-utils       2.2.11-2ubuntu2.3  utility programs for webservers
ii  apache2.2-common    2.2.11-2ubuntu2.3  Apache HTTP Server common files

11. apt-get remove: Delete a Package

Use “apt-get purge” or “apt-get remove” to delete a package as shown below.

$ sudo apt-get purge apache2

(or)

$ sudo apt-get remove apache2

The following packages were automatically installed and are no longer required:
  apache2-utils linux-headers-2.6.28-11 libapr1 apache2.2-common
  linux-headers-2.6.28-11-generic apache2-mpm-worker libpq5 libaprutil1

Use 'apt-get autoremove' to remove them.
The following packages will be REMOVED:
  apache2
0 upgraded, 0 newly installed, 1 to remove and 26 not upgraded.
Removing apache2 ...
  • apt-get remove will not delete the configuration files of the package
  • apt-get purge will delete the configuration files of the package

12. apt-get -u install: Upgrade a Specific Package

The following example shows how to upgrade one specific package.

$ sudo apt-get -u install apache2
Reading package lists... Done
Building dependency tree
Reading state information... Done
apache2 is already the newest version.
The following packages were automatically installed and are no longer required:
  linux-headers-2.6.28-11 linux-headers-2.6.28-11-generic
Use 'apt-get autoremove' to remove them.
0 upgraded, 0 newly installed, 0 to remove and 26 not upgraded.

13. apt-get -u upgrade: Upgrade all Packages

To upgrade all the packages to it’s latest version, use “apt-get -u upgrade” as shown below.

$ sudo apt-get -u upgrade
The following packages will be upgraded:
  libglib2.0-0 libglib2.0-data libicu38 libsmbclient libwbclient0
  openoffice.org-base-core openoffice.org-calc openoffice.org-common
  openoffice.org-core openoffice.org-draw openoffice.org-emailmerge
  openoffice.org-gnome openoffice.org-gtk openoffice.org-impress
  openoffice.org-math openoffice.org-style-human openoffice.org-writer
  python-uno samba-common smbclient ttf-opensymbol tzdata
26 upgraded, 0 newly installed, 0 to remove and 0 not upgraded.

dpkg and dpkg-reconfigure commands

15 Practical Examples of “dpkg commands” for Debian Based Distros

Debian GNU/Linux, the mother Operating System of a number of Linux distributions including Knoppix, Kali,Ubuntu, Mint, etc. uses various package Manager like dpkg, apt, aptitude, synaptic, tasksel, deselect, dpkg-deband dpkg-split.

dpkg Command Examples

We will be describing each of these briefly before focusing on ‘dpkg‘ command.

APT Command

Apt stands for Advanced Package Tool. It doesn’t deal with ‘deb‘ package and works directly, but works with ‘deb‘ archive from the location specified in the “/etc/apt/sources.list” file.

Read More : 25 Useful Basic Commands of APT-GET Commands

Aptitude

Aptitude is a text based package manager for Debian which is front-end to ‘apt‘, which enables user to manage packages easily.

Synaptic

Graphical package manager which makes it easy to install, upgrade and uninstall packages even to novice.

Tasksel

Tasksel lets the user to install all the relevant packages related to a specific task, viz., Desktop-environment.

Deselect

A menu-driven package management tool, initially used during the first time install and now is replaced withaptitude.

Dpkg-deb

Interacts with Debian archive.

Dpkg-split

Useful in splitting and merging large file into chunks of small files to be stored on media of smaller size likefloppy-disk.

Dpkg Command

dpkg is the main package management program in Debian and Debian based System. It is used to install, build,remove, and manage packages. Aptitude is the primary front-end to dpkg.

Some the most commonly used dpkg commands along with their usages are listed here:

1. Install a Package

For installing an “.deb” package, use the command with “-i” option. For example, to install an “.deb” package called “flashpluginnonfree_2.8.2+squeeze1_i386.deb” use the following command.

[root@tecmint~]# dpkg -i flashpluginnonfree_2.8.2+squeeze1_i386.deb
Selecting previously unselected package flashplugin-nonfree.
(Reading database ... 465729 files and directories currently installed.)
Unpacking flashplugin-nonfree (from flashplugin-nonfree_3.2_i386.deb) ...
Setting up flashplugin-nonfree (1:3.2) ...
--2013-10-01 16:23:40--  http://fpdownload.macromedia.com/get/flashplayer/pdc/11.2.202.310/install_flash_player_11_linux.i386.tar.gz
Resolving fpdownload.macromedia.com (fpdownload.macromedia.com)... 23.64.66.70
Connecting to fpdownload.macromedia.com (fpdownload.macromedia.com)|23.64.66.70|:80... connected.
HTTP request sent, awaiting response... 200 OK
Length: 6923724 (6.6M) [application/x-gzip]
Saving to: ‘/tmp/flashplugin-nonfree.FPxQ4l02fL/install_flash_player_11_linux.i386.tar.gz’

2. List all the installed Packages

To view and list all the installed packages, use the “-l” option along with the command.

[root@tecmint~]# dpkg -l
Desired=Unknown/Install/Remove/Purge/Hold
| Status=Not/Inst/Conf-files/Unpacked/halF-conf/Half-inst/trig-aWait/Trig-pend
|/ Err?=(none)/Reinst-required (Status,Err: uppercase=bad)
||/ Name                                   Version                  Architecture    Description
+++-======================================-========================-===============================================================================
ii  accerciser                             3.8.0-0ubuntu1           all             interactive Python accessibility explorer for the GNOME desktop
ii  account-plugin-aim                     3.6.4-0ubuntu4.1         i386            Messaging account plugin for AIM
ii  account-plugin-facebook                0.10bzr13.03.26-0ubuntu1 i386            GNOME Control Center account plugin for single signon - facebook
ii  account-plugin-flickr                  0.10bzr13.03.26-0ubuntu1 i386            GNOME Control Center account plugin for single signon - flickr
ii  account-plugin-generic-oauth           0.10bzr13.03.26-0ubuntu1 i386            GNOME Control Center account plugin for single signon - generic OAuth
ii  account-plugin-google                  0.10bzr13.03.26-0ubuntu1 i386            GNOME Control Center account plugin for single signon
rc  account-plugin-identica                0.10bzr13.03.26-0ubuntu1 i386            GNOME Control Center account plugin for single signon - identica
ii  account-plugin-jabber                  3.6.4-0ubuntu4.1         i386            Messaging account plugin for Jabber/XMPP
....

To view a specific package installed or not use the option “-l” along with package-name. For example, check whether apache2 package installed or not.

[root@tecmint~]# dpkg -l apache2
Desired=Unknown/Install/Remove/Purge/Hold
| Status=Not/Inst/Conf-files/Unpacked/halF-conf/Half-inst/trig-aWait/Trig-pend
|/ Err?=(none)/Reinst-required (Status,Err: uppercase=bad)
||/ Name                                   Version                  Architecture    Description
+++-======================================-========================-==============================================
ii  apache2                                2.2.22-6ubuntu5.1        i386            Apache HTTP Server metapackage

3. Remove a Package

To remove the “.deb” package, we must specify the package name “flashpluginnonfree“, not the original name “flashplugin-nonfree_3.2_i386.deb“. The “-r” option is used to remove/uninstall a package.

[root@tecmint~]# dpkg -r flashpluginnonfree
(Reading database ... 142891 files and directories currently installed.) 
Removing flashpluginnonfree ... 
Processing triggers for man-db ... 
Processing triggers for menu ... 
Processing triggers for desktop-file-utils ... 
Processing triggers for gnome-menus ...

You can also use ‘p‘ option in place of ‘r’ which will remove the package along with configuration file. The ‘r‘ option will only remove the package and not configuration files.

[root@tecmint~]# dpkg -P flashpluginnonfree

4. View the Content of a Package

To view the content of a particular package, use the “-c” option as shown. The command will display the contents of a “.deb” package in long-list format.

[root@tecmint~]# dpkg -c flashplugin-nonfree_3.2_i386.deb
drwxr-xr-x root/root         0 2012-12-14 22:54 ./
drwxr-xr-x root/root         0 2012-12-14 22:54 ./usr/
drwxr-xr-x root/root         0 2012-12-14 22:54 ./usr/bin/
drwxr-xr-x root/root         0 2012-12-14 22:54 ./usr/lib/
drwxr-xr-x root/root         0 2012-12-14 22:54 ./usr/lib/mozilla/
drwxr-xr-x root/root         0 2012-12-14 22:54 ./usr/lib/mozilla/plugins/
drwxr-xr-x root/root         0 2012-12-14 22:54 ./usr/lib/flashplugin-nonfree/
-rw-r--r-- root/root      3920 2009-09-09 22:51 ./usr/lib/flashplugin-nonfree/pubkey.asc
drwxr-xr-x root/root         0 2012-12-14 22:54 ./usr/share/
drwxr-xr-x root/root         0 2012-12-14 22:54 ./usr/share/man/
drwxr-xr-x root/root         0 2012-12-14 22:54 ./usr/share/man/man8/
-rw-r--r-- root/root       716 2012-12-14 22:54 ./usr/share/man/man8/update-flashplugin-nonfree.8.gz
drwxr-xr-x root/root         0 2012-12-14 22:54 ./usr/share/applications/
drwxr-xr-x root/root         0 2012-12-14 22:54 ./usr/share/icons/
drwxr-xr-x root/root         0 2012-12-14 22:54 ./usr/share/icons/hicolor/
drwxr-xr-x root/root         0 2012-12-14 22:54 ./usr/share/icons/hicolor/24x24/
....

5. Check a Package is installed or not

Using “-s” option with package name, will display whether an deb package installed or not.

[root@tecmint~]# dpkg -s flashplugin-nonfree
Package: flashplugin-nonfree
Status: install ok installed
Priority: optional
Section: contrib/web
Installed-Size: 177
Maintainer: Bart Martens <bartm@debian.org>
Architecture: i386
Version: 1:3.2
Replaces: flashplugin (<< 6) Depends: debconf | debconf-2.0, wget, gnupg, libatk1.0-0, libcairo2, libfontconfig1, libfreetype6, libgcc1, libglib2.0-0, libgtk2.0-0 (>= 2.14), libnspr4, libnss3, libpango1.0-0, libstdc++6, libx11-6, libxext6, libxt6, libcurl3-gnutls, binutils
Suggests: iceweasel, konqueror-nsplugins, ttf-mscorefonts-installer, ttf-dejavu, ttf-xfree86-nonfree, flashplugin-nonfree-extrasound, hal
Conflicts: flashplayer-mozilla, flashplugin (<< 6), libflash-mozplugin, xfs (<< 1:1.0.1-5)
Description: Adobe Flash Player - browser plugin
...

6. Check the location of Packages installed

To list location of files to be installed to your system from package-name.

[root@tecmint~]# dpkg -L flashplugin-nonfree
/.
/usr
/usr/bin
/usr/lib
/usr/lib/mozilla
/usr/lib/mozilla/plugins
/usr/lib/flashplugin-nonfree
/usr/lib/flashplugin-nonfree/pubkey.asc
/usr/share
/usr/share/man
/usr/share/man/man8
/usr/share/man/man8/update-flashplugin-nonfree.8.gz
/usr/share/applications
/usr/share/icons
/usr/share/icons/hicolor
...

7. Install all Packages from a Directory

Recursively, install all the regular files matching pattern “*.deb” found at specified directories and all of its subdirectories. This can be used with “-R” and “–install” options. For example, I will install all the “.deb” packages from the directory called “debpackages“.

[root@tecmint~]# dpkg -R --install debpackages/
(Reading database ... 465836 files and directories currently installed.)
Preparing to replace flashplugin-nonfree 1:3.2 (using .../flashplugin-nonfree_3.2_i386.deb) ...
Unpacking replacement flashplugin-nonfree ...
Setting up flashplugin-nonfree (1:3.2) ...
Processing triggers for man-db ...
Processing triggers for bamfdaemon ...
Rebuilding /usr/share/applications/bamf-2.index...
Processing triggers for gnome-menus ...

8. Unpack the Package but dont’ Configure

Using action “–unpack” will unpack the package, but it will don’t install or configure it.

[root@tecmint~]# dpkg --unpack flashplugin-nonfree_3.2_i386.deb
(Reading database ... 465836 files and directories currently installed.)
Preparing to replace flashplugin-nonfree 1:3.2 (using flashplugin-nonfree_3.2_i386.deb) ...
Unpacking replacement flashplugin-nonfree ...
Processing triggers for man-db ...
Processing triggers for bamfdaemon ...
Rebuilding /usr/share/applications/bamf-2.index...
Processing triggers for gnome-menus ...

9. Reconfigure a Unpacked Package

The option “–configure” will reconfigure a already unpacked package.

[root@tecmint~]# dpkg --configure flashplugin-nonfree
Setting up flashplugin-nonfree (1:3.2) ...

10. Replace available Package information

The “–-update-avail” option replace the old information with the available information in the Packages file.

[root@tecmint~]# dpkg –-update-avail package_name

11. Erase Existing Available information of Package

The action “–clear-avaial” will erase the current information about what packages are available.

[root@tecmint~]# dpkg –-clear-avail

12. Forget Uninstalled and Unavailable Packages

The dpkg command with option “–forget-old-unavail” will automatically forget uninstalled and unavailable packages .

[root@tecmint~]# dpkg --forget-old-unavail

13. Display dpkg Licence

[root@tecmint~]# dpkg --licence

14. Display dpkg Version

The “–version” argument will display dpkg version information.

[root@tecmint~]# dpkg –version
Debian `dpkg' package management program version 1.16.10 (i386).
This is free software; see the GNU General Public License version 2 or
later for copying conditions. There is NO warranty.

15. Get all the Help about dpkg

The “–help” option will display a list of available options of dpkg command.

[root@tecmint~]# dpkg –help
Usage: dpkg [ ...] 

Commands:
  -i|--install        ... | -R|--recursive  ...
  --unpack            ... | -R|--recursive  ...
  -A|--record-avail   ... | -R|--recursive  ...
  --configure         ... | -a|--pending
  --triggers-only     ... | -a|--pending
  -r|--remove         ... | -a|--pending
  -P|--purge          ... | -a|--pending
  --get-selections [ ...] Get list of selections to stdout.
  --set-selections                 Set package selections from stdin.
  --clear-selections               Deselect every non-essential package.
  --update-avail    Replace available packages info.
  --merge-avail     Merge with info from file.
  --clear-avail                    Erase existing available info.
  --forget-old-unavail             Forget uninstalled unavailable pkgs.
  -s|--status  ...        Display package status details.
...

That’s all for now. I’ll soon be here again with another interesting article. If I’ve missed any command in the list do let me know via comments. Till then, Stay tuned and Keep connected to Tecmint. Like and share us and help us spread. Don’t forget to mention your valuable thoughts in comment.

——

many and many and many times I see sudo dpkg-reconfigure postfix what is that?

Packages (like postfix) may install or generate configuration files (files that usually go in the /etcfolder). During this process, there may be options that can be changed by the user. On installation, you are usually asked to set these options. In the case of postfix, it involves what type of server you’re running, the hostname, and allowed IP addresses (among other things).

If you wanted to change those options afterwards, though, you can use dpkg-reconfigure which only goes through the configuration files phase of the package, where you can change those options.

Note that not all packages have user-configurable options, so even if a package installs a configuration file in /etc, dpkg-reconfigure might not do anything.

Intro to Linux Shared Libraries (How to Create Shared Libraries)

A library is a file containing compiled code from various object files stuffed into a single file. It may contain a group of functions that are used in a particular context. For example, the ‘pthread’ library is used when thread related functions are to be used in the program.

Broadly, a library (or Program Library) can be of two types :

  1. Shared Library
  2. Static Library

In this article we will discuss specifically about Shared Libraries.

Shared Libraries

Shared Libraries are the libraries that can be linked to any program at run-time. They provide a means to use code that can be loaded anywhere in the memory. Once loaded, the shared library code can be used by any number of programs. So, this way the size of programs(using shared library) and the memory footprint can be kept low as a lot of code is kept common in form of a shared library.

Shared libraries provide modularity to the development environment as the library code can be changed, modified and recompiled without having to re-compile the applications that use this library. For example, for any change in the pthread library code, no change is required in the programs using pthread shared library. A shared library can be accessed through different names :

  • Name used by linker (‘lib’ followed by the library name, followed by ‘.so’ . For example libpthread.so)
  • Fully qualified name or soname ( ‘lib’ followed by the library name, followed by ‘.so’, followed by ‘.’ and a version number. For example : libpthread.so.1)
  • Real name (‘lib’ followed by the library name, followed by ‘.so’, followed by ‘.’ and a version number, followed by a ‘.’ and a minor number, followed by a ‘.’ and a release number. Release number is optional. For example, libpthread.so.1.1)

A version number is changed for a shared library when the changes done in the code make the shared library incompatible with the previous version. For example, if a function is completely removed then a new version of the library is required.

A minor number is changed in case there is a modification in the code that does not make the shared library incompatible with the previous version being used. For example, a small bug fix won’t break the compatibility of the existing shared library so only a minor number is changed while version remains the same.

Now, one may wonder why so many names for a shared library?

Well, these naming conventions help multiple versions of same shared library to co-exist in a system. The programs linking with the shared library do not need to take care about the latest version of the shared library installed in the system. Once the latest version of the shared library is installed successfully, all the programs automatically start linking to the latest version.

The name used by linker is usually a symbolic link to the fully qualified soname which in turn is a symbolic link to the real name.

Placement in File System

There are mainly three standard locations in the filesystem where a library can be placed.

  • /lib
  • /usr/lib
  • /usr/local/lib

We will go by the Filesystem Hierarchy standards(FHS) here. According to the FHS standards, All the libraries which are loaded at start up and running in the root filesystem are kept in /lib. While the libraries that are used by system internally are stored at /usr/lib. These libraries are not meant to be directly used by users or shell scripts. There is a third location /usr/local/lib( though it is not defined in the latest version of FHS ). If it exists, it contains all the libraries that are not part of standard distribution. These non-standard libraries are the one’s which you download and could be possibly buggy.

Using ldconfig

Once a shared library is created, copy the shared library to directory in which you want the library to reside (for example /usr/local/lib or /usr/lib). Now, run ldconfig command in this directory.

What does ldconfig do?

You remember that we discussed earlier that a linker name for shared library is a symbolic link to the fully qualified soname which in turn is a symbolic link to the real name. Well, this command does exactly the same.

When you run an ELF executable, by default the loader is run first. The loader itself is a shared object file /lib/ld-linux.so.X where ‘X’ is a version number. This loader in turn finds and loads all the shared libraries on which our program depends.

All the directories that are searched by the loader in order to find the libraries is stored in /etc/ld.so.conf. Searching all the directories specified in /etc/ld.so.conf file can be time consuming so every time ldconfig command is run, it sets up the required symbolic links and then creates a cache in file /etc/ld.so.cache where all the information required for executable is written. Reading information from cache is very less time consuming. The catch here is that ldconfig command needs to be run every-time a shared library is added or removed. So on start-up the program uses /etc/ld.so.cache to load the libraries it requires.

Using Non Standard Library Locations

When using non standard library locations. One of the following three steps could be carried out :

Add the path to /etc/ld.so.conf file. This file contains paths to all the directories in which the library is searched by the loader. This file could sometime contain a single line like :

include /etc/ld.so.conf.d/*.conf

In that case, just create a conf file in the same directory. You can directly add a directory to cache by using the following command :

ldconfig -n [non standard directory path containing shared library]

Note that this is a temporary change and will be lost once the system is rebooted. Update the environment variable LD_LIBRARY_PATH to point to your directory containing the shared library. Loader will use the paths mentioned in this environment variable to resolve dependencies.

Note that on some Unix systems the name of the environment variable could differ.

Note: On a related topic, as we explained earlier, there are four main stagesthrough which a source code passes in order to finally become an executable.

Example (How to Create a Shared Library)

Lets take a simple practical example to see how we can create and use shared libraries. The following is the piece of code (shared.c) that we want to put in a shared library :

#include "shared.h"
unsigned int add(unsigned int a, unsigned int b)
{
    printf("\n Inside add()\n");
    return (a+b);
}

shared.h looks like :

#include<stdio.h>
extern unsigned int add(unsigned int a, unsigned int b);

Lets first make shared.c as a shared library.

1. Run the following two commands to create a shared library :

gcc -c -Wall -Werror -fPIC shared.c
gcc -shared -o libshared.so shared.o

The first command compiles the code shared.c into position independent code which is required for a shared library.
The second command actually creates a shared library with name ‘libshared.so’.

2. Here is the code of the program that uses the shared library function ‘add()’

#include<stdio.h>
#include"shared.h"
int main(void)
{
    unsigned int a = 1;
    unsigned int b = 2;
    unsigned int result = 0;

    result = add(a,b);

    printf("\n The result is [%u]\n",result);
    return 0;
}

3. Next, run the following command :

gcc -L/home/himanshu/practice/ -Wall main.c -o main -lshared

This command compiles the main.c code and tells gcc to link the code with shared library libshared.so (by using flag -l) and also tells the location of shared file(by using flag -L).

4. Now, export the path where the newly created shared library is kept by using the following command :

export LD_LIBRARY_PATH=/home/himanshu/practice:$LD_LIBRARY_PATH

The above command exports the path to the environment variable ‘LD_LIBRARY_PATH’.

5. Now run the executable ‘main’ :

# ./main

Inside add()

The result is [3]

So we see that shared library was loaded and the add function inside it was executed.

Linux Commands For Shared Library Management & Debugging Problem

If you are a developer, you will re-use code provided by others. Usually /lib, /lib64, /usr/local/lib, and other directories stores various shared libraries. You can write your own program using these shared libraries. As a sys admin you need to manage and install these shared libraries. Use the following commands for shared libraries management, security, and debugging problems.

What is a Library In Linux or UNIX?

In Linux or UNIX like operating system, a library is noting but a collection of resources such as subroutines / functions, classes, values or type specifications. There are two types of libraries:

  1. Static libraries – All lib*.a fills are included into executables that use their functions. For example you can run a sendmail binary in chrooted jail using statically liked libs.
  2. Dynamic libraries or linking [ also known as DSO (dynamic shared object)] – All lib*.so* files are not copied into executables. The executable will automatically load the libraries using ld.so or ld-linux.so.

Linux Library Management Commands

  1. ldconfig : Updates the necessary links for the run time link bindings.
  2. ldd : Tells what libraries a given program needs to run.
  3. ltrace : A library call tracer.
  4. ld.so/ld-linux.so: Dynamic linker/loader.

Important Files

As a sys admin you should be aware of important files related to shared libraries:

  1. /lib/ld-linux.so.* : Execution time linker/loader.
  2. /etc/ld.so.conf : File containing a list of colon, space, tab, newline, or comma separated directories in which to search for libraries.
  3. /etc/ld.so.cache : File containing an ordered list of libraries found in the directories specified in /etc/ld.so.conf. This file is not in human readable format, and is not intended to be edited. This file is created by ldconfig command.
  4. lib*.so.version : Shared libraries stores in /lib, /usr/lib, /usr/lib64, /lib64, /usr/local/lib directories.

#1: ldconfig command

You need to use the ldconfig command to create, update, and remove the necessary links and cache (for use by the run-time linker, ld.so) to the most recent shared libraries found in the directories specified on the command line, in the file /etc/ld.so.conf, and in the trusted directories (/usr/lib, /lib64 and /lib). The ldconfig command checks the header and file names of the libraries it encounters when determining which versions should have their links updated. This command also creates a file called /etc/ld.so.cache which is used to speed up linking.

Examples

In this example, you’ve installed a new set of shared libraries at /usr/local/lib/:
$ ls -l /usr/local/lib/
Sample outputs:

-rw-r--r-- 1 root root 878738 Jun 16  2010 libGeoIP.a
-rwxr-xr-x 1 root root    799 Jun 16  2010 libGeoIP.la
lrwxrwxrwx 1 root root     17 Jun 16  2010 libGeoIP.so -> libGeoIP.so.1.4.6
lrwxrwxrwx 1 root root     17 Jun 16  2010 libGeoIP.so.1 -> libGeoIP.so.1.4.6
-rwxr-xr-x 1 root root 322776 Jun 16  2010 libGeoIP.so.1.4.6
-rw-r--r-- 1 root root  72172 Jun 16  2010 libGeoIPUpdate.a
-rwxr-xr-x 1 root root    872 Jun 16  2010 libGeoIPUpdate.la
lrwxrwxrwx 1 root root     23 Jun 16  2010 libGeoIPUpdate.so -> libGeoIPUpdate.so.0.0.0
lrwxrwxrwx 1 root root     23 Jun 16  2010 libGeoIPUpdate.so.0 -> libGeoIPUpdate.so.0.0.0
-rwxr-xr-x 1 root root  55003 Jun 16  2010 libGeoIPUpdate.so.0.0.0

Now when you run an app related to libGeoIP.so, you will get an error about missing library. You need to run ldconfig command manually to link libraries by passing them as command line arguments with the -l switch:
# ldconfig -l /path/to/lib/our.new.lib.so
Another recommended options for sys admin is to create a file called/etc/ld.so.conf.d/geoip.conf as follows:

/usr/local/lib

Now just run ldconfig to update the cache:
# ldconfig
To verify new libs or to look for a linked library, enter:
# ldconfig -v
# ldconfig -v | grep -i geoip

Sample outputs:

	libGeoIP.so.1 -> libGeoIP.so.1.4.6
	libGeoIPUpdate.so.0 -> libGeoIPUpdate.so.0.0.0

Troubleshooting Chrooted Jails

You can print the current cache with the -p option:
# ldconfig -p
Putting web server such as Apache / Nginx / Lighttpd in a chroot jail minimizes the damage done by a potential break-in by isolating the web server to a small section of the filesystem. It is also necessary to copy all files required by Apache inside the filesystem rooted at /jail/ directory , including web server binaries, shared Libraries, modules, configuration files, and php/perl/html web pages. You need to also copy /etc/{ld.so.cache,ld.so.conf} files and /etc/ld.so.conf.d/ directory to /jail/etc/ directory. Use the ldconfig command to update, print and troubleshoot chrooted jail problems:

### chroot to jail bash
chroot /jail /bin/bash
###  now update the cache in /jail ###
ldconfig
###  print the cache in /jail ###
ldconfig -p
### copy missing libs ###
cp /path/to/some.lib /jail/path/to/some.lib
ldconfig
ldconfig -v | grep some.lib
### get out of jail ###
exit
### may be delete bash and ldconfig to increase security (NOTE path carefully) ###
cd /jail
rm sbin/ldconfig bin/bash
### now start nginx jail ###
chroot /jail /usr/local/nginx/sbin/nginx

Rootkits

A rootkit is a program (or combination of several programs) designed to take fundamental control of a computer system, without authorization by the system’s owners and legitimate managers. Usually, rootkit use /lib, /lib64, /usr/local/lib directories to hide itself from real root users. You can use ldconfig command to view all the cache of all shared libraries and unwanted programs:
# /sbin/ldconfig -p | less
You can also use various tools to detect rootkits under Linux.

Common errors

You may see the errors as follows:

Dynamic linker error in foo
Can’t map cache file cache-file
Cache file cache-file foo

All of the above errors means the linker cache file /etc/ld.so.cache is corrupt or does not exists. To fix these errors simply run the ldconfig command as follows:
# ldconfig

Can’t find library xyz Error

The executable required a dynamically linked library that ld.so or ld-linux.so cannot find. It means a library called xyz needed by the program called foo not installed or path is not set. To fix this problem install xyz library and set path in /etc/ld.so.conf file or create a file in /etc/ld.so.conf.d/ directory.

#2: ldd command

ldd (List Dynamic Dependencies) is a Unix and Linux program to display the shared libraries required by each program. This tools is required to build and run various server programs in a chroot jail. A typical example is as follows to list the Apache server shared libraries, enter:
# ldd /usr/sbin/httpd
Sample outputs:

	libm.so.6 => /lib64/libm.so.6 (0x00002aff52a0c000)
	libpcre.so.0 => /lib64/libpcre.so.0 (0x00002aff52c8f000)
	libselinux.so.1 => /lib64/libselinux.so.1 (0x00002aff52eab000)
	libaprutil-1.so.0 => /usr/lib64/libaprutil-1.so.0 (0x00002aff530c4000)
	libcrypt.so.1 => /lib64/libcrypt.so.1 (0x00002aff532de000)
	libldap-2.3.so.0 => /usr/lib64/libldap-2.3.so.0 (0x00002aff53516000)
	liblber-2.3.so.0 => /usr/lib64/liblber-2.3.so.0 (0x00002aff53751000)
	libdb-4.3.so => /lib64/libdb-4.3.so (0x00002aff5395f000)
	libexpat.so.0 => /lib64/libexpat.so.0 (0x00002aff53c55000)
	libapr-1.so.0 => /usr/lib64/libapr-1.so.0 (0x00002aff53e78000)
	libpthread.so.0 => /lib64/libpthread.so.0 (0x00002aff5409f000)
	libdl.so.2 => /lib64/libdl.so.2 (0x00002aff542ba000)
	libc.so.6 => /lib64/libc.so.6 (0x00002aff544bf000)
	libsepol.so.1 => /lib64/libsepol.so.1 (0x00002aff54816000)
	/lib64/ld-linux-x86-64.so.2 (0x00002aff527ef000)
	libuuid.so.1 => /lib64/libuuid.so.1 (0x00002aff54a5c000)
	libresolv.so.2 => /lib64/libresolv.so.2 (0x00002aff54c61000)
	libsasl2.so.2 => /usr/lib64/libsasl2.so.2 (0x00002aff54e76000)
	libssl.so.6 => /lib64/libssl.so.6 (0x00002aff5508f000)
	libcrypto.so.6 => /lib64/libcrypto.so.6 (0x00002aff552dc000)
	libgssapi_krb5.so.2 => /usr/lib64/libgssapi_krb5.so.2 (0x00002aff5562d000)
	libkrb5.so.3 => /usr/lib64/libkrb5.so.3 (0x00002aff5585c000)
	libcom_err.so.2 => /lib64/libcom_err.so.2 (0x00002aff55af1000)
	libk5crypto.so.3 => /usr/lib64/libk5crypto.so.3 (0x00002aff55cf3000)
	libz.so.1 => /usr/lib64/libz.so.1 (0x00002aff55f19000)
	libkrb5support.so.0 => /usr/lib64/libkrb5support.so.0 (0x00002aff5612d000)
	libkeyutils.so.1 => /lib64/libkeyutils.so.1 (0x00002aff56335000)

Now, you can copy all those libs one by one to /jail directory

# mkdir /jail/lib
# cp  /lib64/libm.so.6 /jail/lib
# cp /lib64/libkeyutils.so.1 /jail/lib

You can write a bash script to automate the entire procedure:

cp_support_shared_libs(){
        local d="$1"            # JAIL ROOT
        local pFILE="$2"        # copy bin file libs
        local files=""
	## use ldd to get shared libs list ###
        files="$(ldd $pFILE |  awk '{ print $3 }' | sed  '/^$/d')"
 
        for i in $files
        do
          dcc="${i%/*}" # get dirname only
          [ ! -d ${d}${dcc} ] && mkdir -p ${d}${dcc}
          ${_cp} -f $i ${d}${dcc}
        done
 
        # Works with 32 and 64 bit ld-linux
        sldl="$(ldd $pFILE | grep 'ld-linux' | awk '{ print $1}')"
        sldlsubdir="${sldl%/*}"
        [ ! -f ${d}${sldl} ] && ${_cp} -f ${sldl} ${d}${sldlsubdir}
}

Call cp_support_shared_libs() it as follows:

cp_support_shared_libs "/jail" "/usr/local/nginx/sbin/nginx"

Report Missing Functions

Type the following command:
$ ldd -d /path/to/executable

Report Missing Objects

Type the following command:
$ ldd -r /path/to/executable

Determine If Particular Feature Supported Or Not

TCP Wrapper is a host-based Networking ACL system, used to filter network access to Internet. TCP wrappers was original written to monitor and stop cracking activities on the UNIX / Linux systems. To determine whether a given executable daemon supports TCP Wrapper or not, run the following command:
$ ldd /usr/sbin/sshd | grep libwrap
Sample outputs:

	libwrap.so.0 => /lib64/libwrap.so.0 (0x00002abd70cbc000)

The output indicates that the OpenSSH (sshd) daemon supports TCP Wrapper.

Other usage of ldd command

You can use the ldd command when an executable is failing because of a missing dependency. Once you found a missing dependency, you can install it or update the cache with the ldconfig command as mentioned above.

#3: ltrace command

The ltrace command simply runs the specified command until it exits. It intercepts and records the dynamic library calls which are called by the executed process and the signals which are received by that process. It can also intercept and print the system calls executed by the program. Its use is very similar to strace command.
# ltrace /usr/sbin/httpd
# ltrace /sbin/chroot /usr/sbin/httpd
# ltrace /bin/ls

Sample outputs:

__libc_start_main(0x804fae0, 1, 0xbfbd6544, 0x805bce0, 0x805bcd0 
strrchr("/bin/ls", '/')                                                                                                                            = "/ls"
setlocale(6, "")                                                                                                                                   = "en_IN.utf8"
bindtextdomain("coreutils", "/usr/share/locale")                                                                                                   = "/usr/share/locale"
textdomain("coreutils")                                                                                                                            = "coreutils"
__cxa_atexit(0x8052d10, 0, 0, 0xbfbd6544, 0xbfbd6498)                                                                                              = 0
isatty(1)                                                                                                                                          = 1
getenv("QUOTING_STYLE")                                                                                                                            = NULL
getenv("LS_BLOCK_SIZE")                                                                                                                            = NULL
getenv("BLOCK_SIZE")                                                                                                                               = NULL
getenv("BLOCKSIZE")                                                                                                                                = NULL
getenv("POSIXLY_CORRECT")                                                                                                                          = NULL
getenv("BLOCK_SIZE")                                                                                                                               = NULL
getenv("COLUMNS")                                                                                                                                  = NULL
ioctl(1, 21523, 0xbfbd6470)                                                                                                                        = 0
getenv("TABSIZE")                                                                                                                                  = NULL
getopt_long(1, 0xbfbd6544, "abcdfghiklmnopqrstuvw:xABCDFGHI:"..., 0x0805ea40, -1)                                                                  = -1
__errno_location()                                                                                                                                 = 0xb76b8694
malloc(40)                                                                                                                                         = 0x08c8e3e0
memcpy(0x08c8e3e0, "", 40)                                                                                                                         = 0x08c8e3e0
....
....
.....
..
output truncated
free(0x08c8e498)                                                                                                                                   = 
free(NULL)                                                                                                                                         = 
free(0x08c8e480)                                                                                                                                   = 
exit(0 
__fpending(0xb78334e0, 0xbfbd6334, 0xb78876a3, 0xb78968f8, 0)                                                                                      = 0
fclose(0xb78334e0)                                                                                                                                 = 0
__fpending(0xb7833580, 0xbfbd6334, 0xb78876a3, 0xb78968f8, 0)                                                                                      = 0
fclose(0xb7833580)                                                                                                                                 = 0
+++ exited (status 0) +++

The ltrace command is a perfect debugging utility in Linux:

  1. To monitor the library calls used by a program and all the signals it receives.
  2. For tracking the execution of processes.
  3. It can also show system calls, used by a program.

ltrace Command Examples

Consider the following c program:

 
#include <stdio.h>
int main(){
	printf("Hello world\n");
	return 0;
}

Compile and run it as follows:
$ cc hello.c -o hello
$ ./hello

Now use the ltrace command to tracking the execution of processes:
$ ltrace -S -tt ./hello
Sample outputs:

15:20:38.561616 SYS_brk(NULL)                                                                                                                      = 0x08f42000
15:20:38.561845 SYS_access("/etc/ld.so.nohwcap", 00)                                                                                               = -2
15:20:38.562009 SYS_mmap2(0, 8192, 3, 34, -1)                                                                                                      = 0xb7708000
15:20:38.562155 SYS_access("/etc/ld.so.preload", 04)                                                                                               = -2
15:20:38.562336 SYS_open("/etc/ld.so.cache", 0, 00)                                                                                                = 3
15:20:38.562502 SYS_fstat64(3, 0xbfaafe20, 0xb7726ff4, 0xb772787c, 3)                                                                              = 0
15:20:38.562629 SYS_mmap2(0, 76469, 1, 2, 3)                                                                                                       = 0xb76f5000
15:20:38.562755 SYS_close(3)                                                                                                                       = 0
15:20:38.564204 SYS_access("/etc/ld.so.nohwcap", 00)                                                                                               = -2
15:20:38.564372 SYS_open("/lib/tls/i686/cmov/libc.so.6", 0, 00)                                                                                    = 3
15:20:38.564561 SYS_read(3, "\177ELF010101", 512)                                                                                            = 512
15:20:38.564694 SYS_fstat64(3, 0xbfaafe6c, 0xb7726ff4, 0xb7705796, 0x8048234)                                                                      = 0
15:20:38.564822 SYS_mmap2(0, 0x1599a8, 5, 2050, 3)                                                                                                 = 0xb759b000
15:20:38.565076 SYS_mprotect(0xb76ee000, 4096, 0)                                                                                                  = 0
15:20:38.565209 SYS_mmap2(0xb76ef000, 12288, 3, 2066, 3)                                                                                           = 0xb76ef000
15:20:38.565454 SYS_mmap2(0xb76f2000, 10664, 3, 50, -1)                                                                                            = 0xb76f2000
15:20:38.565604 SYS_close(3)                                                                                                                       = 0
15:20:38.565709 SYS_mmap2(0, 4096, 3, 34, -1)                                                                                                      = 0xb759a000
15:20:38.565842 SYS_set_thread_area(0xbfab030c, 0xb7726ff4, 0xb759a6c0, 1, 0)                                                                      = 0
15:20:38.566070 SYS_mprotect(0xb76ef000, 8192, 1)                                                                                                  = 0
15:20:38.566185 SYS_mprotect(0x08049000, 4096, 1)                                                                                                  = 0
15:20:38.566288 SYS_mprotect(0xb7726000, 4096, 1)                                                                                                  = 0
15:20:38.566381 SYS_munmap(0xb76f5000, 76469)                                                                                                      = 0
15:20:38.566522 __libc_start_main(0x80483e4, 1, 0xbfab04e4, 0x8048410, 0x8048400 
15:20:38.566667 puts("Hello world" 
15:20:38.566811 SYS_fstat64(1, 0xbfab0310, 0xb76f0ff4, 0xb76f14e0, 0x80484c0)                                                                      = 0
15:20:38.566936 SYS_mmap2(0, 4096, 3, 34, -1)                                                                                                      = 0xb7707000
15:20:38.567126 SYS_write(1, "Hello world\n", 12Hello world
)                                                                                                  = 12
15:20:38.567282 <... puts resumed> )                                                                                                               = 12
15:20:38.567348 SYS_exit_group(0 
15:20:38.567454 +++ exited (status 0) +++

You need to carefully monitor the order and arguments of selected functions such as open() [used to open and possibly create a file or device] or chown() [used to change ownership of a file] so that you can spot simple kinds of race conditions or security related problems. This is quite useful for evaluating the security of binary programs to find out what kind of changes made to the system.

ltrace: Debugging Memory & I/O Usage For HA Based Cluster Computers

The ltrace command can be used to trace memory usage of the malloc() and free() functions in C program. You can calculate the amount of memory allocated as follows:
[node303 ~]$ ltrace -e malloc,free ./simulator arg1 agr2 arg3
The ltrace will start ./simulator program and it will trace the malloc() and free() functions. You can find out I/O problems as follows:
[node303 ~]$ ltrace -e fopen,fread,fwrite,fclose ./simulator arg1 agr2 arg3
You may need to change function names as your programming languages or UNIX platform may use different memory allocation functions.

#4: ld.so/ld-linux.so Command

The ld.so or / ld-linux.so used as follows by Linux:

  1. To load the shared libraries needed by a program.
  2. To prepare the program to run, and then runs it.

List All Dependencies and How They Are Resolved

Type the following command:
# cd /lib
For 64 bit systems:
# cd /lib64
Pass the –list option, enter:
# ./ld-2.5.so --list /path/to/executable

Other options

From the man page:

  --verify                   verify that given object really is a dynamically linked object we can handle
  --library-path PATH   use given PATH instead of content of the environment variable LD_LIBRARY_PATH
  --inhibit-rpath LIST    ignore RUNPATH and RPATH information in object names in LIST

Environment Variables

The LD_LIBRARY_PATH can be used to set a library path for finding dynamic libraries using LD_LIBRARY_PATH, in the standard colon seperated format:
$ export LD_LIBRARY_PATH=/opt/simulator/lib:/usr/local/lib
The LD_PRELOAD allow an extra library not specified in the executable to be loaded:
$ export LD_PRELOAD=/home/vivek/dirhard/libdiehard.so
Please note that these variables are ignored when executing setuid/setgid programs.

Runlevels, shutdown, and reboot

Runlevels define what tasks can be accomplished in the current state (or runlevel) of a Linux system. Every Linux system supports three basic runlevels, plus one or more runlevels for normal operation. The basic runlevels are shown in Table 1.

Table 1. Linux basic runlevels
Level Purpose
0 Shut down (or halt) the system
1 Single-user mode; usually aliased as s or S
6 Reboot the system

Beyond the basics, runlevel usage differs among distributions. One common usage set is shown in Table 2.

Table 2. Other common Linux runlevels
Level Purpose
2 Multiuser mode without networking
3 Multiuser mode with networking
5 Multiuser mode with networking and the X Window System

The Slackware distribution uses runlevel 4 instead of 5 for a full system running the X Window system. Debian and derivatives, such as Ubuntu, use a single runlevel for any multiuser mode, typically runlevel 2. Be sure to consult the documentation for your distribution.

Default runlevel

When a Linux system starts, the default runlevel is determined from the id: entry in /etc/inittab. Listing 1 illustrates a typical entry for a system such as Fedora 8 or openSUSE 11.2, both of which use runlevel 5 for the X Window System.

Listing 1. Default runlevel in /etc/inittab
[root@pinguino ~]# grep "^id:" /etc/inittab
id:5:initdefault:

Edit this value if you want your system to start in a different runlevel, say runlevel 3.

Changing runlevels

There are several ways to change runlevels. To make a permanent change, you can edit /etc/inittab and change the default level as you just saw above.

If you only need to bring the system up in a different runlevel for one boot, you can do this. For example, suppose you just installed a new kernel and need to build some kernel modules after the system booted with the new kernel, but before you start the X Window System. You might want to bring up the system in runlevel 3 to accomplish this. You do this at boot time by editing the kernel line (GRUB) or adding a parameter after the selected system name (LILO). Use a single digit to specify the desired runlevel (3, in this case). We’ll illustrate the process with a GRUB example. Suppose your /boot/grub/menu.lst file contains the stanza shown in Listing 2.

Listing 2. Typical GRUB stanza to boot Fedora 8
title Fedora (2.6.26.8-57.fc8)
        root (hd0,5)
        kernel /boot/vmlinuz-2.6.26.8-57.fc8 ro root=LABEL=FEDORA8 rhgb quiet
        initrd /boot/initrd-2.6.26.8-57.fc8.img

To bring this system up in runlevel 3, wait till the boot entries are displayed, select this entry and enter ‘e’ to edit the entry. Depending on your GRUB options, you may need to press a key to display the boot entries and also enter ‘p’ and a password to unlock editing. The GRUB screen on our Fedora 8 system looks like Figure 1.

Figure 1. Selecting a boot choice in GRUB

Selecting a boot choice in GRUB

In this example, you should now see the root, kernel, and initrd lines displayed. Move the cursor to the line starting with “kernel” and press ‘e’ to edit the line. The GRUB screen on our Fedora 8 system now looks like Figure 2.

Figure 2. Selecting the kernel entry for editing

Selecting the kernel entry for editing

Finally, move the cursor to the end of the line, and add a space and the digit ‘3’. You may remove ‘quiet’ if you wish, or modify any other parameters as needed. The GRUB screen on our Fedora 8 system now looks like Figure 3.

Figure 3. Setting the starting runlevel to 3

Setting the starting runlevel to 3

Finally, press Enter to save the changes, then type ‘b’ to boot the system.

Note: The steps for doing this using LILO or GRUB2 differ from those for GRUB, but the basic principle of editing the way the kernel is started remains. Even GRUB screens on other systems or other distributions may look quite different to those shown here. Prompts will usually be available to help you.

Once you have finished your setup work in runlevel 3, you will probably want to switch to runlevel 5. Fortunately, you do not need to reboot the system. You can use the telinit command to switch to another runlevel. Use the runlevel command to show both the previous runlevel and the current one. If the first output character is ‘N’, the runlevel has not been changed since the system was booted. Listing 3 illustrates verifying and changing the runlevel.

Listing 3. Verifying and changing the runlevel
[root@pinguino ~]# runlevel
N 3
[root@pinguino ~]# telinit 5

After you enter telinit 5 you will see several messages flash by and your display will switch to the configured graphical login screen. Open a terminal window and verify that the runlevel has been changed as shown in Listing 4.

Listing 4. Confirming the new runlevel
[root@pinguino ~]# runlevel
3 5

If you use the ls command to display a long listing of the telinit command, you will see that it really is a symbolic link to the init command. We illustrate this in Listing 5

[root@pinguino ~]# ls -l $(which telinit)
lrwxrwxrwx 1 root root 4 2008-04-01 07:50 /sbin/telinit -> init

The init executable knows whether it was called as init or telinit and behaves accordingly. Since init runs as PID 1 at boot time, it is also smart enough to know when you subsequently invoke it using init rather than telinit. If you do, it will assume you want it to behave as if you had called telinit instead. For example, you may use init 5 instead of telinit 5 to switch to runlevel 5.

Single-user mode

In contrast to personal computer operating systems such as DOS or Windows, Linux is inherently a multiuser system. However, there are times when that can be a problem, such as when you need to recover a major filesystem or database, or install and test some new hardware. Runlevel 1, or single-user mode, is your answer for these situations. The actual implementation varies by distribution, but you will usually start in a shell with only a minimal system. Usually there will be no networking and no (or very few) daemons running. On some systems, you must authenticate by logging in, but on others you go straight into a shell prompt as root. Single-user mode can be a lifesaver, but you can also destroy your system, so always be careful whenever you are running with root authority. Reboot to normal multiuser mode as soon as you are done.

As with switching to regular multiuser runlevels, you can also switch to single-user mode using telinit 1. As noted in Table 1, ‘s’ and ‘S’ are aliases for runlevel 1, so you could, for example, use telinit s instead.

Clean shutdown

While you can use telinit or init to stop multiuser activity and switch to single-user mode, this can be rather abrupt and cause users to lose work and processes to terminate abnormally. The preferred method to shut down or reboot the system is to use the shutdown command, which first sends a warning message to all logged-in users and blocks any further logins. It then signals init to switch runlevels. The init process then sends all running processes a SIGTERM signal, giving them a chance to save data or otherwise properly terminate. After 5 seconds, or another delay if specified, init sends a SIGKILL signal to forcibly end each remaining process.

By default, shutdown switches to runlevel 1 (single-user mode). You may specify the -h option to halt the system, or the -r option to reboot. A standard message is issued in addition to any message you specify. The time may be specified as an absolute time in hh:mm format, or as a relative time, n, where n is the number of minutes until shutdown. For immediate shutdown, use now, which is equivalent to +0.

If you have issued a delayed shutdown and the time has not yet expired, you may cancel the shutdown by pressing Ctrl-c if the command is running in the foreground, or by issuing shutdown with the -c option to cancel a pending shutdown. Listing 6 shows several examples of the use ofshutdown, along with ways to cancel the command.

Listing 6. Shutdown examples
[root@pinguino ~]# shutdown 5 File system recovery needed

Broadcast message from root (pts/1) (Tue Jan  4 08:05:24 2011):

File system recovery needed
The system is going DOWN to maintenance mode in 5 minutes!
^C
Shutdown cancelled.
[root@pinguino ~]# shutdown -r 10 Reloading updated kernel&
[1] 18784
[root@pinguino ~]#
Broadcast message from root (pts/1) (Tue Jan  4 08:05:53 2011):

Reloading updated kernel
The system is going DOWN for reboot in 10 minutes!

[root@pinguino ~]# fg
shutdown -r 10 Reloading updated kernel
^C
Shutdown cancelled.
[root@pinguino ~]# shutdown -h 23:59&
[1] 18788
[root@pinguino ~]# shutdown -c

Shutdown cancelled.
[1]+  Done                    shutdown -h 23:59

You may have noticed that our last example did not cause a warning message to be sent. If the time till shutdown exceeds 15 minutes, then the message is not sent until 15 minutes before the event as shown in Listing 7. Listing 7 also shows the use of the -t option to increase the default delay between SIGTERM and SIGKILL signals from 5 seconds to 60 seconds.

Listing 7. Another shutdown example
[root@pinguino ~]# date;shutdown -t60 17 Time to do backups&
Tue Jan  4 08:12:55 EST 2011
[1] 18825
[root@pinguino ~]# date
Tue Jan  4 08:14:13 EST 2011
[root@pinguino ~]#
Broadcast message from root (pts/1) (Tue Jan  4 08:14:55 2011):

Time to do backups
The system is going DOWN to maintenance mode in 15 minutes!

If you do cancel a shutdown, you should use the wall command to send a warning to all users alerting them to the fact that the system is not going down.

As we said earlier, it is also possible to use telinit (or init) to shut down or reboot the system. As with other uses of telinit, no warning is sent to users, and the command takes effect immediately, although there is still a delay between SIGTERM and SIGKILL signals. For additional options of telinit, init, and shutdown, consult the appropriate man pages.

Halt, reboot, and poweroff

You should know about a few more commands related to shutdown and reboot.

  • The haltcommand halts the system.
  • The poweroff command is a symbolic link to the halt command, which halts the system and then attempts to power it off.
  • The rebootcommand is another symbolic link to the halt command, which halts the system and then reboots it.

If any of these are called when the system is not in runlevel 0 or 6, then the corresponding shutdown command will be invoked instead.

For additional options that you may use with these commands, as well as more detailed information on their operation, consult the man page.

/etc/inittab

By now, you may be wondering why pressing Ctrl-Alt-Delete on some systems causes a reboot, or how all this runlevel stuff is configured. Remember the id field in /etc/inittab? Well, there are several other fields in /etc/inittab, along with a set of init scripts in directories such as rc1.d or rc5.d, where the digit identifies the runlevel to which the scripts in that directory apply. Listing 8 shows the full inittab from our Fedora 8 system.

Listing 8. Full inittab from Fedora 8
#
# inittab       This file describes how the INIT process should set up
#               the system in a certain run-level.
#
# Author:       Miquel van Smoorenburg, <miquels@drinkel.nl.mugnet.org>
#               Modified for RHS Linux by Marc Ewing and Donnie Barnes
#

# Default runlevel. The runlevels used by RHS are:
#   0 - halt (Do NOT set initdefault to this)
#   1 - Single user mode
#   2 - Multiuser, without NFS (The same as 3, if you do not have networking)
#   3 - Full multiuser mode
#   4 - unused
#   5 - X11
#   6 - reboot (Do NOT set initdefault to this)
#
id:5:initdefault:

# System initialization.
si::sysinit:/etc/rc.d/rc.sysinit

l0:0:wait:/etc/rc.d/rc 0
l1:1:wait:/etc/rc.d/rc 1
l2:2:wait:/etc/rc.d/rc 2
l3:3:wait:/etc/rc.d/rc 3
l4:4:wait:/etc/rc.d/rc 4
l5:5:wait:/etc/rc.d/rc 5
l6:6:wait:/etc/rc.d/rc 6

# Trap CTRL-ALT-DELETE
ca::ctrlaltdel:/sbin/shutdown -t3 -r now

# When our UPS tells us power has failed, assume we have a few minutes
# of power left.  Schedule a shutdown for 2 minutes from now.
# This does, of course, assume you have powerd installed and your
# UPS connected and working correctly.
pf::powerfail:/sbin/shutdown -f -h +2 "Power Failure; System Shutting Down"

# If power was restored before the shutdown kicked in, cancel it.
pr:12345:powerokwait:/sbin/shutdown -c "Power Restored; Shutdown Cancelled"


# Run gettys in standard runlevels
1:2345:respawn:/sbin/mingetty tty1
2:2345:respawn:/sbin/mingetty tty2
3:2345:respawn:/sbin/mingetty tty3
4:2345:respawn:/sbin/mingetty tty4
5:2345:respawn:/sbin/mingetty tty5
6:2345:respawn:/sbin/mingetty tty6

# Run xdm in runlevel 5
x:5:respawn:/etc/X11/prefdm -nodaemon

As usual, lines starting with # are comments. Other lines have several fields with the following format:
id:runlevels:action:process

id
is a unique identifier of one to four characters. Older versions limited this to two characters, so you will often see only two characters used.
runlevels
lists the runlevels for which the action for this id should be taken. If no runlevels are listed, do the action for all runlevels.
action
describes which of several possible actions should be taken
process
tells which process, if any, should be run when the action on this line is performed.

Some of the common actions that may be specified in /etc/inittab are shown in Table 3. See the man pages for inittab for other possibilities.

Table 3. Some common inittab actions
Action Purpose
respawn Restart the process whenever it terminates. Usually used for getty processes, which monitor for logins.
wait Start the process once when the specified runlevel is entered and wait for its termination before init proceeds.
once Start the process once when the specified runlevel is entered.
initdefault Specifies the runlevel to enter after system boot.
ctrlaltdel Execute the associated process when init receives the SIGINT signal, for example, when someone on the system console presses CTRL-ALT-DEL.

Listing 9 shows just the entry for Ctrl-Alt-Delete from Listing 8. So now you see why pressing Ctrl-Alt-Delete causes the system to be rebooted.

Listing 9. Trapping Ctrl-Alt-Delete
# Trap CTRL-ALT-DELETE
ca::ctrlaltdel:/sbin/shutdown -t3 -r now

Initialization scripts

You may have noticed several lines in Listing 8, such as

l5:5:wait:/etc/rc.d/rc 5

In this example, init will run the /etc/rc.d/rc script (or command) with the parameter of 5 whenever runlevel 5 is entered. init will wait until this command completes before doing anything else.

These scripts used by init when starting the system, changing runlevels, or shutting down are typically stored in the /etc/init.d or /etc/rc.d directory. A series of symbolic links in the rcn.d directories, one directory for each runlevel n, control whether a script is started when entering a runlevel or stopped when leaving it. These links start with either a K or an S, followed by a two-digit number and then the name of the service, as shown in Listing 10.

Listing 10. Init scripts
[root@pinguino ~]# find /etc -path "*rc[0-9]*.d/???au*"
/etc/rc.d/rc2.d/S27auditd
/etc/rc.d/rc2.d/K72autofs
/etc/rc.d/rc4.d/S27auditd
/etc/rc.d/rc4.d/S28autofs
/etc/rc.d/rc5.d/S27auditd
/etc/rc.d/rc5.d/S28autofs
/etc/rc.d/rc0.d/K72autofs
/etc/rc.d/rc0.d/K73auditd
/etc/rc.d/rc6.d/K72autofs
/etc/rc.d/rc6.d/K73auditd
/etc/rc.d/rc1.d/K72autofs
/etc/rc.d/rc1.d/K73auditd
/etc/rc.d/rc3.d/S27auditd
/etc/rc.d/rc3.d/S28autofs
[root@pinguino ~]# cd /etc/rc.d/rc5.d
[root@pinguino rc5.d]# ls -l ???a*
lrwxrwxrwx 1 root root 16 2008-04-07 11:29 S27auditd -> ../init.d/auditd
lrwxrwxrwx 1 root root 16 2008-04-01 07:51 S28autofs -> ../init.d/autofs
lrwxrwxrwx 1 root root 15 2008-04-01 14:03 S44acpid -> ../init.d/acpid
lrwxrwxrwx 1 root root 13 2008-04-01 07:50 S95atd -> ../init.d/atd
lrwxrwxrwx 1 root root 22 2008-04-01 07:54 S96avahi-daemon -> ../init.d/avahi-daemon
lrwxrwxrwx 1 root root 17 2008-11-17 13:40 S99anacron -> ../init.d/anacron

Here you see that the audit and autofs services have Knn entries in all runlevels and Snn entries for both in runlevels 3 and 5. The S indicates that the service is started when that runlevel is entered, while the K entry indicates that it should be stopped. The nn component of the link name indicates the priority order in which the service should be started or stopped. In this example, audit is started before autofs, and it is stopped later.

Consult the man pages for init and inittab for more information.

initd

initd1

initd2

Beyond Init

As we have seen here, the traditional method of booting a Linux system is based on the UNIX System V init process. It involves loading an initial RAM disk (initrd) and then passing control to a program called init, a program that is usually installed as part of the sysvinit package. The initprogram is the first process in the system and has PID (Process ID) 1. It runs a series of scripts in a predefined order to bring up the system. If something that is expected is not available, the init process typically waits until it is. While this worked adequately for systems where everything is known and connected when the system starts, modern systems with hot-pluggable devices, network file systems, and even network interfaces that may not be available at start time present new challenges. Certainly, waiting for hardware that may not come available for a long time, or even just a relatively long time, is not desirable.

In the following sections of this article we will describe two alternatives to System V init, upstart and systemd.

Upstart

A new initialization process called upstart was first introduced in Ubuntu 6.10 (“Edgy Eft”) in 2006. Fedora 9 through 14 and Red Hat Enterprise Linux (RHEL) 6 use upstart, as do distributions derived from these. Upstart has now supplanted the init process in Ubuntu among others, although vestiges of init remain and the full power of upstart may not be realized for some time yet.

In contrast to the static set of init scripts used in earlier systems, the upstart system is driven by events. Events may be triggered by hardware changes, starting or stopping or tasks, or by any other process on the system. Events are used to trigger tasks or services, collectively known asjobs. So, for example, connecting a USB drive might cause the udev service to send a block-device-added event, which would cause a defined task to check /etc/fstab and mount the drive if appropriate. As another example, an Apache web server may be started only when both a network and required filesystem resources are available.

The upstart initialization program replaces /sbin/init. Upstart jobs are defined in the /etc/init directory and its subdirectories. The upstart system will currently process /etc/inittab and System V init scripts. On systems such as recent Fedora releases, /etc/inittab is likely to contain only the id entry for the initdefault action. Recent Ubuntu systems do not have /etc/inittab by default, although you can create one if you want to specify a default runlevel.

Upstart also has the initctl command to allow interaction with the upstart init daemon. This allows you to start or stop jobs, list jobs, get status of jobs, emit events, restart the init process, and so on. Listing 11 shows how to use initctl to obtain a list of upstart jobs on a Fedora 13 system.

Listing 11. Interacting with upstart init daemon using initctl
[ian@echidna ~]$ initctl list
rc stop/waiting
tty (/dev/tty3) start/running, process 1486
tty (/dev/tty2) start/running, process 1484
tty (/dev/tty6) start/running, process 1492
tty (/dev/tty5) start/running, process 1490
tty (/dev/tty4) start/running, process 1488
plymouth-shutdown stop/waiting
control-alt-delete stop/waiting
system-setup-keyboard start/running, process 1000
readahead-collector stop/waiting
vpnc-cleanup stop/waiting
quit-plymouth stop/waiting
rcS stop/waiting
prefdm start/running, process 1479
init-system-dbus stop/waiting
ck-log-system-restart stop/waiting
readahead stop/waiting
ck-log-system-start stop/waiting
start-ttys stop/waiting
readahead-disable-services stop/waiting
ck-log-system-stop stop/waiting
rcS-sulogin stop/waiting
serial stop/waiting

To learn more about upstart, see Resources.

Systemd

Another new initialization system called systemd is also emerging. Systemd was developed by Lennart Poettering in early 2010. He described the rationale and design in a blog post (see Resources. It has been adopted for Fedora 15, openSUSE 12.1 and Mandriva 2011 among others.

Many daemon processes communicate using sockets. In order to gain speed and enhance parallelism in the system startup, systemd creates these sockets at startup, but only starts the associated task when a connection request for services on that socket is received. In this way, services can be started only when they are first required and not necessarily at system initialization. Services that need some other facility will block until it is available, so only those services that are waiting for some other process need block while that process starts.

Extending the idea of waiting for services systemd uses autofs to define mount points, so the mount point for a file system is available, but the actual mount may be delayed until some process attempts to open a file on the file system or otherwise use it.

These ideas not only delay startup of services until needed, they also reduce the need for dependency checking between services, as the interface for the service can be ready long before the service itself needs to be available.

Like upstart, systemd can process existing initialization from /etc/inittab. It can also process /etc/fstab to control file system mounting. Native systemd initialization revolves around the concept of units, which can be grouped into control groups or cgroups.

  • Service units are daemons that can be started, stopped, restarted, reloaded.
  • Socket units encapsulate a socket in the file-system or on the Internet.
  • Device units encapsulate a device in the Linux device tree.
  • Mount units encapsulate a mount point in the file system hierarchy.
  • Automount units encapsulate an automount point in the file system hierarchy.
  • Target units group other units together, providing a single control unit for multiple other units.
  • Snapshot units reference other units and can be used to save and roll back the state of all services and units of the init system, for example during suspend.

Units are configured using a configuration file which includes the unit type as a suffix. For example, cups.service, rpcbind.socket or getty.target. The location of system configuration files, for example /etc/systemd/system can be determined using the pkg-config command as shown in Listing 11 which shows the location on a Fedora 17 system. Systemd also checks /usr/local/lib/systemd/system and /usr/lib/systemd/system for configuration information.

Listing 12. Locating the systemd system configuration directory
[ian@attic4 ~]$ pkg-config systemd --variable=systemdsystemconfdir
/etc/systemd/system

The systemctl command allows you to interrogate and control the systemd daemon, including starting and stopping units or listing their status. Listing 13 illustrates the use of systemctl to display the status of systemd units.

Listing 13. Partial output from systemctl
[ian@attic4 ~]$ systemctl --no-pager
UNIT                      LOAD   ACTIVE SUB       JOB DESCRIPTION
proc-sys...misc.automount loaded active running       Arbitrary Executable File
sys-devi...et-eth0.device loaded active plugged       RTL8111/8168B PCI Express
sys-devi...da-sda1.device loaded active plugged       WDC_WD6401AALS-00L3B2
sys-devi...a-sda10.device loaded active plugged       WDC_WD6401AALS-00L3B2
sys-devi...a-sda11.device loaded active plugged       WDC_WD6401AALS-00L3B2
sys-devi...a-sda12.device loaded active plugged       WDC_WD6401AALS-00L3B2
sys-devi...da-sda2.device loaded active plugged       WDC_WD6401AALS-00L3B2
...
systemd-...ssions.service loaded active exited        Permit User Sessions
systemd-...-setup.service loaded active exited        Setup Virtual Console
tcsd.service              loaded failed failed        LSB: Init script for TCSD
udev-settle.service       loaded active exited        udev Wait for Complete Dev
udev-trigger.service      loaded active exited        udev Coldplug all Devices
udev.service              loaded active running       udev Kernel Device Manager
udisks2.service           loaded active running       Storage Daemon
upower.service            loaded active running       Daemon for power managemen
avahi-daemon.socket       loaded active listening     Avahi mDNS/DNS-SD Stack Ac
cups.socket               loaded active running       CUPS Printing Service Sock
...
syslog.target             loaded active active        Syslog
systemd-...ted-ntp.target loaded active active        Network Time Protocol
systemd-...ead-done.timer loaded active elapsed       Stop Read-Ahead Data Colle
systemd-...es-clean.timer loaded active waiting       Daily Cleanup of Temporary

LOAD   = Reflects whether the unit definition was properly loaded.
ACTIVE = The high-level unit activation state, i.e. generalization of SUB.
SUB    = The low-level unit activation state, values depend on unit type.
JOB    = Pending job for the unit.

132 units listed. Pass --all to see inactive units, too.

Linux Changing Run Levels

If you are moving to higher run levels, you may make additional services available to users, while moving to a lower run level will causes to services (daemons) to become unavailable. On the production server run level 3 is the normally used and rarely changed. However, some administrative tasks require the administrator to move system to run level 1 i.e single user mode.

Linux Find Out Current Run Level Command

Type the following command:
$ who -r
Sample outputs:

         run-level 2  2011-10-12 05:38

Linux Change Run Level Command

Use the init command to change rune levels:
# init 1

Runlevel And Its Usage

The Init is the parent of all processes with PID # 1. Its primary purpose is to create processes from a script stored in the file /etc/inittab file. This file usually has entries which cause init to spawn gettys on each line that users can log in. A runlevel is nothing but a software configuration of the Linux system which allows only a selected group of processes to exist. The processes spawned by init for each of these runlevels are defined in the /etc/inittab file. Init can be in one of eight runlevels as follows:

  • Runlevel 0 is halt
  • Runlevel 1 is single-user
  • Runlevels 2-5 are multi-user (some distro uses RUN level 5 to start X [KDE/Gnome])
  • Runlevel 6 is for rebooting system

For example, typing the init 3 command will move system to run level 3:

# init 3

On most Linux server system default run level is 3 and on most Linux Desktop system default run level is 5. The default run level is defined by the initdefault line at the top of /etc/inittab file under CentOS / Fedora / Redhat / RHEL / Debian Linux. To change the default run level, edit /etc/inittab file, and edit entry initdefault:

# vi /etc/inittab

Set initdefault to 5, so that you can boot to X next time when Linux comes up:

id:5:initdefault:

Save and close the file. Reboot the system to see changes:
# reboot

What’s a Runlevel?

When a Linux system boots, it launches the init processes. init is responsible for launching the other processes on the system. For example, when you start your Linux computer, the kernel starts init, and init executes the startup scripts to initialize your hardware, bring up networking, start your graphical desktop.

However, there isn’t just one single set of startup scripts init executes. There are multiple run levels with their own startup scripts – for example, one runlevel may bring up networking and launch the graphical desktop, while another runlevel may leave networking disabled and skip the graphical desktop. This means you can drop from “graphical desktop mode” to “text console mode without networking” with a single command, without manually starting and stopping different services.

More specifically, init runs the scripts located in a specific directory that corresponds to the runlevel. For example, when you enter runlevel 3 on Ubuntu, init runs the scripts located in the /etc/rc3.d directory.

image

At least, this is how it works with a traditional System V init system – Linux distributions are beginning to replace the old System V init system. While Ubuntu’s Upstart currently maintains compatibility with SysV init scripts, this is likely to change in the future.

The Runlevels

Some runlevels are standard between Linux distributions, while some runlevels vary from distribution to distribution.

The following runlevels are standard:

  • 0 – Halt (Shuts down the system.)
  • 1 – Single User Mode (The system boots into superuser mode without starting daemons or networking. Ideal for booting into a recovery or diagnostics environment.)
  • 6 – Reboot

Runlevels 2-5 vary depending on distribution. For example, on Ubuntu and Debian, runlevels 2-5 are the same and provide a full multi-user mode with networking and graphical login. On Fedora and Red Hat, runlevel 2 provides multi-user mode without networking (console login only), runlevel 3 provides multi-user mode with networking (console login only), runlevel 4 is unused, and runlevel 5 provides multi-user mode with networking and graphical login.

Switching to a Different Runlevel

To switch to a different runlevel while the system is already running, use the following command:

sudo telinit #

Replace # with the number of the runlevel you want to switch to. Omit sudo and run the command as root if you’re running a distribution that doesn’t use sudo.

image

Booting Directly to a Specific Runlevel

You can select a runlevel to boot into from the boot loader – Grub, for example. At the start of the boot process, press a key to access Grub, select your boot entry, and press e to edit it.

sshot-1

You can add single to the end of the linux line to enter the single-user runlevel (runlevel 1). (Press Ctrl+x to boot after.) This is the same as the recovery mode option in Grub.

image

Traditionally, you could specify a number as a kernel parameter and you’d boot to that runlevel – for example, using 3 instead of single to boot to runlevel 3. However, this doesn’t appear to work on the latest versions of Ubuntu – Upstart doesn’t seem to allow it. Similarly, how you change the default runlevel will depend on your distribution.

Linux/Unix: pstree Command Examples: See A Tree Of Processes

am a new Linux user. How do I display the process on the Linux based server or desktop/laptop in easy to read tree format using bash shell prompt?

Linux and Unix are multitasking operating systems i.e. a system that can run multiple tasks (process) during the same period of time. A process is nothing but a running program (command) on Linux or Unix-like systems.

The pstree command shows running processes as a tree.

Purpose

Display running processes as a treeon Linux

Syntax

The basic syntax is as follows:

pstree

OR

pstree pid

OR

pstree user

OR

pstree [options] pid|user

NOTE: If pid given as a command line argument, start at this PID; default is 1 (init). if usergiven as a command line argument, show only trees rooted at processes of this user. pstree only accept one argument, and that argument can be either the user or a pid.

Install pstree on Unix

By default the pstree command installed and available on Linux operating systems only. For Unix-like system such as FreeBSD, OS X and others you need to install it using either source code or third party binary repos. You can compile pstree under most unixes, tested are AIX, Linux, HP-UX, A/UX, SunOS, Solaris, (Free|Open|Net)BSD, MacOSX/Darwin, and others. Use wget command to grab the source code:
$ wget ftp://ftp.thp.uni-duisburg.de/pub/source/pstree.tar.gz
Use tar command to extract files and build the source code with c compiler (cc):
$ tar zxvf pstree.tar.gz
$ cc -O -o pstree pstree.c
## install binary in /usr/local/bin/ directory ##
$ sudo cp pstree /usr/local/bin

Sample outputs:

Animated gif 01: Installing pstree on Unix operating systems

pstree command examples

To see a tree diagram of all the processes currently on the server, type:
# pstree
# pstree | less
# pstree | more

Sample outputs:

Fig.01: pstree command in action
At the top of the diagram, you will the process init which is the first process that is started when Linux comes on line. init is the parent of all processes on the system, it is executed by the kernel and is responsible for starting all other processes. You can use ASCII characters to draw the tree by passing the -A option:
# pstree -A

Display command line arguments

To see the list of command line arguments, pass the -a option:
$ pstree -a
Sample outputs:

init
  ├─abrt-dump-oops -d /var/spool/abrt -rwx /var/log/messages
  ├─abrtd
  ├─acpid
  ├─atd
  ├─auditd
  │   ├─audispd
  │   │   ├─sedispatch
  │   │   └─{audispd}
  │   └─{auditd}
  ├─crond
  ├─dbus-daemon --system
  │   └─{dbus-daemon}
  ├─hald
  │   ├─hald-runner
  │   │   ├─hald-addon-acpi
  │   │   └─hald-addon-inpu
  │   └─{hald}
  ├─irqbalance --pid=/var/run/irqbalance.pid
  ├─keepalived -D
  │   ├─keepalived -D
  │   └─keepalived -D
  ├─master
  │   ├─pickup -l -t fifo -u
  │   └─qmgr -l -t fifo -u
  ├─mingetty /dev/tty1
  ├─mingetty /dev/tty2
  ├─mingetty /dev/tty3
  ├─mingetty /dev/tty4
  ├─mingetty /dev/tty5
  ├─mingetty /dev/tty6
  ├─nginx
  │   ├─nginx
  │   ├─nginx
  │   └─nginx
  ├─ntpd -u ntp:ntp -p /var/run/ntpd.pid -g
  ├─rhnsd
  ├─rhsmcertd
  ├─rsyslogd -i /var/run/syslogd.pid -c 5
  │   ├─{rsyslogd}
  │   ├─{rsyslogd}
  │   └─{rsyslogd}
  ├─sshd
  │   └─sshd
  │       └─bash
  │           └─pstree -a
  ├─udevd -d
  │   ├─udevd -d
  │   └─udevd -d
  └─vnstatd -d

Display PIDs

To show PIDS for each process name, pass the -p option:
$ pstree -p
Sample outputs:

init(1)-+-NetworkManager(1300)---{NetworkManager}(1313)
        |-accounts-daemon(2448)---{accounts-daemon}(2453)
        |-acpid(1460)
        |-aptd(6958)
        |-atd(1463)
        |-atop(3941)
        |-avahi-daemon(1359)---avahi-daemon(1361)
        |-bamfdaemon(6531)-+-{bamfdaemon}(6532)
        |                  `-{bamfdaemon}(6533)
        |-bluetoothd(1293)
        |-colord(2875)-+-{colord}(2884)
        |              `-{colord}(3091)
        |-console-kit-dae(2493)-+-{console-kit-dae}(2496)
        |                       |-{console-kit-dae}(2497)
.....
...
....
        ├─vmware-vmblock-(1792)─┬─{vmware-vmblock-}(1793)
        │                       └─{vmware-vmblock-}(1794)
        ├─whoopsie(1477)───{whoopsie}(1609)
        ├─zeitgeist-daemo(6740)───{zeitgeist-daemo}(6743)
        ├─zeitgeist-datah(6750)───{zeitgeist-datah}(6754)
        └─zeitgeist-fts(6748)─┬─cat(6756)
                              └─{zeitgeist-fts}(6755)

How do I sort processes?

To sort processes with the same ancestor by PID instead of by name i.e. numeric sort, pass the -n options as follows:
$ pstree -n
$ pstree -np

How can I see who is the owner/user of a process?

To find out the owner of a process in parenthesis, pass the -u option to pstree command:
$ pstree -u
Sample outputs:

init─┬─abrt-dump-oops
     ├─abrtd
     ├─acpid
     ├─atd
     ├─auditd─┬─audispd─┬─sedispatch
     │        │         └─{audispd}
     │        └─{auditd}
     ├─crond
     ├─dbus-daemon(dbus)───{dbus-daemon}
     ├─hald(haldaemon)─┬─hald-runner(root)─┬─hald-addon-acpi(haldaemon)
     │                 │                   └─hald-addon-inpu
     │                 └─{hald}
     ├─irqbalance
     ├─keepalived───2*[keepalived]
     ├─master─┬─pickup(postfix)
     │        └─qmgr(postfix)
     ├─6*[mingetty]
     ├─nginx───3*[nginx(nginx)]
     ├─ntpd(ntp)
     ├─rhnsd
     ├─rhsmcertd
     ├─rsyslogd───3*[{rsyslogd}]
     ├─sshd───sshd───bash───pstree
     ├─udevd───2*[udevd]
     └─vnstatd

How can I highlight the current process and its ancestors?

Pass the -h option to highlight the current process and its ancestors. Pass -H option highlight the specified process (by name/pid):
$ pstree -h
OR highlight process with PID # 60093:
$ pstree -H 60093
Sample outputs:

Fig. 02: Highlighting processes

How can I view a process by PID or user?

The pstree can either accept PID or username as a command line argument. The syntax is as follows to see info about PID 1313
$ pstree 1313
$ pstree -H 1313

In this following example, display only those tree branches (processes) that have been initiated by a user with a username nixcraft:
$ pstree nixcraft

pstree command options

From the pstree(1) command man page:

Option Meaning
-a Show command line arguments.
-A Use ASCII line drawing characters.
-c Don’t compact identical subtrees.
-h Highlight current process and its ancestors.
-H Highlight this process and its ancestors.
-G Use VT100 line drawing characters.
-l Don’t truncate long lines.
-n Sort output by PID.
-p Show PIDs; implies -c.
-u Show uid transitions.
-U Use UTF-8 (Unicode) line drawing characters.
-V Display version information.
-Z Show SELinux security contexts.

What is a boot loader? (install boot manager)

Most simply, a boot loader loads the operating system. When your machine loads its operating system, the BIOS reads the first 512 bytes of your bootable media (which is known as the master boot record, or MBR). You can store the boot record of only one operating system in a single MBR, so a problem becomes apparent when you require multiple operating systems. Hence the need for more flexible boot loaders.

The master boot record itself holds two things — either some of or all of the boot loader program and the partition table (which holds information regarding how the rest of the media is split up into partitions). When the BIOS loads, it looks for data stored in the first sector of the hard drive, the MBR; using the data stored in the MBR, the BIOS activates the boot loader.

Due to the very small amount of data the BIOS can access, most boot loaders load in two stages. In the first stage of the boot, the BIOS loads a part of the boot loader known as the initial program loader, or IPL. The IPL interrogates the partition table and subsequently is able to load data wherever it may exist on the various media. This action is used initially to locate the second stage boot loader, which holds the remainder of the loader.

The second stage boot loader is the real meat of the boot loader; many consider it the only real part of the boot loader. This contains the more disk-intensive parts of the loader, such as user interfaces and kernel loaders. These user interfaces can range from a simple command line to the all-singing, all-dancing GUIs.

Boot loaders are usually configured in one of two ways: either as a primary boot loader or as a secondary boot loader. Primary boot loaders are where the first stage of the boot loader is installed on the MBR (per the previous description). Secondary boot loaders are where the first stage of the boot loader is installed onto a bootable partition. A separate boot loader must then be installed into the MBR and configured to pass control to the secondary boot loader.

Many newer Linux boot loaders can be especially useful since they give you varying degrees of interaction, such as advanced GUI and encrypted passwords, along with the ability to load from a selection of operating systems. Thus you can have many operating systems coexisting on the same machine spanning multiple physical disks. This setup has become common because it helps many users reconcile the treasures of valuable datafiles originally generated by their Windows® machines with their shiny new Linux installs. Personally, I think this setup is great; I use a single box for both Linux and Windows.

Over time, boot loaders have been enhanced to include a greater range of functionality for the user. Such functionality and configuration vary from loader to loader, although the basic purpose remains the same.

Now let’s look at two of the more popular boot loaders: LILO and GRUB.

LILO

LInux LOader, or LILO, comes as standard on all distributions of Linux. As one of the older/oldest Linux boot loaders, its continued strong Linux community support has enabled it to evolve over time and stay viable as a usable modern-day boot loader. Some new functionality includes an enhanced user interface and exploitation of new BIOS functions that eliminate the old 1024-cylinder limit.

Although LILO continues to be developed, the basic principles of how LILO works still remain the same.

lilo

Making LILO your boot loader

What you will need to do to use LILO as your boot loader depends on whether you are installing the OS fresh or have already installed Linux and are planning on moving to LILO. If you’re starting fresh, you can jump straight to the Configuring LILO section. If you already have a Linux distribution installed, you usually get an option to install and configure LILO (and can boot your machine into your new Linux install).

For existing Linux users migrating to LILO, first you have to acquire the latest version of LILO. Before doing anything else, I advise you to make sure you have a Linux boot disk handy — it makes life a lot easier if you accidentally mess something up and would like to be able to get back into your original Linux configuration! Once you have LILO on your system, making it take over your MBR is very easy. As the root user, type:

# /sbin/lilo -v -v

This will use the current LILO defaults and splat anything that is currently in the MBR. However, read about Configuring LILO to make sure you are able to boot up as expected. Also note that if you want to run Windows and Linux on a single machine, you should install your Windows OS first and then the Linux OS, so that the boot loader you choose in the Linux install won’t be written over by the Windows boot loader. Unlike the Linux boot loaders, the majority of Windows boot loaders will not allow you to load Linux. If you’ve already installed Linux first, don’t fret; just create yourself a Linux boot disk so that after you have installed Windows, you can get back into your Linux install and overwrite the MBR.

Configuring LILO

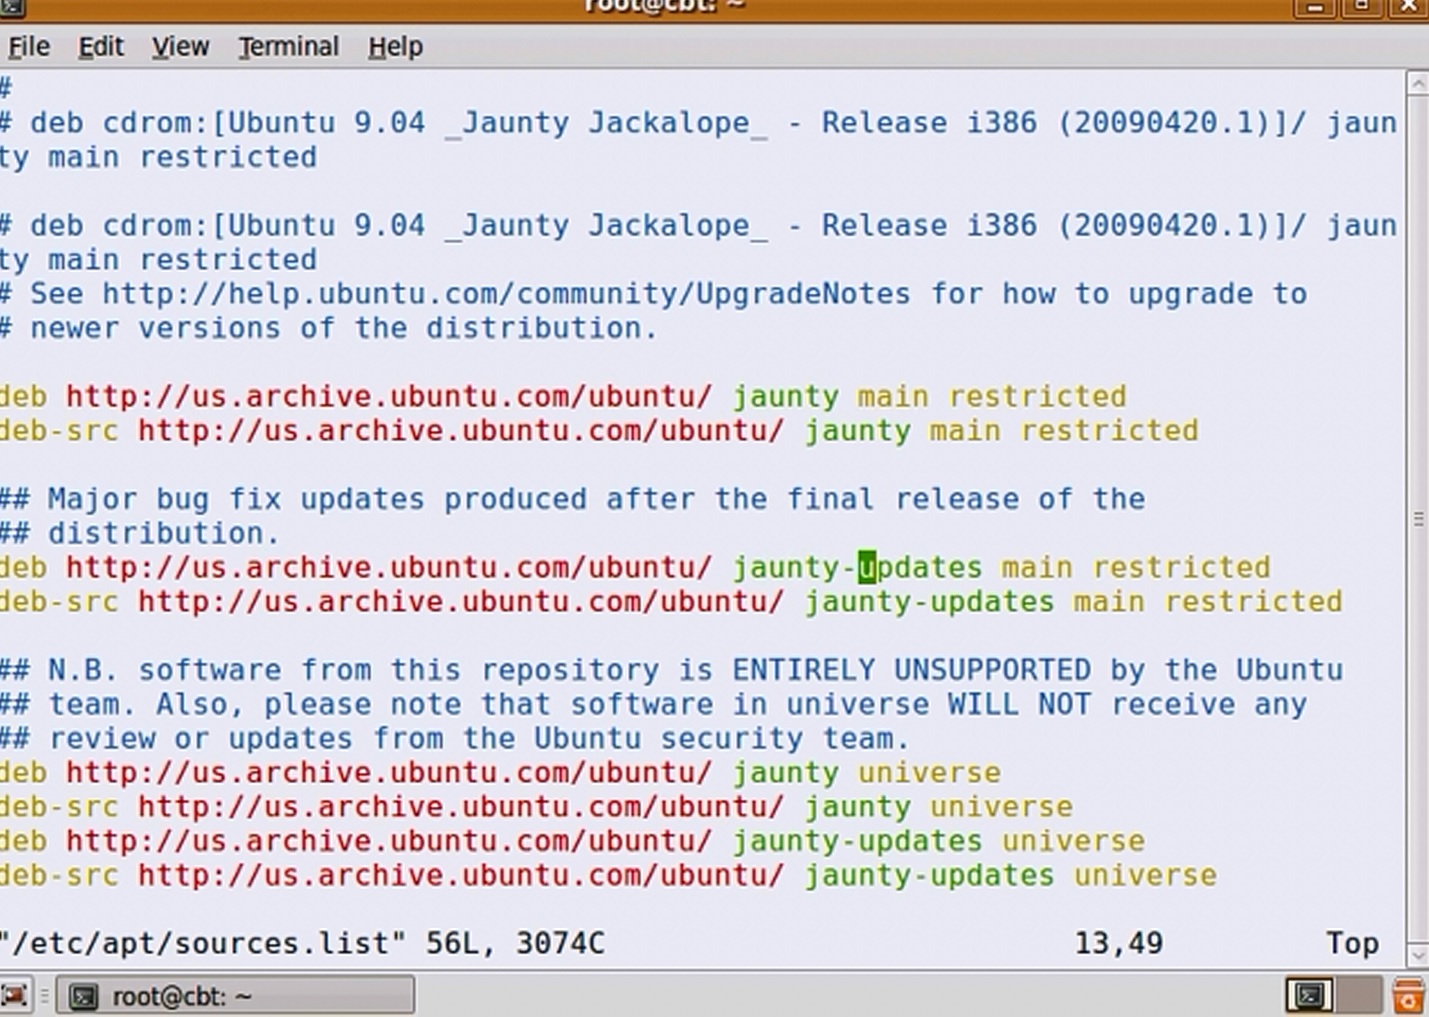
LILO configuration is all done through a configuration file located in /etc/lilo.conf. Listing 1 shows an example configuration, relating to my home machine, for dual booting a Linux and Windows machine. You can visualize how this configuration relates to an actual machine by looking at my basic workstation setup:

  • Primary HDD (physical disk 1) with Windows XP installed (initially all there was on the machine). In Linux terms, this HDD is /dev/hda (hd0,0 in GRUB terms).
  • Secondary HDD (physical disk 2) with Red Hat Linux installed; the root partition is on the third partition of this hard drive, /dev/hdb3 (hd1,2 in GRUB terms).
Listing 1. Example lilo.conf file
boot=/dev/hda
map=/boot/map
install=/boot/boot.b
prompt
timeout=100
compact
default=Linux
image=/boot/vmlinuz-2.4.18-14
	label=Linux
	root=/dev/hdb3
	read-only
	password=linux
other=/dev/hda
	label=WindowsXP

The options used in Listing 1 are:

  • The boot= line tells LILO where to install the boot loader. In the previous example, this will install it to the MBR of first hard disk. You could alternatively install LILO in /dev/hdb3 (the Linux partition in the example), which would then require you to install another boot loader into /dev/hda that points it to the LILO boot loader; then you just let LILO act as a secondary boot loader. In general, /dev/hda is the most common place for your boot loader to reside. You can also make a LILO floppy boot disk by pointing this parameter to the floppy drive, most commonly /dev/fd0.
  • map= points to the map file used by LILO internally during bootup. When you install LILO using the /sbin/lilo command, it automatically generates this file, which holds the descriptor table (among other things). My advice is to leave this as it is!
  • install= is one of the files used internally by LILO during the boot process. This holds both the primary and secondary parts of the boot loader. A segment of this boot.b file is written to the MBR (the primary part of the boot loader), which then points to the map and subsequently points to the secondary boot loader. Again, leave this as it is!
  • prompt= tells LILO to use the user interface (giving you in this example two selections — Linux and WindowsXP). In addition using the prompt/user interface, you get the option to specify specific parameters for the Linux kernel or others if appropriate. If you do not specify this option in the configuration file, LILO will boot into the default OS with no user interaction and no waiting. (It’s worth noting, though, that if you hold the SHIFT key down during boot, you can get the prompt up anyway, which is quite useful if you don’t want the average Joe to be exposed to the boot loader).
  • timeout= is the number of tenths of a second that the boot prompt will wait before automatically loading the default OS, in this case Linux. Ifprompt is not specified in the lilo.conf, this parameter is ignored.
  • The compact option magically makes the boot process quicker by merging adjacent disk read requests into a single request. It can be a mixed blessing, though, as I’ve seen a number of posts on forums regarding issues with this option. This option especially useful if you wish to boot from a floppy.
  • The default= option tells LILO which image to boot from by default, such as after the timeout period. This relates to a label of one of the images in the lilo.conf file. If you don’t specify this option in the configuration file, it will boot the first image specified in the file.
  • For each version of Linux you want to make available for users to boot into, you should specify image= and the following three options. The image option specifies the kernel version you wish to boot to.
  • label= identifies the different OS you want to boot from at the user interface at runtime. In addition, this label is used for specifying the default OS to boot from. (Note: Avoid spaces in the label name; otherwise, you will get an unexpected error when loading the file.)
  • The root= option tells LILO where the OS file system actually lives. In our example, it is /dev/hdb3, which is the third partition of the second disk.
  • read-only tells LILO to perform the initial boot to the file system read only. Once the OS is fully booted, it is mounted read-write.
  • The password= option allows you to set a password for the specific OS you are booting into. In the example this password is held in the lilo.conf file as readable text, so is easily accessible for all to read. Alternatively if you set password=”” you can set the password when the bootloader is installed. These can be set on each of the operating systems you wish to boot from if required (in our example we only set a password on the Linux boot).
  • other= acts like a combination of the image and root options, but for operating systems other than Linux. In our example, it tells LILO where to find the Windows OS, which resides on the first disk in the first partition. This will usually be the case if you have installed Windows first, then Linux.
  • label= is the same as all other label options.

You can use many other parameters in the lilo.conf file, but the parameters in Listing 1 should get you into a fairly usable state on your machine. For further information on these and other lilo.conf parameters, refer to the manual pages (man lilo.conf). Since lilo.conf is not read at boot time, the MBR needs to be “refreshed” when this is changed. If you do not do this upon rebooting, none of your changes to lilo.conf will be reflected at startup. Like getting LILO into the MBR in the first place, you need to run:

$ /sbin/lilo -v -v

The -v -v flags give you very verbose output. There are a fair number of parameters you can specify when running LILO like we did. See the manual pages for further information (man lilo).

The initial boot process

When LILO initially loads, it brings up in order each of the letters — L-I-L-O. If all the letters come up, the first stage boot was successful. Anything less indicates a problem:

  • L: The first stage boot loader has been loaded. If LILO stops here, there were problems loading the second stage boot loader. This is usually accompanied by an error code. The common problems at this stage are media problems or incorrect disk parameters specified in your lilo.conf file.
  • LI: The second stage boot loader has been loaded. LILO halting at this point indicates the second stage boot loader could not be executed. Again, this can be due to problems similar to just L: loading or if the boot.b file has been corrupted, moved, or deleted.
  • LIL: The second stage boot loader has now been executed. At this point, media problem could again be responsible or the map file (as specified in the lilo.conf file) could have had problems finding the descriptor tables.
  • LIL?: Loaded to the same point as above. This usually means the second stage boot loader loaded at an incorrect address, caused most likely by boot.b being in a different place than specified in the lilo.conf file.
  • LIL-: Loaded to the same point as above. Problem loading the descriptor table, most likely due to a corrupt descriptor table.
  • LILO: LILO has successfully loaded with no errors.

Additional configuration at boot time

Once LILO has successfully loaded, you will see a LILO prompt. Still using the example lilo.conf file as before, at this point you have two choices, which may not be immediately obvious to LILO newbies. First, you may let LILO time out (after 10 seconds), which will boot /dev/hdb3, the Linux partition. Second, you can press the TAB key, which will list a selection of operating systems to boot from. In our example lilo.conf, we would get “Linux” and “WindowsXP” as our options. Typing either of these will load up that OS. Specifically loading the Linux option will then prompt you to enter a password, which in this case is linux. Incorrectly entering the password will take you back to the LILO prompt.

A final word of advice when trying out LILO for the first time: I found it a lot safer to work out my LILO configuration using a floppy boot disk rather than my hard disk. To do this, you must replace the boot=/dev/hda with boot=/dev/fd0 in the lilo.conf file. That way, if I messed up any of the configuration in my lilo.conf file, I could take out the boot disk and boot into Linux as before. Once I was happy everything booted fine using the floppy disk, I then changed my lilo.conf back to use boot=/dev/hda and ran /sbin/lilo a final time to upload my changes.

GNU GRUB

grub

grub1

More recently, the GRand Unified Boot loader (commonly known as GRUB) seems to have somewhat taken the boot loaders crown from LILO. GNU GRUB is actively developed by the Free Software Foundation and based on the original GRUB program, originally created by Erich Stefan Boleyn.

Make GRUB your boot loader

As with LILO, the steps you will need to perform to use GRUB as your active boot loader depend on whether you are installing the OS fresh or have already installed Linux and are planning on moving to GRUB. If you’re starting fresh, you can jump straight to the Configuring GRUB section. If you already have a Linux distribution installed, you usually get an option to install and configure LILO (and can boot your machine into your new Linux install).

For existing Linux users wanting to migrate to GRUB, get the latest version of GRUB (see Resources). Again, as with LILO, before doing anything else, have a Linux boot disk handy. With the interactive mode (described below), this disk should not be required, but it’s nice to have just in case you get out of your depth. Once you have GRUB installed on your system, making it take over your MBR is easy. As the root user, type:

# /boot/grub/grub

This will load up a BASH-like command prompt where you now use the GRUB command:

grub> install (hd1,2)/boot/grub/stage1 (hd1) (hd1,2)/boot/grub/stage2 p (hd1,2)/boot/grub/menu.conf

This command uses the GRUB install command, which requires the location of the stage one image and the location of the MBR (install (hd1,2)/boot/grub/stage1 (hd1)). Also the location of the stage two image ((hd1,2)/boot/grub/stage2) is required. Finally, an optional p (hd1,2)/boot/grub/menu.conf tells GRUB the location of the GUI menu configuration file.

In the previous example, hd1 is my Linux Disk and hd0 is my Windows disk. This will use the current GRUB defaults and splat anything that is currently in the MBR (read Configuring GRUB to make sure you are able to boot up as expected).

Configuring GRUB

GRUB configuration is all done through a configuration file located in /boot/grub/grub.conf. Listing 2 shows an example configuration that relates to my home setup, a dual-booting Linux and Windows machine:

lilo1

lilo2

Listing 2. Example grub.conf file
default=0
timeout=10
splashimage=(hd1,2)/grub/splash.xpm.gz
password --md5 $1$opeVt0$Y.br.18LyAasRsGdSKLYlp1
title Red Hat Linux
	password --md5 $1$0peVt0$Y.br.18LyAasRsGdSKLYlp1
	root (hd1,2)
	kernel /vmlinuz-2.4.18-14 ro root=LABEL=/
	initrd /initrd-2.4.18-14.img
title Windows XP
	password --md5 $1$0peVt0$Y.br.18LyAasRsGdSKLYlp1
	rootnoverify (hd0,0)
	chainloader +1

The options used in Listing 2 are:

  • The default= option signals to GRUB which image to boot from by default after the timeout period. This relates to one of the images in the grub.conf file. 0 is the first specified, 1 is the second specified, etc. If you don’t specify this option in the configuration file, it will boot the first image specified in the file.
  • timeout= is the number of seconds the boot prompt will wait before automatically loading the default OS, in this case, Red Hat Linux.
  • splashimage= is the location of the image to be used as the background for the GRUB GUI.
  • The password option specifies the MD5-encrypted password used to gain access to GRUB’s interactive boot options. Note this does not stop users loading your defined OS choices; this needs to be set on a per-title basis. To generate an md5 password, run the tool grub-md5-crypt (as root), which comes with GRUB. It will prompt you for the password you want to encrypt. It then will output the MD5-encrypted password. Copy this into your grub.conf after password -md5 but on the same line. Usually this password can be set to the root password, since it is only root who can read the grub.conf file anyway.
  • title identifies the specific OS that will be booted from at the user interface at runtime. Unlike with LILO, you can include spaces in this name.
  • password is set in the same way as the password above. Do not set this password to the root password if you are planning on sharing this machine with other users.
  • The root option tells GRUB where the OS file system actually lives. As you can see, GRUB references the media in a different way than LILO. In our LILO example, /dev/hdb3 is the third partition of the second disk. Grub references this disk as (hd1,2), again the third partition of the second disk (disk 0 being the first disk, partition 0 being the first partition).
  • kernel: vmlinuz-X.X.XX-XX is the name of the default boot kernel image within your root directory.
  • initrd: initrd-X.X.XX-XX.img is the name of the default initrd file within your root directory.
  • title is the same as all other title options.
  • password: See other password options.
  • The rootnoverify option tells GRUB to not try to vary the root of the OS. This saves load errors if the file system is not a supported by GRUB.
  • chainloader +1 tells GRUB to use a chain loader to load this OS, which is required for loading Windows.

You can use many other parameters in the grub.conf file, but the parameters in Listing 2 should get you into a fairly usable state on your machine. For further information on these and other grub.conf parameters, see the manual pages (man grub.conf).

Unlike LILO’s configuration file, grub.conf is read at boot time, and the MBR does not need to be refreshed when this is changed.

The initial boot process

When GRUB initially loads, like LILO it loads its first stage from the MBR. Once this has loaded, it then enters an intermediate stage between the common boot loader stages one and two (or for argument’s sake, Stage 1.5). Stage 1.5 is present to enable regular file system access to the GRUB configuration files in /boot/grub rather than accessing using disk blocks. We then enter stage two of the boot loader where GRUB loads the grub.conf file.

You should now see the GRUB GUI. For any native Windows user, this seems a much more friendly experience than that of LILO. But don’t think by having a GUI that GRUB is a dumbed-down boot loader. The wealth of options is astonishing. (See the tips for additional configuration at boot time.)

If your configuration is like mine, you should now be looking at a screen giving you two options: to boot into Red Hat Linux or to boot into Windows XP. By default, it will load Linux. The result of selecting either one of these is self explanatory.

Now for the good stuff.

Additional configuration at boot time

At the GRUB GUI, pressing any key will stop the timeout from kicking in. Then by pressing the P key, you can enter your GRUB password and gain full access to GRUB’s interactive booting options. You should now be able to use one of the three options by pressing the one of the following keys:

  • For edit commands before booting, press E. This allows you to edit the specific options for the currently highlighted OS. GRUB will then show only the options specific to the booting of that OS, which you can then edit as you see fit. This is especially useful if you have specified the wrong HDD for the root file system. If you need to access the machine in single-user mode (giving you root access without specifying a password!), select the Linux OS at the GRUB main screen. Then as before, press E and move to the kernel line (in my example, this is kernel /vmlinuz-2.4.18-14 ro root=LABEL=/). You then append single to the end of this line, and press B to boot using your changed grub.conf. Any changes you make in edit mode are not saved to the grub.conf file.
  • To modify kernel arguments, press A. If you are an experienced Linux user, you can tweak the kernel arguments to suit your needs.
  • To get to a BASH-like command-line interface, press C. This minimal command-line interface allows you to find GRUB configuration files on your system, load an alternate configuration file, and edit lines in the configuration file, as well as enter GRUB commands directly. You might use this if a configuration change, such as deleting a partition, has made your system unbootable. You might also use it if you need to boot a system into single-user mode or perhaps runlevel 3 instead of your normal runlevel.

The many uses for these options are beyond the scope of this article.

As you can see, GRUB really opens up the possibilities at boot time. This can be a mixed blessing, though, as GRUB also potentially allows attackers to gain access to the system before the OS has loaded. The main areas open to misuse are:

  • Access to single-user mode. Anyone loading into single-user mode is given root access, leaving your Linux system wide open to abuse.
  • Access to other operating systems. Any bootable operating systems you have configured that do not require a password, such as DOS, will be open.
  • Access to the GRUB editor. This allows users full access to change the GRUB configuration.

Setting security plays an important part in your GRUB configuration; setting a password and using MD5 encryption pays dividends to your overall system security.

Future of GRUB

GRUB is now being replaced by GRUB2. The original GRUB is being renamed to GRUB Legacy; apart from fixing bugs, it will no longer be actively developed. GRUB2 will be a complete rewrite of the original boot loader. To date, the following features are the core of the changes:

  • Replacement of Stage 1.5 with the creation of a compact core image
  • Support for dynamic loading to the core image
  • Trend towards making the overall GRUB framework object oriented
  • Support for internationalization, such as non-ASCII character sets
  • Support for different hardware architectures and different platforms (other than Linux)

Refer to the GRUB Web site (see the Resources section below for the latest developments.

GRUB vs. LILO

As stated at the start of this article, all boot loaders work in a similar way to fulfill a common purpose. But LILO and GRUB do have a number of differences:

  • LILO has no interactive command interface, whereas GRUB does.
  • LILO does not support booting from a network, whereas GRUB does.
  • LILO stores information regarding the location of the operating systems it can to load physically on the MBR. If you change your LILO config file, you have to rewrite the LILO stage one boot loader to the MBR. Compared with GRUB, this is a much more risky option since a misconfigured MBR could leave the system unbootable. With GRUB, if the configuration file is configured incorrectly, it will simply default to the GRUB command-line interface.

Conclusion

As with all software, the best choice for one user isn’t always the best for all. Of the two boot loaders covered here, my personal favorite is GNU GRUB. It is a good all-around loader, combining a slick user interface with a wealth of functionality. And yet many people who have used and loved LILO still find it to be the boot loader of choice. Fortunately, if you are new to the world of Linux boot loading, you won’t go far wrong with either.

Regarding security, anyone with access to a boot disk/CD can get past any of the security measures mentioned in this article by simply booting using a grub.conf or lilo.conf that does not have security set. With GRUB in particular, being able to boot into single-user mode could pose a serious security hole. A simple way to get around this problem is to disable booting from CD and floppy in your machine’s BIOS and make sure your BIOS is set with a password so others can not change these settings.

Have fun!

GRUB bootloader – Full tutorial

One of the most frightening things about Linux is the horrible word bootloader. The primary reason for this is the fact that most new Linux users have only ever used Windows operating systems. In the Windows world, they have never bothered with bootloaders. For them, the issue of a system booting was a transparent one. At most, they would use Windows Recovery Console to fix problems for them. Thus, they have been spared the need to learn about the single most important piece of software on a computer – the little program that makes it all work.

This article is supposed to provide you with basic understanding of the GRUB bootloader. If you have read my other Linux articles, you are familiar with partitioning and Linux notation, as well as with the command line. The next logical step is to enhance this knowledge by taking one step further. Understanding how GRUB works and what boot entries in the boot menu mean will help you understand how the operating systems work, how to fix, recover or modify the GRUB menu to suit your needs, and how to setup different work environments with several operating systems.

In the past, we have relied on the installation setups to make the hard work for us. In fact, setting up GRUB, while frightening, is a quite simple and fully reversible procedure. Mastering the GRUB is a very important step in building up the confidence to use Linux. So if you are ready, read on.

But first of all, a foreword of wisdom. This article is a compilation of sources and examples that will help you learn about GRUB. Of course, it’s all out there somewhere, on the Internet. However, new Linux users will probably find the notion of spending hours searching for relevant pieces of information (especially if their PC won’t boot) somewhat frustrating. The goal of this guide is to help provide simple and quick solutions to most common problems regarding multi-boot setups and installation of Linux operating systems.

Everything is a file

To be able to successfully master the secrets of GRUB, you must understand one of the basic foundations of *NIX-based operating systems. Everything is a file. Even hard disks and partitions are treated as files. There is no magic. If you remember this, you will find the supposedly perilous task of tampering with partitions no different than playing with files using a file explorer (or the command line). Now that we have established this, we can move on to the more technical parts of grubbing.

Introduction

GNU GRUB is a bootloader (can also be spelled boot loader) capable of loading a variety of free and proprietary operating systems. GRUB will work well with Linux, DOS, Windows, or BSD. GRUB stands for GRand Unified Bootloader.

GRUB is dynamically configurable. This means that the user can make changes during the boot time, which include altering existing boot entries, adding new, custom entries, selecting different kernels, or modifying initrd. GRUB also supports Logical Block Address mode. This means that if your computer has a fairly modern BIOS that can access more than 8GB (first 1024 cylinders) of hard disk space, GRUB will automatically be able to access all of it.

GRUB can be run from or be installed to any device (floppy disk, hard disk, CD-ROM, USB drive, network drive) and can load operating systems from just as many locations, including network drives. It can also decompress operating system images before booting them.

What about LILO?

You may have heard about another Linux bootloader called LILO (stands for LInux LOader). While a sensible option for many Linux users, I believe that GRUB is a better choice, for several reasons:

  • LILO supports only up to 16 different boot selections; GRUB supports an unlimited number of boot entries.
  • LILO cannot boot from network; GRUB can.
  • LILO must be written again every time you change the configuration file; GRUB does not.
  • LILO does not have an interactive command interface.

All in all, it seems that GRUB is the winner. So let’s see what this baby can do.

How does GRUB work?

When a computer boots, the BIOS transfers control to the first boot device, which can be a hard disk, a floppy disk, a CD-ROM, or any other BIOS-recognized device. We’ll concentrate on hard disks, for the sake of simplicity.

The first sector on a hard is called the Master Boot Record (MBR). This sector is only 512 bytes long and contains a small piece of code (446 bytes) called the primary boot loader and the partition table (64 bytes) describing the primary and extended partitions.

By default, MBR code looks for the partition marked as active and once such a partition is found, it loads its boot sector into memory and passes control to it.

GRUB replaces the default MBR with its own code.

Furthermore, GRUB works in stages.

Stage 1 is located in the MBR and mainly points to Stage 2, since the MBR is too small to contain all of the needed data.

Stage 2 points to its configuration file, which contains all of the complex user interface and options we are normally familiar with when talking about GRUB. Stage 2 can be located anywhere on the disk. If Stage 2 cannot find its configuration table, GRUB will cease the boot sequence and present the user with a command line for manual configuration.

Stage 1.5 also exists and might be used if the boot information is small enough to fit in the area immediately after MBR.

The Stage architecture allows GRUB to be large (~20-30K) and therefore fairly complex and highly configurable, compared to most bootloaders, which are sparse and simple to fit within the limitations of the Partition Table.

GRUB notation

This section is intended to help you get familiar with GRUB, without touching anything. The next section deals with actual files and manual configuration. GRUB has its own notation, which is very similar yet somewhat different from the general notation a typical Linux user might be used to. Now, here’s an example of a typical GRUB entry:

(hd0,1)
  • The brackets are a must; all devices listed in GRUB menu must be enclosed in brackets.
  • hd stands for hard disk; alternatively, fd stands for floppy disk, cd stands for CD-ROM etc.
  • The first number (integer for geeks) refers to the physical hard drive number; in this case, the first drive, as they are counted from zero up. For example, hd2 refers to the third physical hard drive.
  • The second number refers to the partition number of the selected hard drive; again, partitions are counted from zero up. In this case, 1 stands for the second partition.

From here, it is evident that GRUB (menu) does not discriminate between IDE or SCSI drives or primary or logical partitions. The task of deciding which hard drive or partition may boot is left to BIOS and Stage 1. As you see, the notation is very simple.

Primary partitions are marked from 0 to 3 (hd?,0), (hd?,1), (hd?,2), (hd?,3). Logicalpartitions in the extended partition are counted from 4 up, regardless of the actual number of primary partitions on the hard disk, e.g. (hd1,7).

The entries alone are not enough to boot an operating system though. GRUB also needs to know what operating system images to load. These are assigned as parameters to each of the called devices, including special flags (switches). For example, Windows Safe Mode is a special flag. Here is an example of a GRUB menu booting only Ubuntu.

GRUB Ubuntu boot

Here’s an example of a GRUB menu from a computer with triple boot (SUSE 10.2, Ubuntu 6.10 and Windows XP). This is the actual menu.lst on one of my real machines.

GRUB triple boot

Let’s try to understand what the entries mean. Only uncommented lines count. Commentsare marked with #. The lines that have a series of small gray xs showing are in indication that text therein belongs to the line preceding it. In other words, there text simply dropped to another line to visually accommodate the text editor and screen resolution limitations.

default 0
timeout 8

The first line (default 0) means that the first operating system listed will be booted. In this case, it’s SUSE 10.2. The second line (timeout 8) tells how much time (seconds) the user has to make his choice before the default entry is loaded. Simple, isn’t it?

gfxmenu (hd0,2)/boot/message

The GRUB menu can also be graphic. The fancy stuff needed to present the user with a colorful background and possibly some extras is located on the first physical disk, thirdpartition (hd0,2). This is a primary partition, as we have seen earlier.

title openSUSE 10.2
root (hd0,2)
kernel /boot/vmlinuz-…
initrd /boot/initrd.img-…

This is the first operating system entry in the menu.

  • title is as simple as it sounds. It’s merely a string that’s meant to help the user read the menu in human terminology.
  • root (hd0,2) tells GRUB where its configuration files are located. In this instance, they can be found under (hd0,2)/boot/grub.
  • kernel /boot/vmlinuz-… boots the actual kernel image. There can be many such images available. The fact there is no device specified before the /boot/vmlinuz indicates the image is located on the same partition as the GRUB itself. This is often the default case for your primary choice of operating system.
  • initrd /boot/initrd.img-… is the temporary file system that makes system preparations – adapts generic kernel image to specific hardware – before the real root is loaded.

The extra switches used after the kernel indicate where the actual root is located, what graphic mode is used and where the swap partition resides. This article will not go into detail regarding the more advanced GRUB configurations.

title Ubuntu, kernel … (/dev/sda9)
kernel (hd0,8)/boot/vmlinuz-…
initrd (hd0,8)/boot/initrd.img-…
  • Again, title indicates a name, in this case fancily adorned with technical details.
  • kernel (hd0,8)/boot/vmlinuz-… points to the 9th partition on the first hard disk (hd0,8). Accidentally, the root flag (/dev/sda9) indicates that the root partition is the same as the one containing the kernel image. Normally, this is the case, and for the sake of simplicity, you will want this option during your installations.
  • initrd (hd0,8)/boot/initrd.img-… nothing new here.

Note regarding kernel images and root partitions: On older computers with BIOS that do not support access to more than the first 1024 cylinders, you might setup a boot partition that contains the kernel image, while the root itself is located elsewhere. But people with computers younger than the botched Y2K crisis need not worry.

Another thing you might notice is that the Ubuntu entry is fairly detailed. This feature is called Multi-boot Compliance; openSUSE recognizes Ubuntu and can accurately call its images (including special switches) and mount the partitions. However, most operating systems are only partially multi-boot compliant. A little later on, I will show you how the Ubuntu entry could have been treated differently, with the same results.

title Windows
rootnoverify (hd0,0)
chainloader (hd0,0)+1
  • rootnoverify (hd0,0) means that openSUSE cannot understand Windows operating system, i.e. no multi-boot compliance. Therefore, the operating system is called without any fore-knowledge of the kernel. GRUB assumes that the relevant boot images will be found on the target partition and mounted by the other operating system bootloader. As you can see, Windows was installed on the first partition of the first hard disk. This is the most convenient option.
  • chainloader (hd0,0)+1 feature is used for operating systems that cannot be booted directly. Not surprisingly, Windows operating systems cannot be booted directly. They are booted by the method of chainloading. As the name implies, GRUB passes the control of the boot sequence to another bootloader, located on the device to which the menu entry points. This can be a Windows operating system, but also any other, including Linux.

Back to Ubuntu. You remember that I have told we could have booted Ubuntu in an alternative way? Indeed, we could have simply chainloaded it, just like Windows.

title Ubuntu
root (hd0,8)
chainloader (hd0,8)+1

This would have worked equally well. The last option in the menu allows you to boot SUSE in the failsafe mode (sort of Safe Mode, no graphics) and does not contribute to our knowledge, therefore we will skip it at the moment. Let’s see some more examples. The example below is actually written in the Ubuntu menu.lst (commented, of course).

title Windows 95/98/NT/2000
root (hd0,0)
makeactive
chainloader +1

title Linux
root (hd0,1)
kernel /vmlinuz root=/dev/hda3 ro

By now, you should be able to “read” GRUB language with ease. We begin with the title. rootspecifies the partition where we expect to find the Windows kernel and mounts it (rootnoverify would leave this job to the Windows bootloader). makeactive command sets the active partition on the root disk (above) to GRUB root device. This means that the next command, chainloader, is executed without the target partition specified (as the target partition is the same, now).

The second entry is even simpler. We name a Linux, we call its partition and we boot the kernel. In this case, we see the very interesting case where the kernel image and root (/) partition of the operating system are NOT located on the same partition. This would be a very likely case for older computers – or ones with a specific boot partition.

You see, it’s very simple! Once you get the hang of it, it actually becomes fun.

GRUB configuration

Most of the time, you will not want or need to touch GRUB. When you install operating systems, especially in the right sequence (inconsiderate OS first – like Windows, flexible OS later – Linux and family), the GRUB will be installed automatically and relevant entries appended.

Nevertheless, you should know when and what to do if things go wrong.

Installation of GRUB

GRUB can be installed to a variety of devices. Most people will be interested in setting up GRUB on their hard disk. Nevertheless, it does not hurt to know learn about other options. Of course, you can skip forward. Before we install anything, we need to know where our files are. If installed, GRUB menu is located on the root partition under:

/boot/grub/menu.lst

Always, always back this file up before making any changes! The GRUB files can be found in the image of your operating system (usually a CD), under:

/usr/lib/grub/i386-pc

You should also be aware of the basic Linux commands regarding the hard disks and partitions. To this end, you might want to try my article Highly useful Linux commands & configurations. Nevertheless, for those who do not fancy reading yet another article, here’s a brief version:

You can display your PC environment information either through terminal or a text editor. Files through text editor are invoked by specifying the text editor and a target file (with su or sudo for system files).

sudo vi /etc/fstab
OR
sudo gedit /etc/fstab

Alternatively, you can simply print the contents of the files in the terminal by using the cat(concatenate) command.

(sudo) cat /etc/fstab

Some useful commands that one might need when dealing with boot, hard drives and partitions: Display the partition table:

fdisk -l

Display the mounted partitions:

cat /etc/fstab

Now that we know what we need and where to find it, it’s time to install GRUB.

GRUB on a floppy disk

To create GRUB on a floppy disk, we must copy the Stage 1 and Stage 2 files from the image directory to the first and second sector of the floppy disk. We’ll use the dd command, which copies information sector by sector. Here’s the set of commands that you need to execute (taken from the Manual):

cd /usr/lib/grub/i386-pc
dd if=stage1 of=/dev/fd0 bs=512 count=1
dd if=stage2 of=/dev/fd0 bs=512 seek=1

Just a short explanation: if stands for input file, of stands for output file, /dev/fd0 refers to the first mounted floppy device, bs specifies the block size (in bytes), count instructs how many blocks should be copied, and seek tells how many blocks should be skipped before writing. Not surprisingly, since we need to write the files to the first two sectors of the floppy disk, we write stage1 to the first sector, and copy stage2 to the second (skip first, then write). Now that we have taken this deep fancy for the command line, I’ll leave you with the nuances of different commands for homework.

Regarding the GRUB on floppy, that’s it. Since we have copies the stages from OS image, all of the required information is there. Of course, you can always make manual adjustments. But that’s the next chapter.

Installing GRUB natively

Native install means placing GRUB Stage 1 in the first sector of the hard disk (MBR orPartition Table). This means you will be able to boot without a secondary device, like a floppy disk (which have become a rarity nowadays). However, this also means that if you install an inconsiderate OS later on (like Windows) or try to repair the MBR for some reason (by running fdisk /MBR from DOS prompt), you will erase the GRUB and render all systems listed in the menu.lst unbootable.

To install GRUB in MBR, you will need to boot from external media (floppy, live Linux CD). Then, once you reach the GRUB prompt, execute the following commands:

Find the GRUB root device:

find /boot/grub/stage1

GRUB will search for all available Stages 1 and present them. If you have more than one operating system image present (e.g. SUSE, Kubuntu, Mandriva), you will have more than one stage1 available. Example – Let’s say the computer has the following operating systems installed on different partitions:

  • SUSE on (hd0,1)
  • Kubuntu on (hd0,2)
  • Mandriva on (hd0,4)

All these will be returned as potential roots for GRUB device (as each OS has its own files). If you wish to use SUSE GRUB, then you will setup the GRUB root device to (hd0,1):

root (hd0,1)

If you want Mandriva’s GRUB, then:

root (hd0,4)

If you know in advance what you want to do, you can skip the find command. Once you have decided on the root, you need to write the information to the MBR:

setup (hd0)

Finally, quit the GRUB prompt:

quit

As a sequence, the commands that you need are:

find /boot/grub/stage1 (optional)
root (hdX,Y)
setup (hd0)
quit

You can also setup GRUB on another drive or partition, but then you will have to chainloadGRUB to another bootloader for this to work. That’s it. Easy peasy orange squeasy!

Installing GRUB with grub-install

This method is considered less safe (according to the Manual), as it guesses the mapping. Still, for total newbs in need of dire help, this might be the preferred method. You only need to invoke a single command – namely, where to install the bootloader. Furthermore, this command can be written in several ways, all equivalent:

grub-install /dev/hda
grub-install /dev/hd0
grub-install ‘(hd0)’
grub-install hd0

After you have installed the GRUB, your operating systems should boot. Once booted, you can once again start playing with GRUB, manually changing settings – adding and removing entries, chainloading other bootloaders, or even hiding and unhiding partitions.

Setting up GRUB manually (after installation)

You can reconfigure or reinstall GRUB at any moment.

Backup!

First, before you make any changes to the GRUB configuration file, it is most warmly recommended that you backup the existing menu. You might even consider copying to another machine or printing the menu, in case things go bunkerous.

cp /boot/grub/menu.lst /boot/grub/menu.lst_backup

To access GRUB, execute the following command in Linux terminal:

sudo grub

After a few moments, the GRUB command line should show up. You can identify it by thegrub> prompt.

GRUB prompt

Alternatively, you can reach the GRUB command line during bootup. When the GRUB menu loads, press C on the keyboard.

Adding a new operating system to the GRUB menu

Let’s say you have installed yet another operating system on your machine, Sabayon. During the installation, you skip the GRUB setup. This means that the original GRUB remains untouched – and it does not contain an entry about Sabayon. For all practical purposes, Sabayon is not bootable.

Note: GRUB menu entries are called stanzas (probably a twist of instance?). So, we need to add Sabayon to the list. If you know where Sabayon is installed, you just need to add its entry to the menu.lst.

title Sabayon
root (hdX,Y)
chainloader +1

That’s it. You can also do this while booting the computer, without editing the menu. When the original GRUB comes up, press C to reach the command line. And then:

root (hdX,Y)
chainloader +1

Optionally, you will use the find command to get around. Basically, this is the whole of GRUB magic. As you can see, it’s very very simple. But for people who have never heard of GRUB and see long lists of strange commands, the prospect can be daunting. Now that we have covered the basics of grubbing, it’s time for extras and some more common problems.

Common problems

GRUB got deleted; how to restore?

This will often happen if you install Windows after Linux. Windows assumes it’s the only operating system in the world and does not try to live with existing information present in the MBR; it overwrites it. For people with dual-boot and very little knowledge of Linux, this is a disaster. Luckily, it’s very easily recoverable one.

The easy way

Use Super Grub Disk. I have written about this tool in detail in my article A (cool) list of Linux tools, under Rescue.

The hard way

  • Boot from floppy disk or CD (any Linux live CD should do).
  • Get to the grub command line.
find /boot/grub/stage1 (optional)
root (hdX,Y)
setup (hd0)
quit

The same as before!

Windows is installed on a non-first hard disk (Swapping)

GRUB cannot directly boot Microsoft operating systems. And sometimes, even chainloading may not work, especially if Windows is not installed on the first hard disk. Once again, you should remember that you should always install Windows first, on the first hard disk, on the first partition (the rule of three first). Nevertheless, even if you have Windows installed on a separate disk, you can solve the problem by swapping. You need to perform a virtual swapbetween hard disks. Like this:

map (hd0) (hd1)
map (hd1) (hd0)

After you add these two lines, you should be able to boot into Windows (or DOS, for that matter).

There is more than one Windows operating system installed on one hard disk (Hide/Unhide)

Again, Windows can cause problems if there’s more than one instance present on a hard disk, especially if installed on primary partitions. When you use the chainloader command, the control is transferred to the Windows boot loader, but which one?

The problem is easily solved by hiding and unhiding partitions. If GRUB hides a partition, it will not be visible by Windows and prevent a possible confusion. Vice versa, if you unhide a partition, Windows will detect it and be able to boot from it, without getting confused.

Here’s the example taken from the Manual that demonstrates this point. Let’s say we have Windows installed on the first and the second partition of your hard disk. We wish to boot thefirst instance of Windows. Then, we need to execute the following set of commands to make it all work:

unhide (hd0,0)
hide (hd0,1)
rootnoverify (hd0,0)
chainloader +1
makeactive

You resized a partition; GRUB is gone

This is an interesting case. It can happen after you use a partitioning or an imaging software to make changes to the Partition Table. Usually, this will happen when you make such a change in Windows. Linux will not be informed of the change, because Windows is blind to anything else on the machine save Microsoft thingies. Consequently, GRUB will suffer.

The solution is that most likely the filesystem is damaged and needs to be repaired. Boot from a live CD and execute the following commands, assuming you know where Linux partitions are. Check the filesystem:

fsck.ext2 /dev/hdXY

Replace X and Y with hard disk letter and partition number that you want to check (hda2, hdb3, etc.). Create the ext2/3 filesystem parameters again.

tune2fs -j /dev/hdXY

Now mount the root filesystem on /mnt/sysimage and run grub:

mount -t ext2 /dev/hdXY /mnt/sysimage
OR
mount -t ext2 /dev/hdXY /mnt/sysimage

cd /mnt/sysimage/sbin
grub

what is initrd in Linux?

What is initrd image in Linux

The initial RAM disk (initrd) is an initial root file system that is mounted prior to when the real root file system is available. The initrd is bound to the kernel and loaded as part of the kernel boot procedure. The kernel then mounts this initrd as part of the two-stage boot process to load the modules to make the real file systems available and get at the real root file system.

initrd provides the capability to load a RAM disk by the boot loader. This RAM disk can then be mounted as the root filesystem and programs can be run from it. Afterwards, a new root file system can be mounted from a different device. The previous root (from initrd) is then moved to a directory and can be subsequently unmounted.

How initrd works

initrd provides the capability to load a RAM disk by the bootloader. This RAM disk can then be mounted as the root fileystem and programs can be run from it. Afterwards, a new root file system can be mounted from a different device. Theprevious root (from initrd) is then moved to a directory andcan be subsequently unmounted. initrd is mainly designed to allow system startup to occur  in two phases, where the kernel comes up with a minimum set of compiled-in drivers, and where additional modules are  loaded from initrd.

When using initrd, the system typically boots as follows:

  1. The boot loader loads the kernel and the initial RAM disk
  1. The kernel converts initrd into a “normal” RAM disk and frees the memory used by initrd
  1. initrd is mounted read-write as root
  1. /linuxrc is executed (this can be any valid executable, including shell scripts; it is run with uid 0 and can do

basically everything init can do)

  1. linuxrc mounts the “real” root file system
  1. linuxrc places the root file system at the root directory using the pivot_root system call
  1. The usual boot sequence (e.g. invocation of /sbin/init) is performed on the root file system

8) The initrd file system is removed

Note

That changing the root directory does not involve unmounting it. It is therefore possible to leave processes running on initrd during that procedure. Also note that file systems mounted under initrd continue to be accessible.

initrd